One of the most frequent questions we get from aspiring and current inbound marketers is, "How do you manage all of that content?"
The answer: we rely on an editorial calendar in Google Calendar to stay keep our content organized.

There are a lot of great calendar tools out there you can choose from. In fact, for those of you who are HubSpot customers, there's a marketing calendar built right into HubSpot's software. But after trying a ton of other solutions, our team found that we really operated the best with just a simple Google Calendar. In fact, this has actually been the longest-running editorial calendar solution our team has ever seen.
Here's how we set it up.
Follow Along With Free Editorial Calendar Templates
 Download the Template for Free
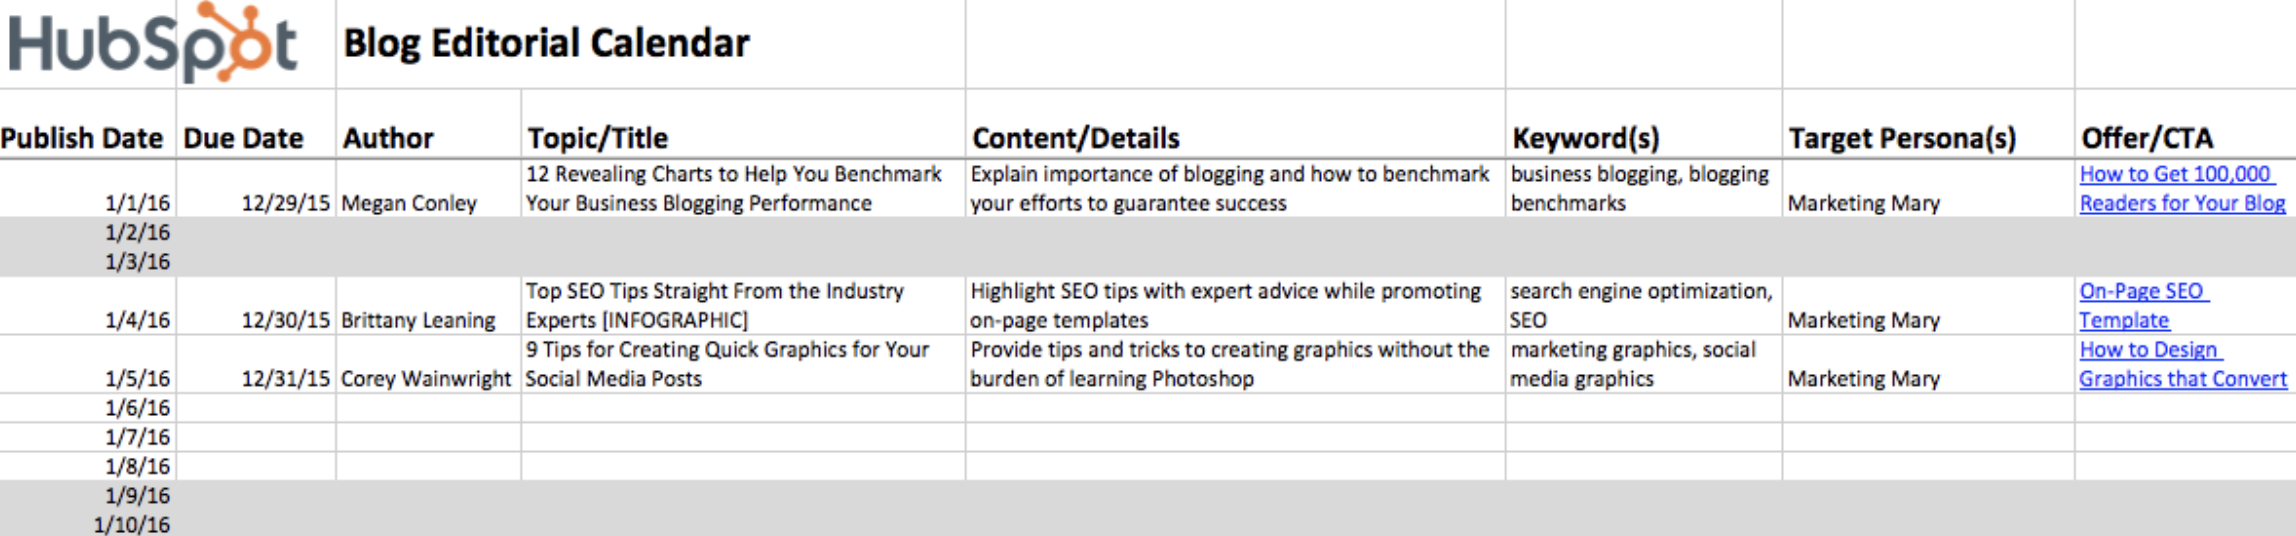
1. Download HubSpot's free editorial calendar templates.
First thing's first: Download the calendar templates, above (they're free.) By doing this, you'll have three editorial calendar templates on your computer to use at your leisure: one for Google Calendar, one for Excel, and one for Google Sheets. In this blog post, we'll be going over how to import the Excel template into Google Calendar.
2. Customize your template and prepare for import into Google Calendar.
By default, the publish dates on the templates you download will be stamped for the year 2016. Feel free to change them to the present year in the spreadsheet itself — you can also drag them to the dates of your choosing after you upload the file into Google Calendar.
Google Calendar makes it easy to load a calendar you might have pre-created in another program into Google. This includes Microsoft Excel. Here's how to import the Excel calendar template you downloaded in the previous step into Google Calendar:
3. Open Google Calendar.
Once you've downloaded (or, for that matter, created) a calendar that opens in Microsoft Excel, it's time to open Google Calendar. Just make sure you're already logged into the Gmail account you want this calendar to give access to.
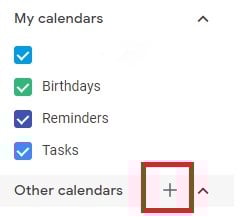
4. Use the lefthand dropdown menu to create a new calendar.
Now it's time to set up your Google Calendar to accommodate the information in your Excel spreadsheet. First, go into your Google Calendar and click the plus sign to the right of "Other Calendars," as shown in the screenshot below. In the dropdown menu that appears, select "Create new calendar."
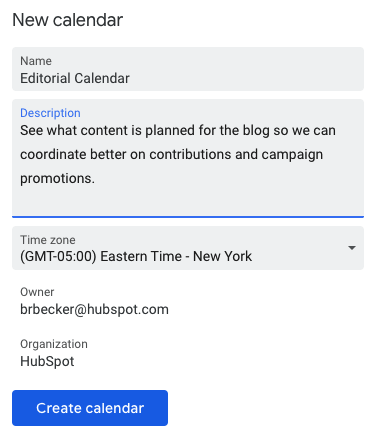
5. Fill out the details of your new calendar.
Fill out the fields that appear on the next screen. This includes a brief description of your calendar, as shown below, to give people proper context when you invite them into this calendar. When you're done filling in the details, click "Create calendar."
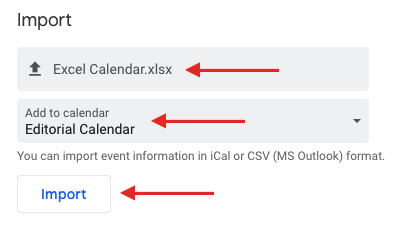
6. Import your XLS or CSV file from the same dropdown menu.
Using the same dropdown menu you used to create your editorial calendar, you'll now import the Excel file itself into Google Calendar. Click that plus sign and select "Import."
Click the upload box that reads "Select file from your computer," and locate the file entitled "Blog Editorial Calendar - Excel" that was included in the ZIP file you downloaded in Step 1, above.
7. Select which calendar to add this file to.
In the second box below your imported file, click the "Add to calendar" dropdown. Be sure to choose the name of the calendar you just created from the dropdown menu, as shown below. Then, click "Import."
8. Click Import.
Once you've uploaded your Excel file and selected the calendar you want to add this file to, click "Import." You should see an Import calendar dialog box telling you that seven events were successfully imported. Click "Close."
Now, if you didn't change the dates of the first seven assignments in the original Excel document, you can now. Navigate to January 3, 2016, which is the start of your calendar. Be sure all of your other calendars are temporarily hidden by clicking the colored box to the left of the calendar name. On the week of January 3, 2016, you should just see one "Blog TBD" calendar event on each day from 10 a.m. to 11 a.m.
Use the edit window of each assignment to change the publish date. For example, if you're satisfied with the 10 a.m. publish time, you can simply change the date from January X, 2016 to January X, 2021. Each assignment will then appear as event blocks in your 2021 monthly calendar view.
9. Determine your publishing schedule.
Now that you have your calendar created, it's time to fill it in with assignments for the year. This is when you have to make some decisions about your blog's publishing schedule.
While the Excel file you imported accounts for one blog post per day, this doesn't mean you need to publish seven days a week. Maybe you want to publish every Monday, Wednesday, and Friday. Or perhaps you plan on publishing on just Thursdays. Remember, the key to successful blogging is quality over quantity.
Don't overcommit to a blogging schedule if the quality of your content will take a hit. How often your company should blog will vary depending on your business goals and resources.
If you decide to decrease the number of days you want to publish, click on the calendar event of that day and select "Delete."
Even if you wanted to publish multiple times a day, updating this calendar is as easy as adding an event. Select a slot on your calendar to add another "Blog TBD" event and copy the default description from another one of the events you imported.
Next, it's time for some minor adjustments. Currently, the "Blog TBD" events are set for 10 a.m. Feel free to move these events to whichever time your blog publishes during the day.
10. Set up recurring events.
Now that you have your publish dates and times set, you can make these recurring events on your calendar. If you have a regular publishing schedule, like every Monday, Wednesday, and Friday at 10:00 a.m., then put that in as a recurring "slot" on your calendar. It's okay if you don't have a piece of completed content — or even a working title — to put there yet. It's just a reminder that you want to publish something that day.
To add your recurring slot, click on your first "Blog TBD" event and click the pencil icon to edit your event. This will take you to the details of the post, where you can create a custom recurring schedule for each assignment, as shown in the screenshot below.
 You can set the post up as a recurring post so it automatically appears every Monday, Wednesday, and Friday at 10:00 a.m. (or whatever days and times you want).
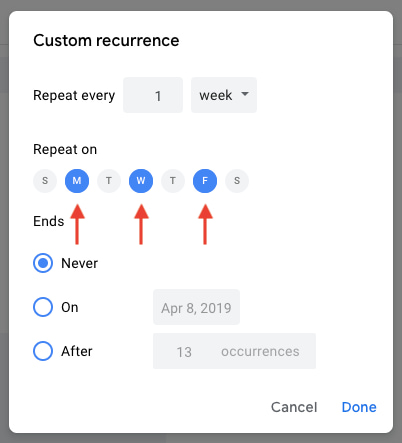
Once you've selected the recurring days, hit "Done" and "Save," and you'll have an editorial calendar framework to work with.
For now, keep the title of the event as "Blog TBD," but feel free to customize the description with any extra details you want to be sure you include for each post. Wait to invite any guest, as we'll use this to assign posts to an author once you begin filling in your topics. With everything complete, click "Save."
If you don't have a recurring schedule like this, you might not be in need of an editorial calendar just yet — but it is a good way to set goals for yourself. If you know you want to publish a certain number of posts each week, even if you don't hit every single slot, it's a good reminder for yourself and your team that this is something you should all be striving for.
11. Fill your publishing slots.
Now that you know all of the slots you want to fill, you gotta actually ... you know ... fill 'em. (If you don't have topic ideas yet, check out this free topic idea generator. It'll give you some good ideas for content to put in the calendar.)
Let's say one of the posts you want to write is "10 Surprising Facts About Tapirs," and one of the posts you've already written and want to publish later is "Think You're Cut Out to Own a Tapir? Read This First." Cool! Just add 'em both to the calendar by clicking on "Post - TBD" on the correct date, choosing "Edit Event," and then changing the "Post - TBD" text to the actual title of the post.

Now, let's say you don't actually want to write "10 Surprising Facts About Tapirs," and you want your colleague to write it instead. To assign the post an author, you'll invite them to the event as a guest. To do this, click on the event, hit "Edit Event," then invite that colleague to the post by typing his or her name or email address into the "Add guests" box, selecting "Add" when their name pops up, and hitting "Save" on the event once you're done.
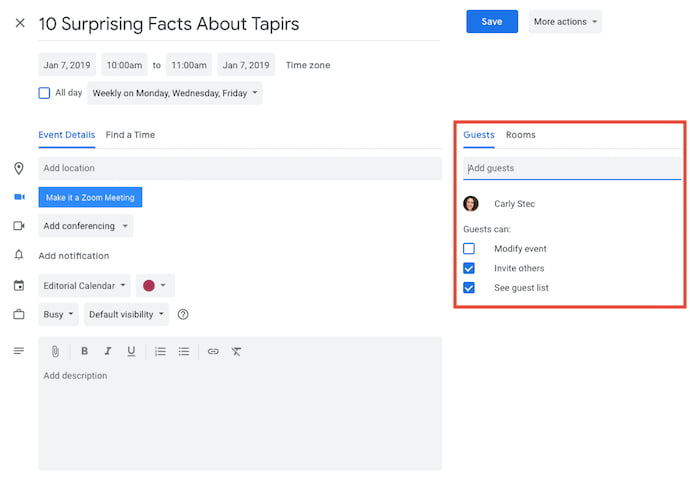
Now, anyone can see who is responsible for writing the post that's going up in that time slot.
You can take it a step further by adding details to the "Description" box of the event, as shown in the large box in the screenshot above. You might include a quick synopsis, the keywords you plan to target the post for, the target audience you're trying to reach, and the offer or CTA you will direct the reader to at the end of the post. Don't forget a due date for the draft.
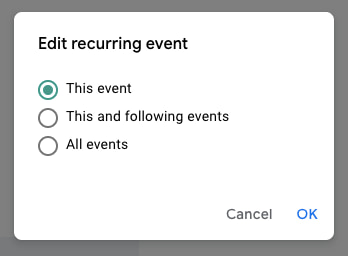
Before Google Calendar will let you save the event, you'll see a dialog box asking if you would like to change just this event or all of the events in the series. Select "Only this event."
Repeat these steps to assign each blog topic today and in the future.
12. Share your editorial calendar with others.
Now that you have your calendar set up, you can start to invite people to see it. I'd recommend you start with your immediate team and regular contributors — as well as anyone who regularly asks you about publishing content on your company blog.
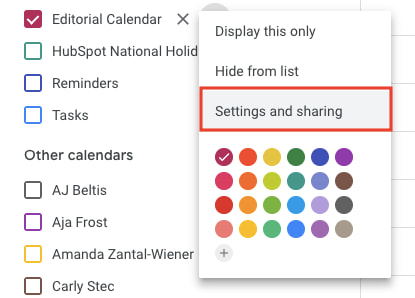
To share this editorial calendar with people, simply find your editorial calendar under "My Calendars," as shown below. Click the three dots next to the calendar name and then select "Settings and sharing" when it appears in the dropdown menu. You'll be taken to the same screen we saw when you first filled out the details of your editorial calendar in Step 2.
 Then, you can add in the names of people with whom you'd like to share the calendar and set the right permission levels for each invitee.
It's wise to keep those with the permission settings to manage changes and sharing to a minimum so there aren't too many cooks in the kitchen — but I recommend you let everyone see all event details so it's clear exactly what content is going up in each slot.
Under the "Share with specific people" heading, enter the email addresses of those on your content team and decide if they have viewing, editing, or admin privileges. Save your updated settings.
Why Using Google Calendar as an Editorial Calendar Works
I mentioned earlier that we tried a lot of different editorial calendar solutions, and this is the only one that's stuck for more than a couple of months. I think one reason for that is because we use Gmail for our corporate email, which means everyone on our team is already in Gmail (and their calendar, specifically) all day. As a result, it isn't hard for people to form a habit of checking the editorial calendar, because it's not difficult for them to find it.
 Google Calendar also makes things really easy to move around and schedule because ... well ... it's already a calendar. It has all the functionality you need to schedule stuff out and let the people who need to know about it know. When we were using other solutions for this, we were trying to hack a calendaring function instead of just relying on one that already existed.
Along those lines, adding people to view your calendar is simple, which makes it easy for multiple teams to collaborate, see what's being published, and figure out when they might be able to launch content and campaigns.
Finally, this sets a precedent for other teams to coordinate with you in a really simple way. You can have a calendar for upcoming campaigns, offers, social media pushes, product launches — you name it. And you can all share those calendars with one another for a single-screen view of everything that's going on so you can coordinate more easily.
Are there other solutions of there for maintaining an editorial calendar? Of course. But if you're looking for a minimum viable product, and a free one at that, this ain't too shabby. It's kept our content team sane, agile, and transparent for quite some time — and I think it could do the same for you.
Editor's note: This post was originally published in January 2019 and has been updated for comprehensiveness.
How to Create an Editorial Calendar in Google Calendar [Free Templates] was originally posted by Local Sign Company Irvine, Ca. https://goo.gl/4NmUQV https://goo.gl/bQ1zHR http://www.pearltrees.com/anaheimsigns
No comments:
Post a Comment