As a brand, influencer, or creator on Instagram, you know how convenient it is to manage your profile within the app and on a device that sits in your pocket. However, if you ever wanted to view it on a larger screen, like your desktop, you probably had to use an external third-party tool.
Enter Instagram Creator Studio, where you can manage accounts using the familiar in-app tools but on your desktop. Plus, a bonus: the ability to schedule posts. In this post, discover how to use Instagram Creator Studio to manage your profile, from scheduling content to understanding your analytics to monetizing your content.
Specifically, marketers can use Creator Studio to:
- View all of your account’s content (IGTV, photos, Stories, etc.) on a desktop.
- Schedule all of your Instagram content to post at a later date so you can be consistently active in your feed.
- Understand insights for your profile and posts, like performance metrics, follower data, and engagement type, to ensure you’re creating content that your audience enjoys.
- Eligible accounts with over 10,000 followers can monetize content and manage brand collaborations.
Below we’ll outline everything you need to know to begin using Instagram Creator Studio to manage your profile.
How To Connect Instagram To Creator Studio
It’s important to note that you need to have a Business or Creator account to use Creator Studio and connect your account to a relevant Facebook page. Once you’ve done all of those things, here’s how to connect your Instagram account to Creator Studio:
1. Go to the Creator Studio website.
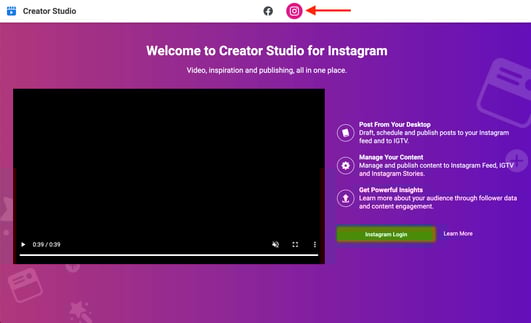
2. Select the Instagram icon on the top of the screen (as shown in the image below).
3. Click the green Instagram Login button and follow the instructions in the pop-up window to log in to your account.
4. As mentioned above, you’ll need to connect your account to a relevant Facebook page. If you haven’t done so already, follow the on-screen instructions to connect one to your account.
Once you’ve successfully linked your account, it’s time to start using the platform.
How To Use Instagram Creator Studio
You can use Instagram Creator Studio to post content, schedule content, and get insights for your account. Below we’ll explain how to do all of those things.
When you first connect your account, you’ll land on the Creator Studio dashboard (as shown in the image below), where you’ll see an initial overview of your profile content library, including video, photo, carousel, Stories, and IGTV content. You can click on specific tabs to view each content type individually.
Please note that your page should show all of your posts and content; this is merely an example.
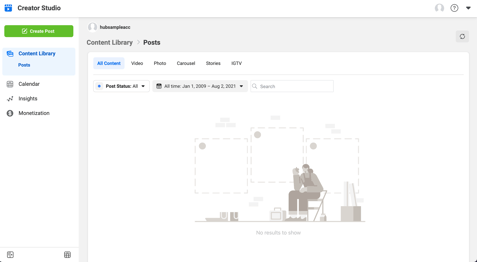
The menu on the left-hand side of the screen (as shown in the image below) has the following options: Content Library, Calendar, Insights (discussed further below), and Monetization.

Under the Calendar tab, you’ll see an overview of the posts you’ve scheduled for the future. Further below, we’ll discuss how to schedule posts so they’ll appear on the calendar.
Under the Monetization tab, you’ll be able to manage your brand collaborations. To have access to this feature, you’ll need an active, public account, 10,000 followers, consistent engagement over the past month, and no history of content violations.
The other tab on the Creator Studio dashboard is the Create Post button, and we’ll discuss how to use it below.
How To Post on Instagram Creator Studio
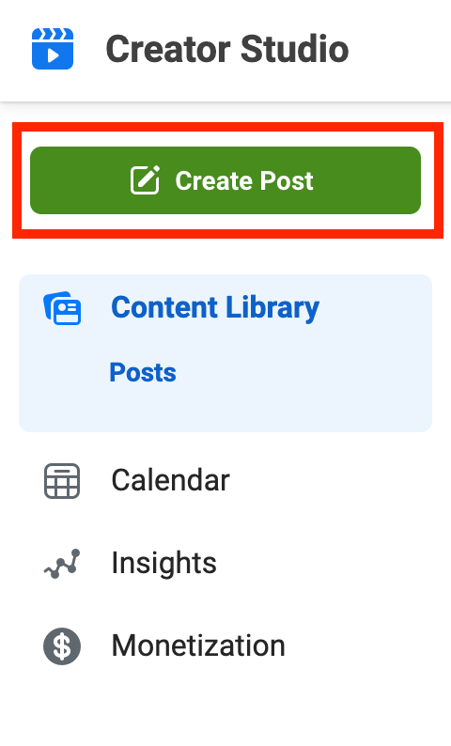
1. Click the green Create Post button on the top left-hand corner of the Creator Studio menu, as shown in the image below, and select the type of post you’re making: Instagram Feed or IGTV.
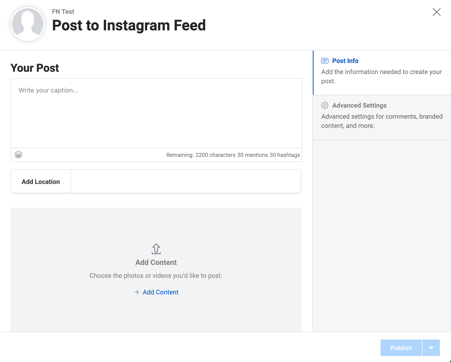
2. If you select Instagram Feed, you should see the pop-up window displayed in the image below. Upload the photo you want to post, and add a description to your image.
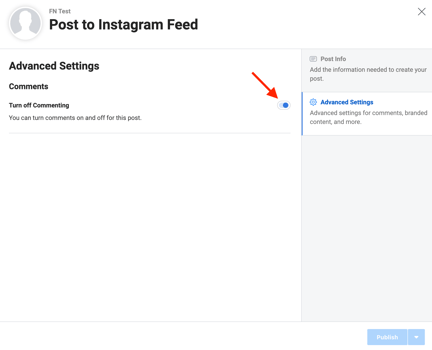
3. If you want to turn off comments on your post, select the Advanced Settings option on the right-hand side of your screen and toggle the Turn Off Commenting button into the on position.
Add Alt Text on Instagram Creator Studio
The accessibility features within the Instagram app are also available in Creator Studio. To add alt text to your content, follow the steps above for uploading your preferred content type.
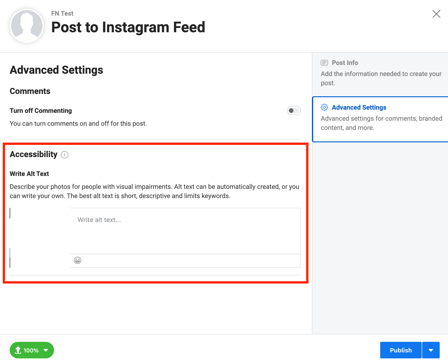
Before publishing or scheduling a post to your Instagram feed, navigate to the Accessibility section in the Advanced Settings tab, as highlighted in the image below, and add your alt text.
4. When you’re satisfied with your upload, select the blue Publish button on the bottom right of the pop-up window.
To upload an IGTV video on Creator Studio, follow these steps:
1. Click the green Create Post button on the top left-hand corner of the Creator Studio dashboard and select IGTV from the drop-down menu. You should see the pop-up window displayed in the image below with an upload, title, and description box.
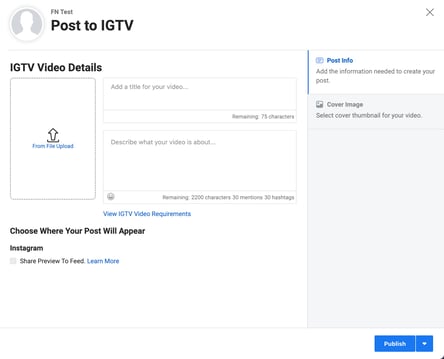
2. Upload your preferred video, and add a title and description.
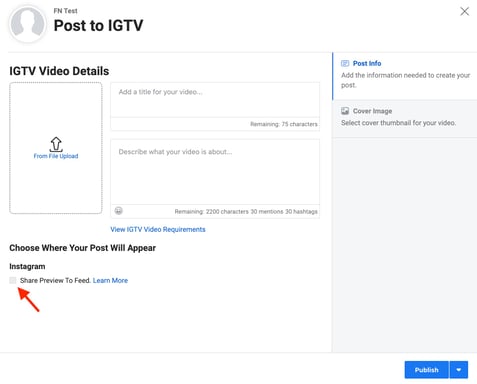
3. If you want to share the IGTV video to your feed, check the box that says Share Preview To Feed underneath the Choose Where Your Post Will Appear Title.
4. Select the Cover Image tab on the right-hand side of your screen, and choose whether you want Instagram to create an auto-generated image, upload your custom frame, or use a video frame preview.
6. When you’re satisfied with all of your selections, click the blue Publish button on the bottom right-hand side of your screen to share your post on Instagram.
The steps outlined above will help you share a post to Instagram immediately after you upload it. Below we’ll go over how to upload content and schedule it to be posted for later on Creator Studio.
How to Schedule Posts on Instagram Creator Studio
To schedule a post on Instagram Creator Studio, follow the same steps you would as if you were going to upload content to your Instagram Feed or an IGTV video. Then,
1. Navigate to the blue Publish button on the bottom right-hand side of the screen and select the down arrow.
2. In the popup window, follow the on-screen instructions and select the date and time you want your post to be posted.
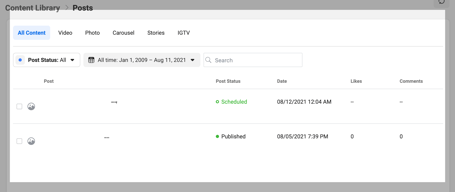
3. After you’re satisfied, click the blue Schedule button and schedule your post. You should then see a list of your scheduled posts in your content library, as shown in the image below.
After you’ve shared your content, you’ll want to understand the success of your content through your insights. Below we’ll explain the insights you can get and how to access them.
How To Get Insights From Instagram Creator Studio
The Creator Studio Insights tab gives you more information about your audience and how they interact with your posts. Here are the specific metrics you’ll get:
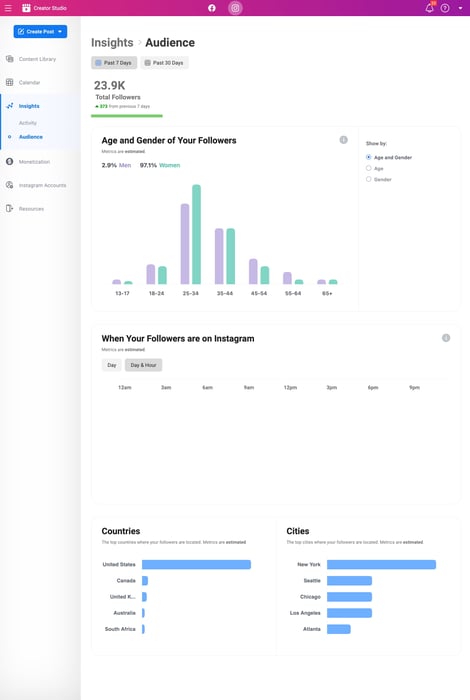
- Audience: Information about your followers and their gender, age range, and location (top countries and cities). You’ll also be shown when they’re most active, so you can schedule your posts when they’re most active on the platform.
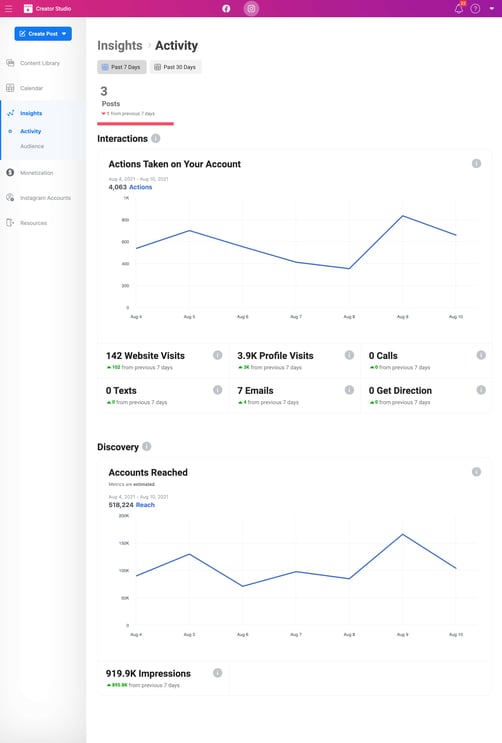
- Activity: Information about how people engage with your account. This includes the reach your posts have, the number of impressions they get, and the actions people have taken (website clicks, taps to get directions, etc.).
1. Select the Insights tab on the right-hand side of the Creator Studio dashboard, as shown in the image below.

2. Select either Activity or Audience from the drop-down menu.
3. Navigate through either tab to learn more about the engagement on activity on your profile.
For example, if you select Activity, you should see the number of actions taken on your account over seven days, including website visits, profile visits, emails, accounts reached, and total impressions. The image below is an example of a Creator Studio activity insights page.
If you select Audience, you’ll see a bar graph displaying your followers’ age and gender breakdown, when they’re active on the app, and two location breakdowns.
Instagram Creator Studio boasts a unique feature not offered within the mobile app: scheduling posts. If you’re hoping to make the switch from managing on only your mobile device to a desktop, leverage the tips on this list to begin using the tool.
What Is Instagram Creator Studio? [+ How Marketers Can Use It] was originally posted by Local Sign Company Irvine, Ca. https://goo.gl/4NmUQV https://goo.gl/bQ1zHR http://www.pearltrees.com/anaheimsigns

No comments:
Post a Comment