Studies show that 76% of consumers research a business online before visiting in person. That means having a website is as necessary for companies today as having a phone number.
Maybe you’re starting a new business venture or developing your personal brand.

Or, maybe you’re looking to update your company’s outdated website. Whatever the case, creating a new website can feel overwhelming, particularly without technical expertise or a budget for web developers.
Steps to Make a Website
We’ve put together a comprehensive, step-by-step guide to creating a website. Best of all, you won’t need a coder, web designer, or big budget to create one — you’ll just need to follow the steps below.
In general, you’ll carry out these steps before launching your site. But before you get started, you’ll need to choose a platform.
We’ll walk you through the two options you have: a website builder or a content management system (CMS).
Start building your website by choosing a platform.
The first thing you’ll need to decide is whether you want to create a website using a website builder or a CMS.
Let’s take a look at the definitions of each below.
| Website Builder |
Content Management System (CMS) |
|
A website builder is a solution that offers domain names, SSL certificates, and templates in one package, typically at a monthly or yearly subscription fee.
|
A content management system is a platform where you place your website’s content and media files. Domain names, SSL certificates, and hosting is typically purchased separately.
|
Both website builders and CMS platforms provide the out-of-the-box features, pre-designed templates, and extensions required to create a custom site without coding, but they offer different experiences for creating and managing a website.
Below, we cover some of the differences you should consider before making a choice.
Website Builders vs. Content Management Systems
| Website Builders |
CMS Platforms |
- Domain registration, hosting, and SSL certificate included
- In-house templates and themes included (typically less variety)
- Monthly subscription with free trials available
- Limited customization
- Less powerful in functionalities and features
- Great option for beginners
|
- Domain registration, hosting, and SSL certificate must be purchased separately
- In-house and third-party templates and themes available (typically more variety)
- Free CMS platforms available
- Highly customizable down to the website code
- More powerful in functionalities and features
- Great option for sites with growth potential
|
Website builders provide everything you need to launch a site. You get website building tools, hosting, domain registration, SSL certification, templates, and support in one place, often for a low monthly rate.
This ease of use and pricing appeals to many site owners; however, free website builders, as well as the more expensive alternatives, tend to be limited in flexibility. For example, you can’t add your own custom code, or drag and drop elements anywhere on your posts and pages.
If you want more control over the functionality and appearance of your site, use a CMS. A CMS will provide the content management features, advanced functionality, and customization options required to build larger, more complex sites.
If you decide that a CMS is the best option for your business, consider the software, ease of use, customizability, security, and pricing of different platforms to narrow down your selection.
Let's look at some examples of both website builders and CMS platforms you could potentially use.
| Website builder examples |
cms systems examples |
- Wix
- WordPress.com
- Squarespace
- Weebly
- Site123
- GoDaddy
- Webflow
|
- CMS Hub
- WordPress.org
- Adobe Experience Manager
- Magento
- Joomla
- Drupal
- Sitecore
|
Here are some resources comparing some CMS systems with popular website builders:
Below, we’ll walk you through the steps to build a website using both a website builder and a CMS.
How to Build a Website with a Website Builder
Have you decided that you’d like to use a website builder? Excellent! This is the easiest way to start for most beginners.
You won’t need to know how to code, and everything you need is typically included in one convenient package — so if you don’t want to go through the hassle of finding a hosting service, domain name, and SSL certificate, this is the option for you.
Let’s go through the process of creating your site using a website builder.
1. Choose a website builder.
First up, choose a website builder that fits your needs and budget. You’ll need to consider the following:
- Cost: Your budget will be by far the most important factor when choosing a website builder. Most require a paid subscription to include premium features such as domain names and increased storage.
- Features: Website builders typically offer different features depending on their target market. Shopify, for example, is specifically designed for ecommerce websites, while WordPress.com is primarily known for blogging.
- Extensions: Check out the extensions and add-ons library for each website builder you’re considering. If they don’t offer something you need for your site, skip that builder.
- Themes and Templates: Some website builders provide more themes and templates, while others provide less variety but more well-designed choices. Check out the template library so you can see what your site could potentially look like once it’s finished.
- Ease-of-use: All website builders are designed to be easy to use: simply sign up on the platform and start building. But some are more intuitive than others. Play around with different builders to find out which one you prefer.
- Support: Is the website builder’s support team known for its responsiveness? Do some research beforehand to ensure the premium subscription will also get you premium support.
No matter what, you’ll want to start with a free trial — that way, you can give the platform a test run before committing.
While most website builders come with a free subscription tier, it doesn’t offer a free domain name or the features you need to build a strong website. Our recommendation is to opt for a paid subscription once you’ve decided on a platform.
Below, we break down some of the most popular website builders you could choose.
Here are a few more resources to help you choose a website builder:
And here are some posts listing alternatives:
2. Sign up for a subscription plan that meets your budgets and needs.
As we mentioned above, you won’t want to go for a free plan because those typically don’t include enough features to launch a professional website. You’ll want to upgrade, but you’ll need to take a close look at the features included in each tier to choose the right subscription for you.
Consider the following questions before choosing a subscription plan:
- How much storage will you need?
- Do you want ads to be removed from your site?
- Will you be setting up an online store?
- Will you want a professional email with your domain name?
- Will you want to customize the site using CSS and HTML?
- How much support do you expect you’ll need?
Most website builders have a pricing page that lays out the differences between plans in an easy-to-scan list. The best part is that you can start with the simplest subscription, then upgrade as you require more features and functionalities.
3. Choose a short and catchy domain name.
Some website builders offer a free subdomain for your site, but you'll want to upgrade to a paid subscription to get a custom domain.
A custom domain name is one of the easiest ways to appear more professional and legitimate as a company. Imagine you were looking for a freelance writer.
Are you more likely to hire me if my website address is carolineforsey.weebly.com or carolineforsey.com? An extension like "weebly.com" can confuse visitors and dilute your brand identity.
Worst case scenario: a visitor might assume you can’t afford a premium hosting service or custom domain, and draw conclusions that your business is not fully established.
The good news is that after you upgrade, your premium website builder subscription will include a domain name for free, at least for the first year. You’ll be able to choose it as you’re setting up the site, or do it later.
When choosing a domain name, pick something short and descriptive. The .com top-level domain will work for most websites, but if you’re planning on launching an organization, you can also consider the .org domain.
Domain names are a surprisingly complicated art — you must choose something memorable that doesn’t yet exist. As you make your choice, avoid the following:
- Including dashes
- Using numbers
- Using a trademarked name
Before signing up on your website builder platform, consider looking up available domain names using a service such as GoDaddy. That way, you can make sure the domain you want is available before you pay for a subscription on the website builder platform.
Here are some more resources for picking the perfect domain name.
4. Pick a premade website template.
During your setup process, the website builder will take you to a template library, where you can choose a premade layout to set up your site.
Most website builders will create a different template depending on the type of business or brand you run. For instance, you can choose a template that’s specifically made for:
- Freelancers
- Bloggers
- Local Businesses
- Creatives
- Resume Websites
Every template should have essential features such as a built-in responsive setting and drag-and-drop page editor.
Your website builder should also allow you to import demo data, so that you only have to replace the images and text and not tinker with anything else during the setup process.
5. Customize the template.
You don’t want your site to look like anyone else’s, so you’ll need to customize the template to your liking.
On most platforms, you'll be able to change the color palette, replace the images, insert social media icons, add personalized forms and menus, and change the size, colors, and fonts of buttons.
Have fun, and don’t forget to use your brand colors. This will be the best part of building your website: making it look like you want it to.
6. Add pages to the site.
Next, it’s time to add pages to your site. You’ll need to create, at a minimum:
- A home page
- An about page
- A contact us page
- A services page, if you’re offering any
- A product page, if you’re selling any
- A blog page
You’ll also want to create specific service pages.
For instance, if you’re selling “Digital Marketing Services,” you’ll want to create pages titled “Social Media Marketing Packages” and “Search Engine Marketing Services” under the digital marketing services umbrella.
Our top suggestion would be to put the topic of your page — or your target keyword — in the title of these new pages.
Instead of having a page titled “Services,” you would title it “Digital Marketing Services.” You’ll want to do the same thing for your home page. You don’t want it to be titled “Home.” Instead, title it “Freelance Digital Marketing Specialist - Your Name.”
Your title shows up in the search results, so it plays an important role in telling visitors what you do.

Here are more resources on creating great page titles:
7. Write optimized content.
This is arguably the most important step. Now that you have your pages set up, what will you put on them?
It’s time to write optimized content to put on all of the pages you’ve created. Get content ideas from your competitors, and don’t forget to aim for at least 800 words per page.
Remember, however, that you can always come back later to write more content. So if you have to write short pages at first, it’s totally fine. Set a date for when you’ll return and add more copy.
Write your content in an editor such as Google Docs and use a grammar checker such as Grammarly to ensure your copy is error-free. When you upload images, be sure to compress them beforehand with a tool such as Toolur or TinyJPG. These steps will ensure your content helps you rank on Google and other search engines.
Check out the following articles on how to write optimized content:
8. Fill in general settings.
Before pushing your site live, you’ll want to fill in general settings. It’s the same list you would run through if you were setting up your site on a CMS platform.
Here’s what you’ll want to adjust:
Make sure you include a site title and tagline in the “Settings” of your website builder. Go through, and check out the URLs — are those optimized for search?
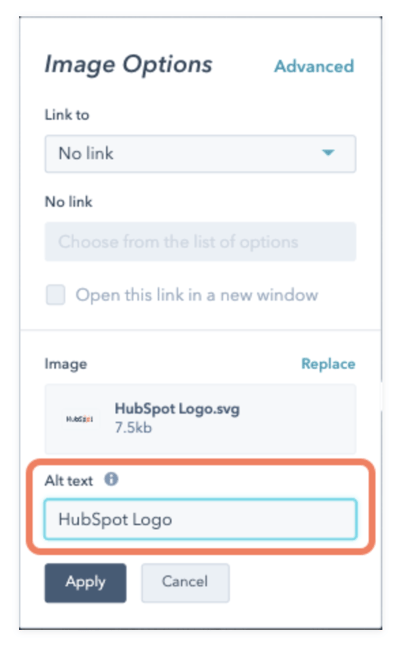
Any website builder you're using to build your site should make it easy to optimize these elements on every post and page. With HubSpot, for example, you can add image alt-text, meta descriptions, headings, and custom URLs right in the CMS.
 Source
9. Install extensions and apps.
Last but not least, install add-ons that will increase your website’s functionality. Each website builder typically has a library of extensions and add-ons that you can choose from.
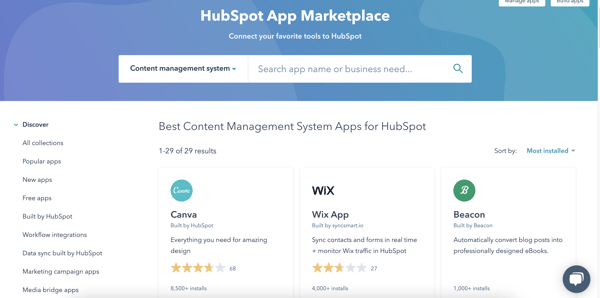
For instance, in the HubSpot App Marketplace, you can filter for, browse, and add a number of different CMS apps and integrations.
Once your pages, content, and plugins are in place, it’s time to push your site live!
The website builder will typically have a button you can click to launch your site into the web. After, simply watch your organic traffic grow.
And remember: if your website builder doesn’t work for you, you’ll always be able to switch over to a CMS. Speaking of CMS, let's review the steps involved in building a website with a CMS next.
How to Build a Website with a CMS
Have you chosen to go with a content management system instead?
The process of building a website with a CMS is a little different than setting up a site with a website builder — mainly because you’ll have to buy a domain name and web hosting on your own.
But the process is just as simple, and the powerful customization options make the extra steps worth it.
Here's some advice from HubSpot's CMS Hub Senior Product Marketing Manager, Alex Girard, about building a website:
When building a website, you want to make sure your content helps your customers achieve their goal with your business. If you sell professional services, can customers learn more about the services you offer and easily get in touch with your team if they have specific questions? If you're an ecomm business, how easy is it for your customers to purchase something right off your website. Interview your customers about their experience on your website, and don't be afraid to run experiments on your copy or on other elements of your website. Constantly iterating on the experience you provide your customers will help you perfect your website over time.
Below, we cover the process of building your website using a CMS from start to finish.
1. Choose a CMS.
The best CMS system for your business will align with your site's needs and goals.
Let's talk about some of the features you'd get from using HubSpot CMS Hub to give you an idea of some of the benefits of using content management software.
Example of CMS Software: HubSpot CMS
Price: $300/mo (Professional), $900/mo (Enterprise)
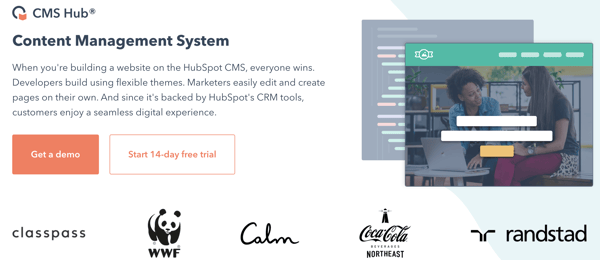
HubSpot CMS Hub is a web content management system that's build on HubSpot’s all-in-one CRM Platform As a result, your team will have the tools necessary to offer a delightful and modern digital experience.
Pro Tip:Get HubSpot CMS Hub, the web content management system for marketers, developers, and IT teams that's built on your all-in-one CRM platform.
Below, we break down some of the most popular website builders you could choose, including CMS Hub.
| CMS |
Plans |
Good Fit For |
| CMS Hub |
$300/month or $900/month |
Scaling Businesses |
| WordPress.org |
Free |
General Websites |
| Adobe Experience Manager |
Custom Pricing |
Enterprise Businesses |
| Joomla |
Free |
General Websites (Recommended for Advanced Users) |
| Drupal |
Free |
General Websites (Recommended for Advanced Users) |
It’s worth noting that while WordPress.org, Joomla, and Drupal are free, you’ll have to pay for domain names, SSL certificates, hosting, and premium themes and templates, adding to your set-up costs. You might also need the help of a developer if you opt for Joomla and Drupal.
It’ll be hard to choose, but you can narrow it down with a few questions.
For instance, do you need a platform that allows you to add your own custom code or one that supports multiple languages? Would you like a proprietary CMS to help share the responsibility of protecting and maintaining your site, or would you prefer an open-source CMS?
You might also narrow your list by comparing the selection of templates and add-ons offered by each system.
Here are some resources to get you started:
Here are some comparison and alternatives posts:
Once you’ve chosen the best CMS platform for your needs, continue to step two.
2. Select a hosting plan.
Web hosting is a service that enables individuals or businesses to run a website on the internet. The service provider, known as a web host, will store your website files on a secure server that it keeps up and running, and then deliver and display that web content to visitors who type in your URL in their browser.
Website builders include hosting in their packages. Content management systems, however, don’t work this way.
You'll have to find your own hosting provider, which will take time and lots of research. There are hundreds of web hosts on the market. Each one might offer different types of hosting, including shared hosting, VPS, and dedicated hosting.
Let's briefly look at the differences below.
- Shared Hosting: In shared hosting, your website shares the same server and resources with other websites. It’s the most popular type of hosting, particularly among new site owners, because it's the cheapest option.
- VPS Hosting: If you go for a Virtual Private Server hosting solution, your site will sit on the same server as other websites; however, it will isolate server resources for your site specifically. That means your site will be able to handle higher volumes of regular traffic. It’s a pricier alternative to shared hosting.
- Dedicated Server: With a dedicated server, your site will sit on a server whose resources and space is reserved for your site only. If you'd rather not share a server with any other website, you can upgrade to dedicated server hosting.
Virtually every web host offers shared hosting. However, because your website has to share the same server with many other websites, it can't support high volumes of traffic and is most vulnerable to hackers and other security threats.
Once you've decided what type of hosting you need, you can pick a provider. DreamHost, HostGator, and Bluehost are among the most popular third-party providers and offer free domain registration for the first year. That will simplify the next step in building a website.
Here are resources about hosting you’ll want to check out:
And some comparisons to help you choose the best one:
3. Get a domain name from a domain name provider.
No matter what type of CMS you chose to build your site, you'll likely have to purchase a domain name.
Purchasing a domain name is typically inexpensive — even for those who sign up for a hosting plan that does not include free domain registration for a year. There are two different approaches you can take.
You can visit a domain site, purchase and register a domain name there, and then connect it to your hosting account. Both Godaddy.com and Namecheap.com are cheap, secure, and effective options for buying a domain name, with added benefits such as SSL security and Office 365 inboxes.
Or you can complete the entire domain name search and registration process on your hosting provider’s site.
Here’s where it gets tricky. You’ll need to choose a domain name as similar as possible to the name of your company, but with over billions of websites out there today, your company's name might already be taken.
If your ideal domain name is already taken, consider using a different extension. Use one of the three most common extensions if you can: .com, .net, or .org. However, if it makes sense for your business, you might want to check out an alternate extension like .us or .shop.
As we covered in the previous section, avoid using dashes, numbers, or trademarked words. Play around with it.
Once you’ve chosen and paid for a domain name, you’ll usually also get personal email accounts attached, so make sure you’re happy to use your domain name as your main online identity.
Below you’ll find some resources about choosing and buying a custom domain:
4. Choose a theme for your site.
Now, for the fun part.
Themes allow you to easily change the look and feel of your site without having to code HTML and CSS from scratch. Themes are made up of templates, modules, images, and global content that control your site's overall design.
On whatever content management system you chose, take the time to browse through the selection of themes available. Many will come with a directory of free themes, where you can use filters or the search bar to find themes related to your industry, with a specific layout, and more.
Tip: It’s important your theme is responsive, so your site will look the same on all devices.
Other considerations will be specific to your business and site. You might be looking for a static header or a slideshow header, for example.
Or you may need a theme that comes with a front-end builder. Below are some questions you can answer to find the right theme for your site:
- Do you need a variety of layouts or just one?
- Are you looking for a theme with built-in social media widgets or any other functionality?
- Would you like to install a demo site or start from scratch?
- Do you want to purchase a theme that includes its own theme builder?
Ultimately, no one knows your business better than you. Take the time to consider which theme would best represent your brand and most likely appeal to your ideal demographic.
You’ll have a wealth of choices right in your CMS. Take a look, for instance, at the theme marketplace in CMS Hub:
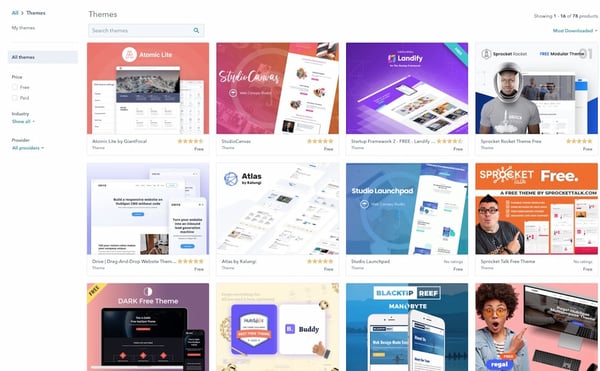
You'll want to stay away from hard-to-read fonts or flashy backgrounds that could distract a consumer from understanding your core message. When in doubt, you can’t go wrong if you choose something clean with straight lines and a limited amount of text.
If you can't find a free theme that meets your exact specifications, try looking for premium themes in third-party marketplaces.
Below are some resources to get started if you’ve opted for the WordPress CMS:
Once you've selected and installed a theme on your site, move on to the next step.
5. Customize your theme and templates.
Once you’ve chosen a theme, take the time to customize it and its individual templates. Your site’s design and functionality are your chance to persuade an audience to take a closer look.
It’s imperative your design makes sense to your ideal consumer and works to enhance your product’s success rather than hinder it.
That's why you should think of your theme and templates as a starting point, rather than the final look. Depending on the website platform you've used to build your site, you'll have different degrees of control over your site's appearance.
On more flexible platforms like CMS Hub, you'll be able to edit your theme's global settings to make sitewide changes. That means you can make changes to your font and other elements in one place and they'll be implemented across all pages on your site.
Here’s a great resource if you’re using WordPress:
6. Add pages to your site.
It’s important to plan exactly which pages you’ll need to include in your site. While it varies from business to business, you’ll need at least a homepage, an “About Us” page, a “Services/Product” page, and a “Contact Us” page.
You should also add a blog homepage. There are serious benefits to business blogging.
While every CMS is different, it’s typically easy to add and remove pages on whichever platform you use. Let's take a closer look at the process on WordPress, for example.
- Start by logging into your WordPress dashboard.
- On the left side of the screen, click Pages > Add New.
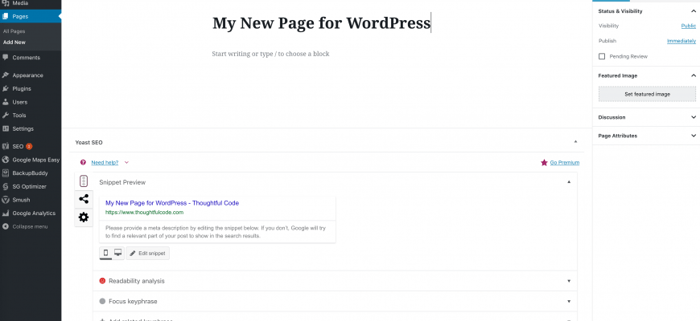
- You can add text, insert images, embed videos, and make any other changes you like.
- When you're ready, click Publish.
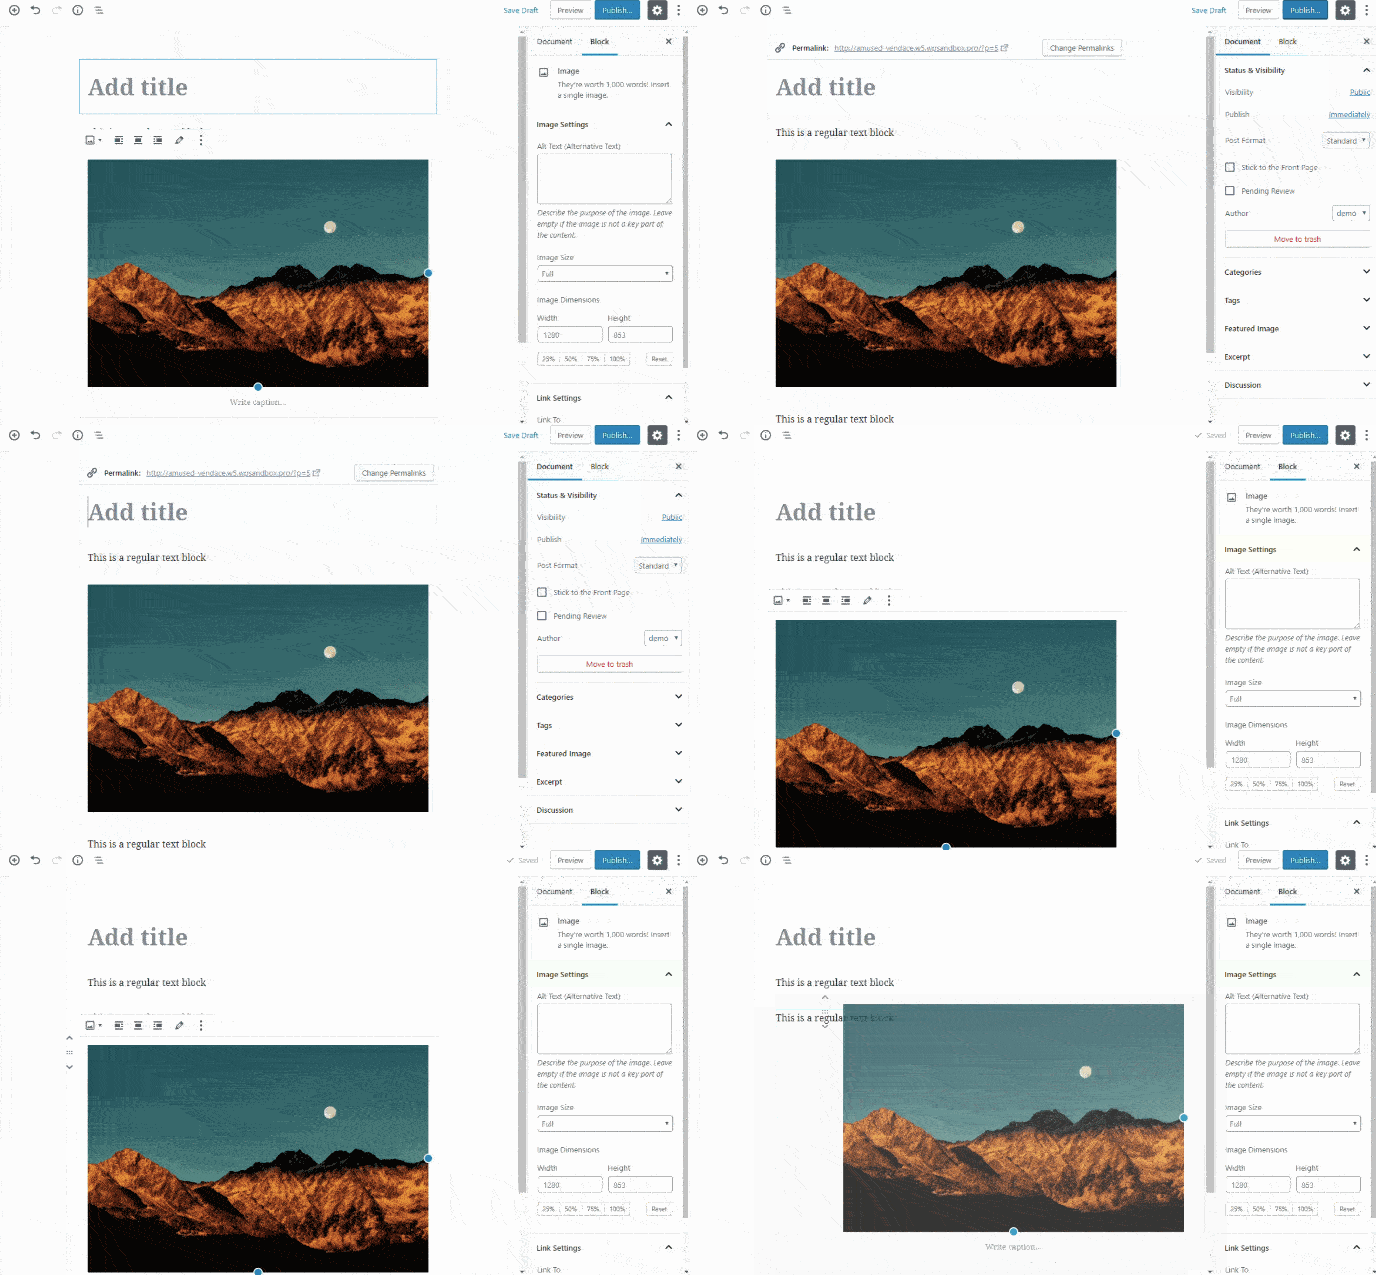 Image Source
Once you've decided what pages you need on your site, make sure to add them to the navigation bar. You can rearrange page topics any way you want, or combine them.
You can visit other company websites within your industry to get ideas for how to organize your navigation bar, or which pages to include and exclude if you're unsure.
7. Write content.
You guessed it: It’s time to write the content you’ll put on your site.
Write rough drafts for pages like your “About Us” page and landing page. Talk with coworkers and stakeholders — what message do you want to put out there? What tone do you want to set? Should you make jokes and be funny, or aim to be more inspirational?
If your online audience stumbled across your site, what questions would they have first?
Imagine your website is your only chance to have a full conversation with a potential customer.
The home page is the preliminary introduction: “Hey, we do XYZ.” Your “About Us” page digs deeper: “We are XYZ.” And your products or services pages are your big push to the finish line: “You want to work with us? Great, here’s how you’ll benefit.”
During this stage, it’s imperative you do your keyword research.
For instance, if you’re selling eyeglasses, and you notice “retro eyeglasses” is a more popular search term than “vintage eyeglasses,” you might use this research to steer the direction of the content on your site.
If you’re stuck, check out competitor’s websites to gauge what other companies in your industry are doing.
We’ve compiled a few more resources to help you get started:
8. Fill in general settings.
Once you’ve filled in your pages with optimized content, it’s time to fill in the general settings. By adding or adjusting the SEO elements, you can increase your search visibility.
It’s the same as if you were building your site on a website builder. On your pages, you should include:
Each of these elements is essential to your on-page SEO. They not only help to tell Google about your website and how you provide value to visitors and customers — but they also help optimize your site for human eyes as well as search engine bots.
9. Install add-ons.
Lastly, take a look at your site and figure out what you’re missing. Ideally, your platform will offer all the add-ons you need to extend the functionality of your site.
It's important to note these add-ons might be called apps, extensions, modules, integrations, or plugins, depending on the platform you use.
If you're running an ecommerce site on HubSpot, for example, you might use HubSpot's Shopify extension.
Or, maybe you want to ensure your WordPress website is secure, to protect client data. In that case, you might download the Wordfence Security plugin for firewall protection against attacks, malware, and other threats.
If you're lacking out-of-the-box features for security, SEO, image compression, and social media, check if your platform offers an app or integration to add that functionality to your site.
It's much easier to do all this work in one place rather than having to log on to several disconnected platforms.
How to Make a Website with HubSpot
Let’s take a look at how to make a website with CMS Hub. If you’re already using HubSpot’s CRM platform, it probably makes the most sense to build a website within HubSpot to integrate all your sales and marketing needs in one place.
CMS Hub offers a variety of plugins and extensions, themed templates, and sophisticated tools for SEO analysis.
If you want to build a website with CMS Hub, it’s easy and intuitive. Don’t forget to get a domain name and hosting before starting to build your site.
Here’s how:
1. Create a homepage.
Within your HubSpot portal, click “Marketing” on the dashboard at the top of your screen. Navigate down to “Website,” then click “Website Pages.”
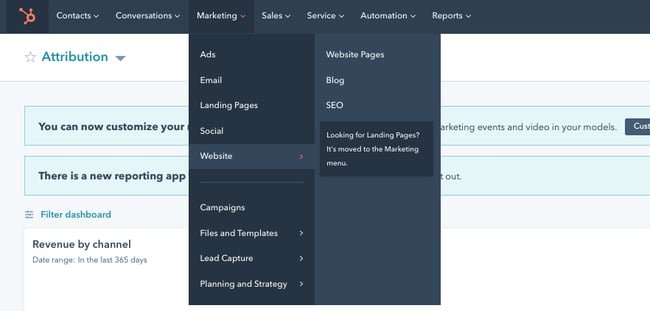 After that, click the orange “Create” button and choose “Website Page” from the drop-down.
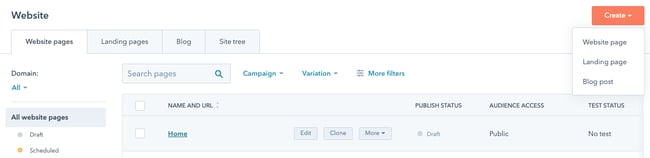
2. Select a theme.
Now, you’ll be taken to this “Choose a theme” page. Scroll through your options, search page templates, or check out the Marketplace. When you’ve found a template you like, select it.
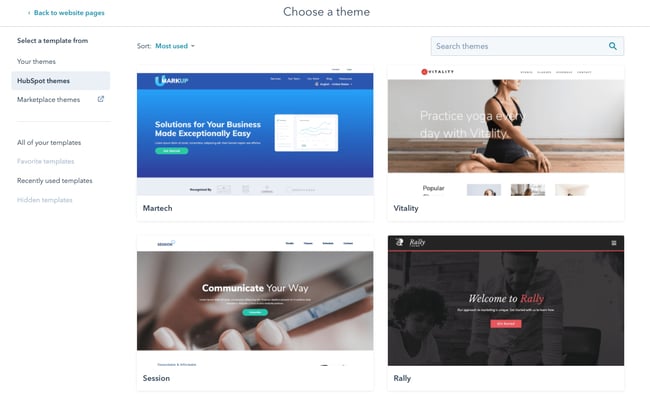
3. Edit the modules.
This is your page. You can scroll over text boxes, images, or other modules to edit them. In the below picture, I scrolled over the “Practice Yoga” Banner Text, and when I click it, it allows me to edit that text.
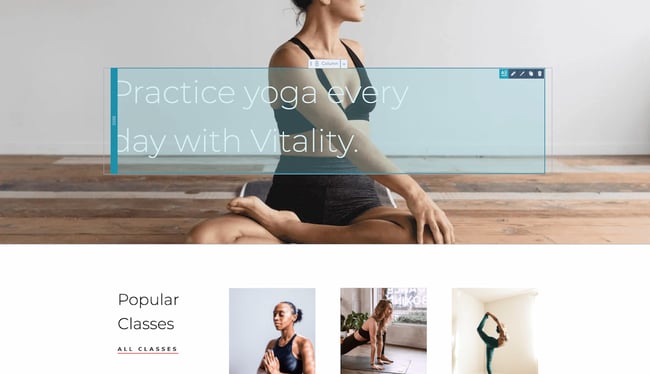 You can also click the “Contents” tool on the left side of your screen and edit from there. For instance, I selected one “Rich Text” option, which directed me to the “Vinyasa” paragraph on the page.
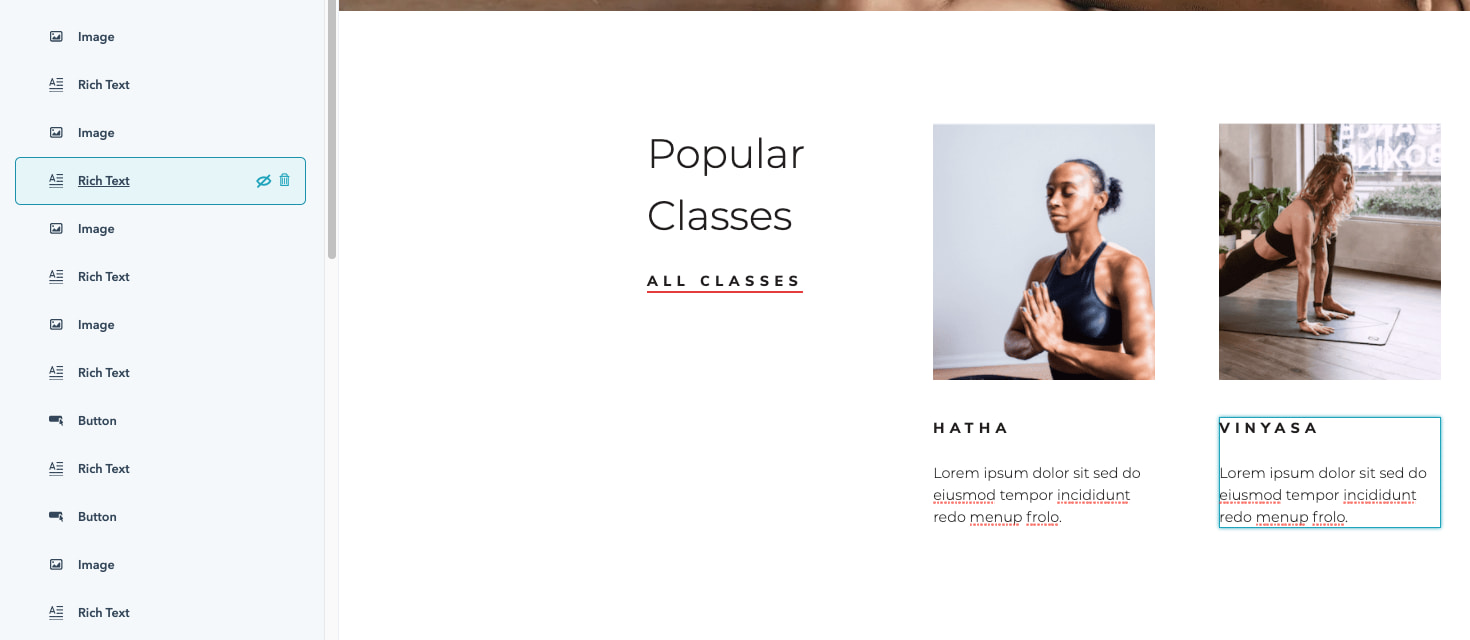 You can then add text, images, sections, forms, and more when you edit it in the “Expanded” view.
4. Create other pages on your website.
When you’re happy with your landing page and want to move on, go back to your dashboard and click “Marketing” at the top of your screen, and then “Website Pages” again.
Here, you’ll click the orange “Create” button and name your page, just like your home page. Then, you’ll be taken through a similar process of choosing a template and adding content. If you want a more in-depth tutorial, check out a quick tour of website pages.
5. Incorporate social media accounts.
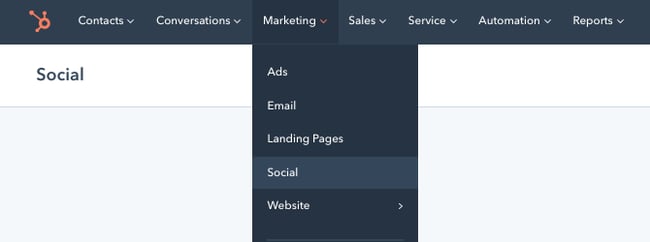
If you want to incorporate your social media accounts, go to “Marketing,” then “Social” on your dashboard. You can monitor all your social media accounts and also publish tweets, Facebook statuses and comments, Instagram pictures, and other content straight from your HubSpot dashboard.
6. View analytics.
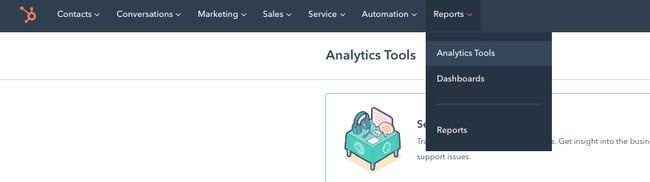
If you want to check out your site analytics, go to “Reports” and then “Analytics Tools”. You’ll need to install the tracking code, which is easy to do within the HubSpot platform by clicking the orange “Install the tracking code” button.
If you’re still unsure, check out how to install the HubSpot tracking code.
7. Add a blog to your site.
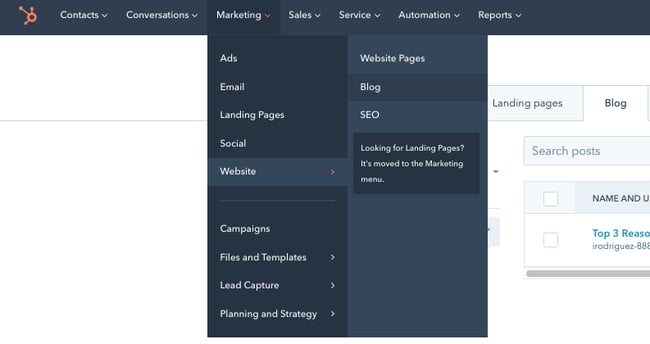
If you want to write blog posts, go to “Marketing” > “Website” > “Blog” on your dashboard to create, publish, and monitor your website’s blog posts.
8. Install add-ons.
Last, it’s time to install an app from the HubSpot marketplace to extend the functionality of your website. Here’s how.
- In your HubSpot account, click the Marketplace icon in the main navigation bar.
- Under Manage, select Connected apps.
- Click Visit App Marketplace.
- Use the filters in the left sidebar to browse for an app.
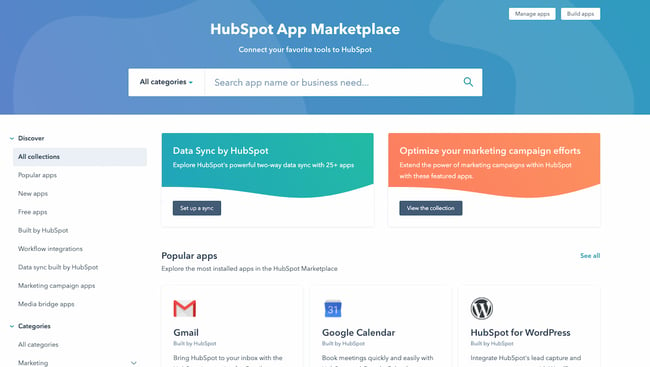
- Click on an app to see more information.
- On the right, you can review the details of the app. Under Requirements, check whether or not the app is compatible with your HubSpot subscription, and see if there are any app-side subscription requirements.
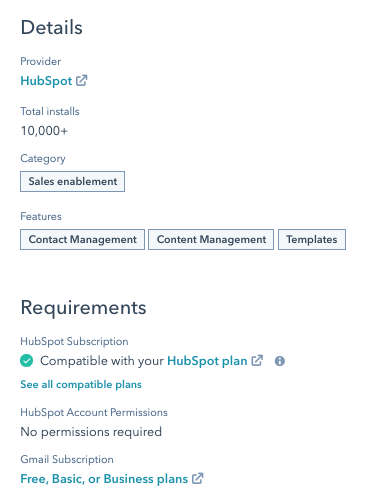
- When you're ready, click the Install app button in the top right corner of the screen.

Once you’ve completed these steps, just click "Publish" and your site is ready for use.
This is a fairly broad and general overview to get you started building a website with CMS Hub, but there are plenty of more in-depth features and tools you might want to explore with a HubSpot specialist, or by checking out some courses on academy.hubspot.com.
Once you're done building a website via CMS Hub, it's important to check that you're not missing any crucial elements or going live with any glaring errors.
Once you've gone through this list above and feel like you're close to a website launch, check out your website launch checklist for a detailed list of things to check before you go live.
Build a Website: FAQs
Below, we cover some frequently asked questions about building a website.
How much does it cost to build a website?
The cost of building a small business website can range from $500 to $2,500, but the price can be higher if you’re working with a developer. You should also take into account recurring costs such as hosting, domain name registration, and SSL certification.
Here’s a resource to help you gauge costs:
How hard is it to build a website?
Building a website isn’t hard at all, especially if you opt for a website builder that packages everything for you. In general, you won’t need to touch a single line of code.
How do you create a website for free?
You can create a website for free by signing up for a free subscription on a website builder platform such as Wix or Weebly.
However, you’ll have a branded subdomain from the provider (e.g. yourname.weebly.com). You’ll also have the branding on your website, and free websites are often limited in design, features, and functionalities.
We recommend avoiding it unless you’re a hobbyist or only wanting to practice before launching your site.
How do you build a website from scratch?
You can build a website from scratch using HTML, CSS, JavaScript, and sometimes, PHP. You compile these files and then upload them to your web host’s file manager. (You’ll still need to purchase a hosting service and register a domain.)
How much does it cost to hire someone to build a website?
Thumbtack reports that a freelance web designer costs from $640 to $1,000. Upwork reports a $15 to $30/hour range for hiring a web developer on their platform. This is on the low end and accurate pricing for building a small website.
For hiring a web developer for a custom or long-term project, you can expect to pay in the $8,000 to $25,000 range.
Here are some more resources:
How long does it take to build a website?
A website takes, on average, three to six months to build if your brand is small or just getting started. If you’re creating a custom or complicated project, you can expect your website to take a year or longer before it is up and running.
Build Your Website: Tips
Ready to build your own site? Let’s take a look at tips you can use to guide the creation of your site.
- Choose a one-page design if you want to launch your site more quickly.
- Include a high-contrast button on the top right of your navigation bar telling visitors to contact you.
- Use Lorem Ipsum text to preview what the written content will look like as you adjust the layout. That way, you don’t have to write all the content right away.
- Buy an SSL certificate if your CMS doesn’t include one already.
- Make good use of white space to keep your site as simple and easy-to-read as possible.
- Set your domain and hosting subscriptions on auto-renew to avoid service interruption.
- Create Terms of Use and Privacy Policy documents if your site gathers user data.
- Double-check that your website is responsive by accessing it from your mobile device. Most CMS systems and website builders will automatically make your site responsive, but you always want to double-check.
- Resize your browser window to test what the elements look like at different browser sizes.
- Access your site from different browsers (Safari, Chrome, Opera, Microsoft Edge) to see how the elements render depending on the browser.
- Learn basic HTML and CSS so you can more easily customize your site later.
- Include high-contrast buttons throughout the page that allow visitors to get in contact with you.
- Stick to five navigation bar itemsat most.
- Ensure your navigation bar shows up on all pages.
- Create submenus for your navigation items to effectively group your subtopics.
- Create an XML sitemap for search engine crawlers to find and index your site.
- Submit your website to Google Search Console once you’ve launched it. That way, Google can crawl it much more quickly.
- Use an analytics tool such as Google Analytics to see who’s accessing your site and from where.
- Link internally from page to page so that search engines understand how the pages are related to each other.
- Use keyword-rich anchor text when linking to internal pages.
- Link to other strong sites in your niche to signal relevancy to Google.
- Add your business or personal brand to social media sites and link back to your website.
- Research other sites in your niche and get content ideas from them.
- Compress all images to under 250KB. The smaller, the better.
- Publish and maintain a blog — we’re serious about that. Try to post once a month.
- Aim for a minimum of 800 words per page and per blog post.
- Use a grammar-checker such as Grammarly to ensure your copy is error-free.
- Avoid duplicate and boilerplate content — even one paragraph can be enough to hurt the credibility of your page.
- Recheck your site architecture to make sure that your page hierarchy makes sense.
- Create a backup of your site whenever you make major changes.
- Seek guest posting opportunities and link back to your site in your author bio.
- Join industry organizations and link back to your site from your member profile.
- Avoid duplicating pages to use the same layout. If you do, double-check that your slug doesn’t read .com/original-page-copy. This happens more often than you think. If it happens, change your slug. Here’s how to change your slug in WordPress, in case you’re using that CMS.
- Keep your page URLs short and user-friendly. If the title of a blog post is “50 Ways to Conquer Your Fear of Heights and Fly Worry-Free,” don’t have a URL that reads example.com/20XX-03-25/blog/50-ways-to-conquer-your-fear-of-heights-and-fly-worry-free. Consider instead: example.com/conquer-fear-of-heights.
- Add breadcrumbs to your website to clarify your site structure. Here’s how to add breadcrumbs in WordPress.
Build a Website to Grow Your Online Reach
Building a website is a must-do for anyone who wants to be online. Without it, you won’t be found at all, and it can help you look more professional and established. Using this guide, you’ll be sure to publish a site that helps your business or your personal brand grow better.
Editor's note: This post was originally published in May 2018 and has been updated for comprehensiveness.
 How to Build a Website: 2 Methods, 9 Easy Steps, & 35 Amazing Tips
 was originally posted by
Local Sign Company Irvine, Ca. https://goo.gl/4NmUQV https://goo.gl/bQ1zHR http://www.pearltrees.com/anaheimsigns

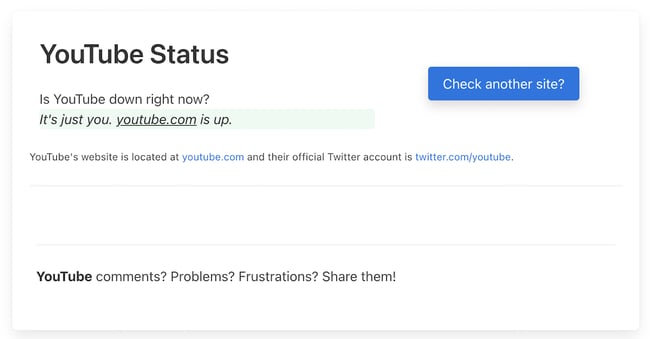 If it's a problem with your server, this should help assuage any concerns that it's an issue with your own computer.
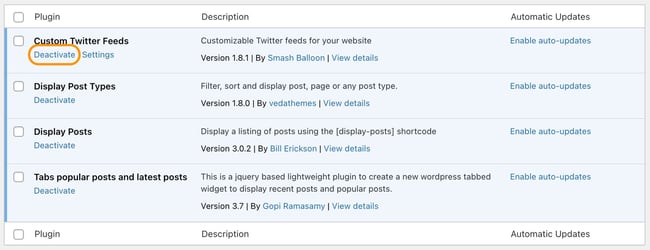 You might find that having fewer active plugins on your site helps things run more smoothly.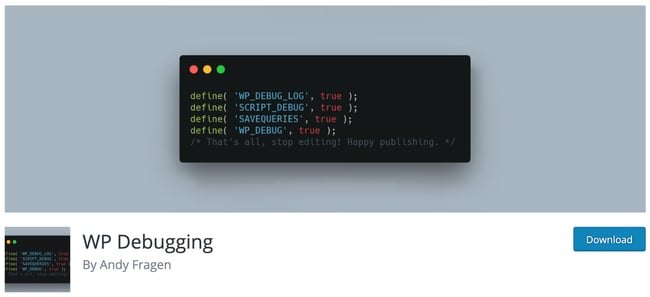
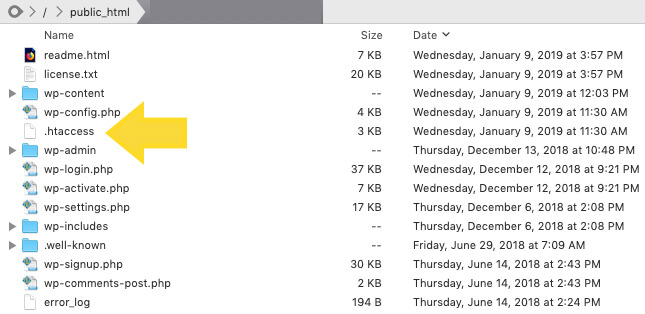
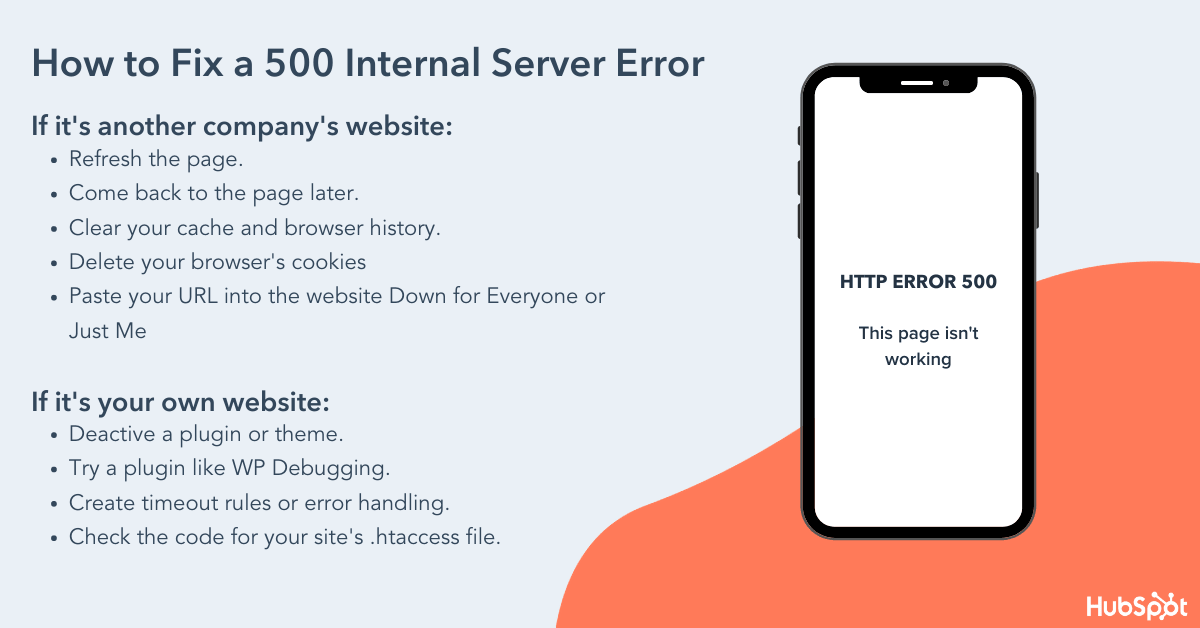



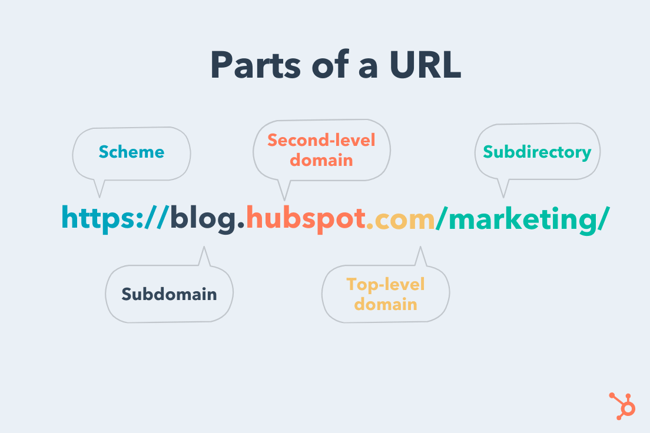 Let's break down this URL structure below.
  The scheme tells web servers which protocol to use when it accesses a page on your website.
 If your website is like a house, your subdomains are like specific rooms in that house. A subdomain in a URL indicates which particular page of your website the web browser should serve up. For instance, subdomains like “blog” or “offers” will provide your website’s blog page or offers page.
 Your second-level domain (SLD) is the name of your website. It helps people know they’re visiting a certain brand’s site. For instance, people who visit “mlb.com” know they’re on Major League Baseball’s website, without needing any more information.
 The top-level domain (TLD) specifies what type of entity your organization registers as on the internet.
 A subdirectory — also known as a subfolder — helps people as well as

![→ Download Now: 80 Professional Bio Examples [Free Templates]](https://no-cache.hubspot.com/cta/default/53/4eb63650-d315-42e5-9ac7-8d0fcba29324.png)
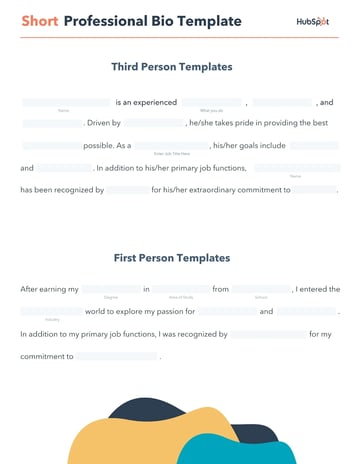
 Alternatively, on
 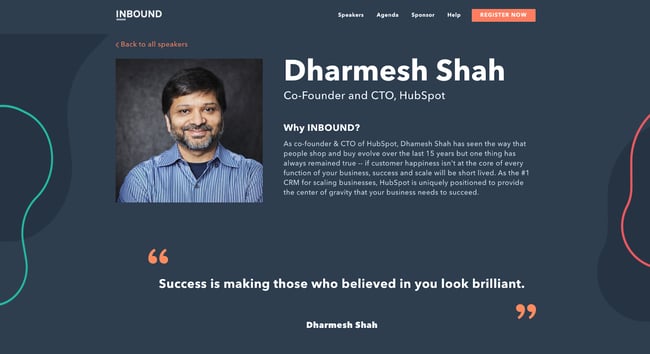 Finally, in his
 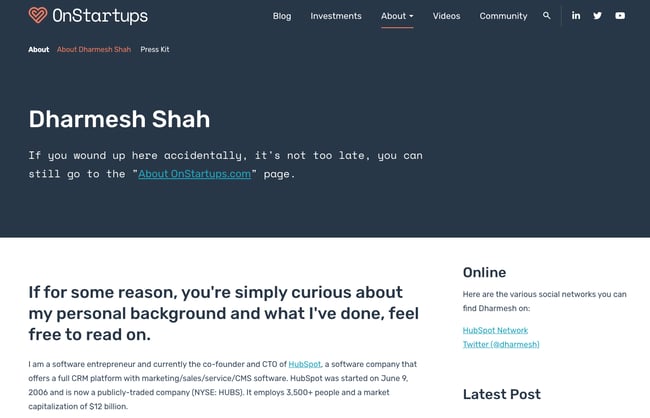 The best part about this approach is that you can create as many versions of your bio as you'd like, or simply recycle a general version whenever you need it.
 Bozoma Saint John opens her biography by covering her most recent role at Netflix, then goes all the way back to the beginning of her career. From there, she provides a detailed overview of her accomplishments, inserting the names of the most notable organizations she has worked with.
 Jim Kowalski walks us through his passions before describing his work experience and accomplishments. He makes it a point to connect his love of the automotive industry to his ethos in his work. Another notable feature of his professional background is that he mentions a brand he invigorated (it was “almost dead,” he asserts). He closes with his fascinating adventures around the world, including building a home in Thailand.
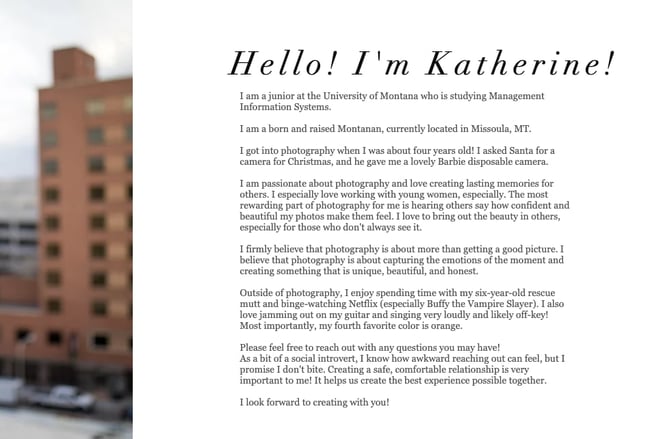 If you’re a college student, you might not have a long list of professional accomplishments, but you can take note from Katherine Gundlach’s example and write about what you love to do — and why you love to do it.
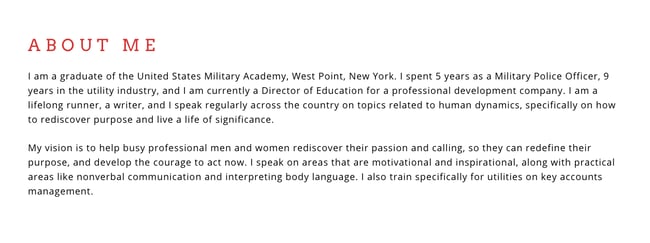 Erick Rheam’s professional background effectively outlines his path to becoming a motivational speaker. He also cements his expertise by stating that he speaks regularly across the U.S. After, he outlines his vision and purpose for doing what he does. Like some of the other examples on this list, he includes personal information about himself: that he’s a runner.
 Dr. Houyuan Luo’s professional background is a classic example of a bio that’s inspirational, professional, and persuasive.
 Claire Buswell immediately establishes herself as a relatable persona by going over her personal history first — then connecting that to her role today. Because she was once in the same position as her clients, Buswell is better prepared to help them professionally. She makes that clear in her professional background and is vulnerable about how hard it was to find a job.