Monday, January 11, 2021

How to Eliminate Render-Blocking Resources From Your WordPress Website

Have you ever finished creating a WordPress website and loved everything about it? Then, promptly began to hate it after realizing it takes forever to load?

Not only are slow loading speeds a nuisance for you and your visitors, but they can also cost you significantly when it comes to SEO. Since 2010, Google algorithms have accounted for loading speed in ranking decisions, so slow pages appear lower on results pages.

You might be familiar with the common culprits of poor page performance — excessive content, uncompressed image files, insufficient hosting, and lack of caching to name a few. But, there’s another often-overlooked perpetrator in play: render-blocking resources.

Don’t get me wrong — CSS and JavaScript are great. Without CSS, websites would be walls of plain text. Without JavaScript, we wouldn’t be able to add dynamic, interactive, engaging elements to our websites. But, if executed at the wrong time, both CSS and JavaScript can put a dent in your website performance.

Here’s why: When a web browser first loads a web page, it parses all the page’s HTML before displaying it onscreen to a visitor. When the browser encounters a link to a CSS file, a JavaScript file, or an inline script (i.e., JavaScript code in the HTML document itself), it pauses the HTML parsing to fetch and execute the code, which slows everything down.

If you’ve optimized your page performance in WordPress and are still experiencing problems, render-blocking resources may be the culprit. Sometimes this code is important to run on the first load, but much of the time it can be removed or pushed until the very end of the queue.

In this post, we’ll show you how to eliminate this pesky code from your WordPress website and give your performance a boost.

1. Identify the render-blocking resources.

Before making any changes, you first need to locate the render-blocking resources. The best way to do this is with a free online speed test like Google's PageSpeed Insights tool. Paste in your site’s URL and click Analyze.

When the scan is complete, Google assigns your website an aggregate speed score, from 0 (slowest) to 100 (fastest). A score in the 50 to 80 range is average, so you’ll want to land in the upper part of this range or above it.

To identify render-blocking files that are slowing your page, scroll down to Opportunities, then open the Eliminate render-blocking resources accordion.

the report from google pagespeed insights

Image Source

You’ll see a list of files slowing the “first paint” of your page — these files affect the loading time of all content that appears in the browser window on the initial page load. This is also called “above-the-fold” content.

Take note of any files ending with the extensions .css and .js, as these are the ones you’ll want to focus on.

2. Eliminate the render-blocking resources manually or with a plugin.

Now that you’ve identified the issue, there are two ways to go about fixing it in WordPress: manually, or with a plugin. We’ll cover the plugin solution first.

Several WordPress plugins can reduce the effect of render-blocking resources on WordPress websites. I’ll be covering two popular solutions, Autoptimize and W3 Total Cache.

How To Eliminate Render-Blocking Resources With the Autoptimize Plugin

Autoptimize is a free plugin that modifies your website files to deliver faster pages. Autoptimize works by aggregating files, minifying code (i.e., reducing file size by deleting redundant or unnecessary characters), and delaying the loading of render-blocking resources.

Since you’re modifying the backend of your site, remember to use caution with this plugin or any similar plugin. To eliminate render-blocking resources with Autoptimize:

1. Install and activate the Autoptimize plugin.

2. From your WordPress dashboard, select, Settings > Autoptimize.

3. Under JavaScript Options, check the box next to Optimize JavaScript code?.

4. If the box next to Aggregate JS-files? is checked, uncheck it.

the settings page in the autoptimize plugin

5. Under CSS Options, check the box next to Optimize CSS Code?.

6. If the box next to Aggregate CSS-files? is checked, uncheck it.

the settings page in the autoptimize plugin

7. At the bottom of the page, click Save Changes and Empty Cache.

8. Scan your website with PageSpeed Insights and check for an improvement.

9. If PageSpeed Insights still reports render-blocking JavaScript files, return to Settings > Autoptimize and check the boxes next to Aggregate JS-files? and Aggregate CSS-files?. Then, click Save Changes and Empty Cache and scan again.

How To Eliminate Render-Blocking Resources With the W3 Total Cache Plugin

W3 Total Cache is a widely-used caching plugin that helps address laggy code. To eliminate render-blocking JavaScript with W3 Total Cache:

1. Install and activate the W3 Total Cache plugin.

2. A new Performance option will be added to your WordPress dashboard menu. Select Performance > General Settings.

3. In the Minify section, check the box next to Minify, then set Minify mode to Manual.

the minify options section in the W3 Total Cache plugin

4. Click Save all settings at the bottom of the Minify section.

5. In the dashboard menu, select Performance > Minify.

6. In the JS section next to JS minify settings, make sure the Enable box is checked. Then, under Operations in areas, open the first Embed type dropdown and choose Non-blocking using “defer”.

the settings page in the w3 total cache plugin

7. Under JS file management, choose your active theme from the Theme dropdown.

8. Refer back to your PageSpeed Insights results from your earlier scan. For each item under Eliminate render-blocking resources ending in .js, click Add a script. Then, copy the full URL of the JavaScript resource from PageSpeed Insights and paste it into the File URI field.

the settings page in the w3 total cache plugin

9. Once you’ve pasted in all render-blocking JavaScript resources reported by PageSpeed Insights, click Save Settings & Purge Caches at the bottom of the JS section.

10. In the CSS section next to CSS minify settings, check the box next to CSS minify settings and make sure the Minify method is set to Combine & Minify.

the settings page in the w3 total cache plugin

11. Under CSS file management, choose your active theme from the Theme dropdown.

12. For each item under Eliminate render-blocking resources ending in .css in your PageSpeed Insights scan results, click Add a style sheet. Then, copy the full URL of the CSS resource from PageSpeed Insights and paste it into the File URI field.

the settings page in the w3 total cache plugin

13. Once you’ve pasted in all render-blocking CSS resources reported by PageSpeed Insights, click Save Settings & Purge Caches at the bottom of the CSS section.

14. Scan your website with PageSpeed Insights and check for an improvement.

How to Eliminate Render-Blocking JavaScript Manually

Plugins can handle the backend work for you. Then again, plugins themselves are just more files added to your web server. If you want to limit these extra files, or if you’d just rather handle the programming yourself, you can address the render-blocking JavaScript manually.

To do this, locate the <script> tags in your website files for the resources identified in your PageSpeed Insights scan. They will look something like this:

<script> tags tell the browser to load and execute the script identified by the src (source) attribute. The problem with this process is that this loading and executing delays the browser’s parsing of the web page, which impacts the overall load time:

a visualization of the default script loading timeline

Image Source

To resolve this, you can add either the async (asynchronous) or the defer attribute to the script tags for render-blocking resources. async and defer are placed like so:

While they have similar effects on load times, these attributes tell the browser to do different things.

The async attribute signals the browser to load the JavaScript resource while parsing the rest of the page and executes this script immediately after it has been loaded. Executing the script pauses HTML parsing:

a visualization of the script loading timeline with the async attribute

Image Source

Scripts with the defer attribute are also loaded while the page is parsed, but these scripts are delayed from loading until after the first render or until after the more essential portions have loaded:

a visualization of the script loading timeline with the defer attribute

Image Source

The defer and async attributes should not be used together on the same resource, but one may be better suited for a particular resource than the other. Generally, if a non-essential script relies on a script to run before it, use defer. The defer attribute ensures that the script will run after the preceding necessary script. Otherwise, use async.

3. Re-run a site scan.

After making your changes, conduct one final scan of your website through PageSpeed Insights and see what impact your changes had on your score.

Hopefully, there’s a noticeable improvement, but don’t worry if not. Many factors can inhibit page performance, and you may have to do some more digging to find the source of poor performance.

4. Check your website for bugs.

In addition to a rescan, check your pages to make sure your site works. Does the page load correctly? Are all elements showing up? If something is broken or fails to load properly, undo your changes and troubleshoot the issue.

If you’ve reached a point where you’ve repeatedly tried various measures with minimal speed gains, it might be best to consider other ways to speed up your pages, rather than risk breaking your site.

Optimizing Your WordPress Site for Performance

Many factors contribute to your users’ experience on your website, but few are more important than load time. Whenever you make big changes to content or appearance on your WordPress site, you should always consider how such changes affect performance.

Now that you’ve eliminated the render-blocking resources, you should continue to optimize your website’s speed by analyzing other features that are known to slow down performance. Try to incorporate regular speed testing into your site maintenance schedule — staying ahead of any potential issues will be critical to your success.


How to Eliminate Render-Blocking Resources From Your WordPress Website was originally posted by Local Sign Company Irvine, Ca. https://goo.gl/4NmUQV https://goo.gl/bQ1zHR http://www.pearltrees.com/anaheimsigns

8 Inclusive Advertising Tips for 2021, According to Microsoft's Head of Inclusive Marketing

Advertising can help create a direct connection between consumers and your brand, and is a critical component of marketing.

And inclusive advertising can yield dramatic results and increase brand trust, loyalty, and better overall brand perception. In fact, 64% of people said they are more trusting of brands that represent diversity in ads, and 85% of consumers said they will only consider a brand they trust.

Advertising that works hard for your company has never been more important as we come off the heels of a challenging year affecting all businesses. However, there is one concept that rang true for us all that can inform our approach in advertising for 2021 and beyond – that is, we are all interconnected and interdependent, both as consumers and as advertisers.  

In this post, we'll provide eight tips curated from Microsoft's Marketing with Purpose Playbook to help you create more inclusive advertising, reach more customers, and grow your business.

1. Showcase human diversity in your campaigns.

Inclusive advertising means having diversity authentically represented in your ads and promotions, while aligning it to your local market's composition of diversity. It also means considering the many dimensions of human diversity, including (but not limited to) age, gender, ethnicity, sexual orientation, location, language preference and gender expression.

Additionally, you'll be able to expand your ability to connect and tailor ad creative and promotions with your audience when you consider experiential diversity like ability, parental status, marital status, military status, affinities, and job function.

Ultimately, inclusive advertising is understanding with empathy who your customers are, representing them accurately, and more importantly, recognizing who you're excluding in your marketing materials.

2. Perform a landing page and website audit for audience diversity.

Inclusive advertising doesn't end with the ad. In fact, half of the customer experience with your advertising resides where you send them after they click — which means it's critical you demonstrate diversity in your landing pages or website, as well.

Considering 64% people are more likely to consider or purchase a product after seeing diversity or inclusion in advertising, it's critical you ensure your landing pages and website represent true diversity.

Does your website's collection of photos and images match the audience representation you created across your entire ad campaign? Does each inclusive advertisement point the customer after the click to the landing page that matches the inclusive spirit of the image creative? If not, it should.

However, while it's relatively easy to spot-check a landing page with the corresponding ad creative, how can you collectively evaluate your entire website for the right amount and variety of diversity?

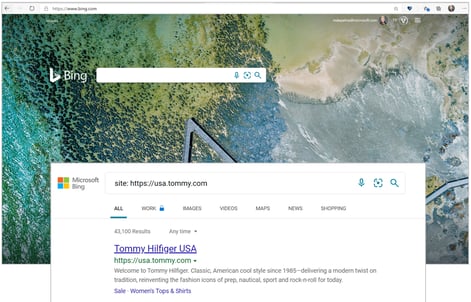
For an easy way to review what images are across your site's web pages, simply use Bing.com and type in the search bar the command, "site:" and then add your website's URL after the colon.

For example, let's search Bing for the clothing brand Tommy Hilfiger, which looks like this in the search bar: "Site:https://usa.tommyhilfiger.com". Then, hit "Enter". Bing will produce a search engine results page indexing all your web pages:

bing site search of tommy hilfiger

Then click on the "images" in the search engine results page for your "site:" search in the navigation bar:images of Tommy Hilfiger models in clothing

This will produce all the images found on the website. You can quickly scroll through to get a sense of the diversity — or lack of diversity — in the collection of images on your website.

Your audit can be used as a general website check, or a search for specific dimensions of diversity that you feel are underrepresented in your upcoming advertising campaign.

3. Align your advertising messaging to the nine feelings of inclusion.

Emotions are becoming increasingly linked with brand outcomes. As Maya Angelou once said, "I've learned that people will forget what you said, people will forget what you did, but people will never forget how you made them feel."

Feeling included so that a person feels that this brand is for me is at the heart of brand trust, love, and loyalty.

There are actual identified feelings of inclusion in advertising, which can create connection and drive trust. Inclusive advertising can conjure two major feelings: joy, and trust. As a marketer, it's critical you look for brand connection points in product or features that can create these two main feelings.

However, there is more to it than that – there are actually nine feelings that make up joy and trust, which is great news for advertising. If you can find a genuine and authentic way that your product creates any one of these feelings, this can convey inclusion, which – you guessed it, builds trust, brand love, and loyalty.

This product marketing approach facilitates connections with people, making them feel like part of a community. Here are some marketing ideas to evoke feelings of joy and trust:

  • Celebration: Of people, their successes, honoring of holidays, etc. How does your product celebrate them?
  • Zest: For life (for ours, theirs, and that of the planet). Convey enthusiasm and energy. How does your product create a zest for life?
  • Hope: Bringing hope to conquer challenges and/or societal issues. How does your product give your consumers' hope?
  • Relaxation:Instead of portraying the need to be on guard, remove tension or anxiety for your customers. How does your product produce relaxation?
  • Relief: From concern or worry, removing something distressing or oppressive. How does your product bring relief?
  • Safety: Create experiences or highlight how your brand extends safety to all people. How does your brand experience make someone feel safe?
  • Confidence: Instill a sense of confidence—the belief that we strive to act in the right way. How does your product give your consumers' confidence?
  • Acceptance: Of others' differences, typically to be included as part of the group. How does your product make someone feel accepted or demonstrate you are accepting of others?
  • Clarity: Bring a sense of certainty, clarity, and transparency in ambiguity. How does your product bring clarity to a confusing situation?

4. Incorporate three metaphors of inclusion.

Another customer touchpoint that can help your brand emotionally connect with people in your advertising is language cues and context, which evoke positive feelings.

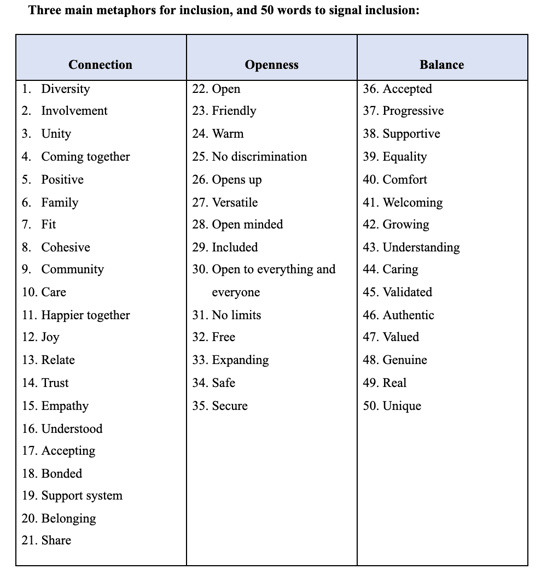
Discovered in our research, The Psychology of Inclusion and the Effects in Advertising at Microsoft Advertising, we uncovered the following fifty language-based cues that signal inclusion, as well as three metaphors of inclusion which are inextricably tied to emotions.

If used in context and in a genuine and authentic way in your ad copy, website, or digital content marketing, these metaphors can help convey inclusion and drive brand performance.

table of 50 words that signal inclusion

5. Practice inclusive and authentic image selection.

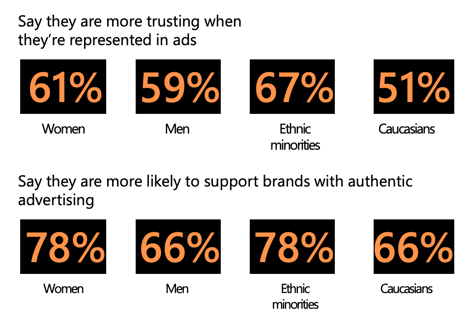
Authentic representation in advertising is important. It drives trust and brand support — so the images you choose matter. It is worth noting that from the Microsoft Advertising research around trust, we found that there is a strong tie between trust, love, and loyalty.

statistics of women, men, and ethnic minorities who are more trusting when they see themselves represented in ads

Once trust is established as the baseline, a brand can begin to build love and loyalty. To do this, brands must go the extra mile to make someone feel understood through inclusion, and that means authentic imagery, too. Inclusion was found to be a key brand attribute that creates loyalty.

The same story threads are woven through our inclusive advertising research. Our research uncovered that authentic representation in advertising builds trust and brand support, with 72% of people saying they're more likely to support brands with authentic advertising.

Choosing imagery is an important part of the process in constructing a meaningful and inclusive customer experience. Inclusive advertising isn't just about representing everyone — it's also about making everyone feel your products or services are for them.

Here are some tips to help identify and select inclusive imagery:

Tips to illustrate "Connection":

  • Have more than one person in an image
  • Include realistic diversity: use authentic and genuine imagery, which is best conveyed using real people being themselves, that reflect everyday life, not actors hired to play a part
  • Create a visible relationship between people that is positive
  • Include people in photos rather than featuring the product only

Tips to illustrate "Openness":

  • Include people with disabilities
  • Feature non-traditional dimensions of diversity like people with larger bodies
  • Include unique subsets of diverse populations
  • Include multiple people of color
  • Have people with intersectionality in diversity

Tips to illustrate "Balance":

  • Everyone is featured with the same prominence
  • Equity is conveyed
  • Ensure multiple dimensions of diversity are represented in an image
  • Within your campaign, have the creative represent the spectrum of people that your potential customer base could be

Lastly, it's good practice to include a diverse representation of people in the review of your creative to uncover blind spots, such as non-obvious negative connotations, stereotypes, cultural inaccuracies, or negative associations.

6. Perform an accessibility audit on your ads, content, and landing pages.

Would you want to turn away one in four people from buying your product simply because your ad or website was not in the right format for them?

Conversely, wouldn't you want to increase your reach by 25%? I hear you saying, "Yes, of course!"

Without accessible advertising, no matter how perfect your product or offer is for someone, one in four people in Europe or the United States might not get your message. This is the ratio of people with disabilities to the general population. According to the United Nations, more than one billion people globally live with disabilities.

Digital inclusion is important because it provides access to services, products, data, information, and education for everyone. We, as advertisers, can recognize these exclusions, solve for them, and make a difference for the one in four people — and also in our business performance.

  • Download the plug-in for your browser https://accessibilityinsights.io/ and begin to learn how to make your landing pages for your campaigns accessible. This free open-source tool by Microsoft will highlight what accessibility issues are present and how to fix them. It could not be more turn-key, it's free.
  • Use the Accessibility Checker in Microsoft 365 to make any media or content more accessible.
  • Learn the ten accessibility principles to building accessibility into your advertising from the start.

7. Develop an inclusive keyword library.

Nothing replaces the value of first-hand customer experience as you develop an inclusive keyword library for your brand. Begin with customer focus groups with the audience you are trying to reach, and you'll be surprised what you uncover. You can even start by sourcing this information from your internal Employee Resource Groups.

To develop an inclusive keyword library, you'll want to consider the consumer decision journey for the product or service you offer. Next, layer on the journey for the consumer with a physical disability, cognitive difference, military status, age consideration, gender expression, or other dimensions of diversity.

Include their lived experience and map the unique keywords that they might use to seek out your product. By understanding the consumer decision journey from their perspective, you will develop your own inclusive keyword strategy for your business.

One simple example is understanding gender differences. In Microsoft Advertising's Inclusive Automotive Marketing webcast, we shared the difference between men and women in the consumer decision journey when shopping for a car. An inclusive keyword strategy can inform not only your search engine marketing (SEM) but could shape you content marketing, as well.

As suggested earlier, don't stop at the usual dimensions of diversity — go further and see what you can uncover to help you connect and give people the feeling that you're "a brand for someone like me."

8. Root out bias in your ads and your data.

Contending with and working towards eliminating bias applies to all of us. As marketers, our job is to understand and identify potential bias that can live within our datasets and our marketing models. Bias in data produces biased models, which can be discriminatory and harmful. Bias can lead to missed opportunities in marketing, or even damage your brand's reputation.

There is a long list of bias types, and it's good to become familiar with many of these. A great resource is the Harvard Implicit Bias Tests, which you can use to explore and learn about the variety of biases.

For instance, a marketer might conclude that a luxury accessories brand should target women, because gender appears to correlate with a higher purchase probability. You might assume that only women buy luxury handbags. However, gender may just be a red herring. Income could correlate to a much higher degree with conversion.

The resulting bias of only targeting women, then, would limit your opportunity. I invite you to have deliberate curiosity about long-held beliefs, because you might be accidentally leaving out other buyer personas.

Additionally, it's critical you're cognizant of gender-neutral pronouns in your marketing materials. Refer to "they" or "them" when writing about people (rather than "he" or "she"), and ensure you offer at least a third option when asking for gender in customer profile forms.

As we start 2021 and work to find new ways to drive business impact while making a positive impact in the world, we hope these eight tips for inclusive advertising help get you there. Let's work together to build a more inclusive world today.


8 Inclusive Advertising Tips for 2021, According to Microsoft's Head of Inclusive Marketing was originally posted by Local Sign Company Irvine, Ca. https://goo.gl/4NmUQV https://goo.gl/bQ1zHR http://www.pearltrees.com/anaheimsigns
Friday, January 8, 2021

How the HubSpot Blog Generates Leads [+ How Yours Can, Too]

It's hard to believe that if the HubSpot Blog were a person, it would currently be in high school.

That's right – for well over a decade, content has been published on the HubSpot Blog to help hundreds of millions of readers discover best practices in the areas of marketing, sales, customer service, website development, agency work, and general business best practices.

Behind the scenes, our team also thinks about how we can convince as many readers as possible to become leads and access more information, tools, and resources from HubSpot – and anyone who has worked on lead generation knows that accomplishing this task is much easier said than done.

Effective blog lead generation requires both creative and analytical skills. It's about knowing what numbers to crunch, how to analyze your existing data, and how to make projections based off of traffic, monthly search volume, and conversion potential.

Additionally, any good marketer needs to understand the human aspect behind this process and not lose sight of the people reading your blog and the problems your business can help them solve.

Over the years, the team at HubSpot has landed on a process that continuously generates leads day-after-day, with a reliable blog view-to-lead conversion rate and a steady flow of traffic.

Here are the steps my team at HubSpot takes to generate leads from our blog.

1. Audit existing blog metrics.

To develop a process for growing our blog lead number, we first needed an understanding of how well we were performing.

To capture the current state of blog lead generation, we looked for the overall traffic number and number of leads generated from the blog. These two numbers gave us a baseline conversion rate (in this case, number of leads generated, divided by the total views to the HubSpot Blog in a given time period) from which we knew the team could only go up.

While the number of leads was the ultimate goal for our team, we wanted to take a deeper look at the overall conversion rate and how it changed month-over-month – this number would let us know for sure if we were growing traffic to posts and topics that were most likely to convert their intended audiences.

The big-picture conversion rate gave us an important directional view, but if we ever saw a major shift in that conversion rate, we needed to know where that shift was happening. For example, if we saw a surge in traffic to a low-converting post, that would hinder the overall conversion rate for the blog.

To drill down further, we also looked at all of our post-level data – that is, each post's traffic number, number of leads generated, and CVR. By exporting and tracking this data monthly, we were able to see which posts were dragging down our CVR, which posts were keeping it strong, and which posts were prime candidates for a better CVR.

How to complete this step:

  1. Choose a time period (last quarter, last month, etc.) for which you want to know your conversion metrics.
  2. Determine your overall data for traffic and leads generated in this time and calculate overall blog CVR.
  3. Export your traffic and lead numbers for individual blog posts for this time period. Depending on your analytics tool, this may require you to export data from two different sources and combine metrics using a VLOOKUP on Excel or Google Sheets.
  4. For each post, divide the number of leads it generated by its traffic number to get post-level conversion metrics.

2. Group common posts together.

Over the years, HubSpot has published thousands of blog posts – and while this was immensely helpful for growing HubSpot's email subscription base and ranking for countless keywords, it made the process of organizing and analyzing conversion metrics extremely difficult.

Luckily, the blog and SEO teams developed a model to group posts with similar search intent with the pillar-cluster model. In a nutshell, this model was the result of a massive audit to better organize our blog, reduce redundancy on the blog, and help search engines understand which pieces of content we wanted to be considered the most authoritative on a given subject.

As a result of this project, all of our blog posts were given a relevant "topic tag" – or the cluster for which each post belonged. For instance, any Instagram post is assigned an "Instagram Marketing" tag, and links back to our Instagram Marketing pillar page.

This process ensures effectiveness when analyzing metrics. For instance, when exporting blog metrics, we can analyze blog posts by tag (i.e. all "Instagram Marketing" posts), of which we have a few hundred — rather than analyzing each individual URL, of which we have over 10,000.

How to complete this step:

  1. Export all of your blog posts from your CMS or website analytics tool onto a spreadsheet.
  2. Categorize each of your keywords into a topic cluster. These topic clusters should be high in search volume, anchored by a long and high-trafficked post, and related to each other when it comes to search intent. For example, rather than put all of our posts on social media in one giant “Social Media” cluster, we created more niche clusters for Facebook, Twitter, LinkedIn, and Instagram to help us categorize with more specificity.
  3. With each post properly categorized, organize your data with a pivot table to look at the numbers generated by each cluster rather than each URL. Your pivot table should include the number of posts in each cluster, the views generated, and the leads generated. From there, you can calculate the cluster's CVR by dividing total leads by total views.

3. Determine the best content offer opportunities.

One of the major benefits of grouping your posts together is identifying a content offer opportunity that can be effectively promoted on multiple blog posts, as opposed to an individual post.

As acquisition marketers, it's tempting for us to attempt optimizing the conversion paths for high-traffic posts. However, these high-traffic posts are oftentimes too general and unrelated to what it is we're trying to market.

This mismatch results in misplaced efforts and unmet lead goals, as we're quick to ignore blog posts which – on their own – may have lower traffic numbers, but together have a substantial traffic number.

Ask yourself – which of these two options is a better pursuit for lead generation?

  • A blog post that has little or nothing to do with your products or services, but is viewed 100,000 times a year.
  • 10 individual blog posts that have a clear connection to your company's core competencies, but on average generate only 10,000 views each per year.

In either scenario, you'd be optimizing the conversion path for 100,000 readers – it's only by grouping these posts together that you'd realize option #2 is a much better option for lead generation.

To address this issue, we organized all of our blog topics by the potential number of leads they could generate, but readily discounted any topic cluster of which we doubted the conversion potential. This crucial step ensured we only considered ideas that we believed would be worth our time and resources to create.

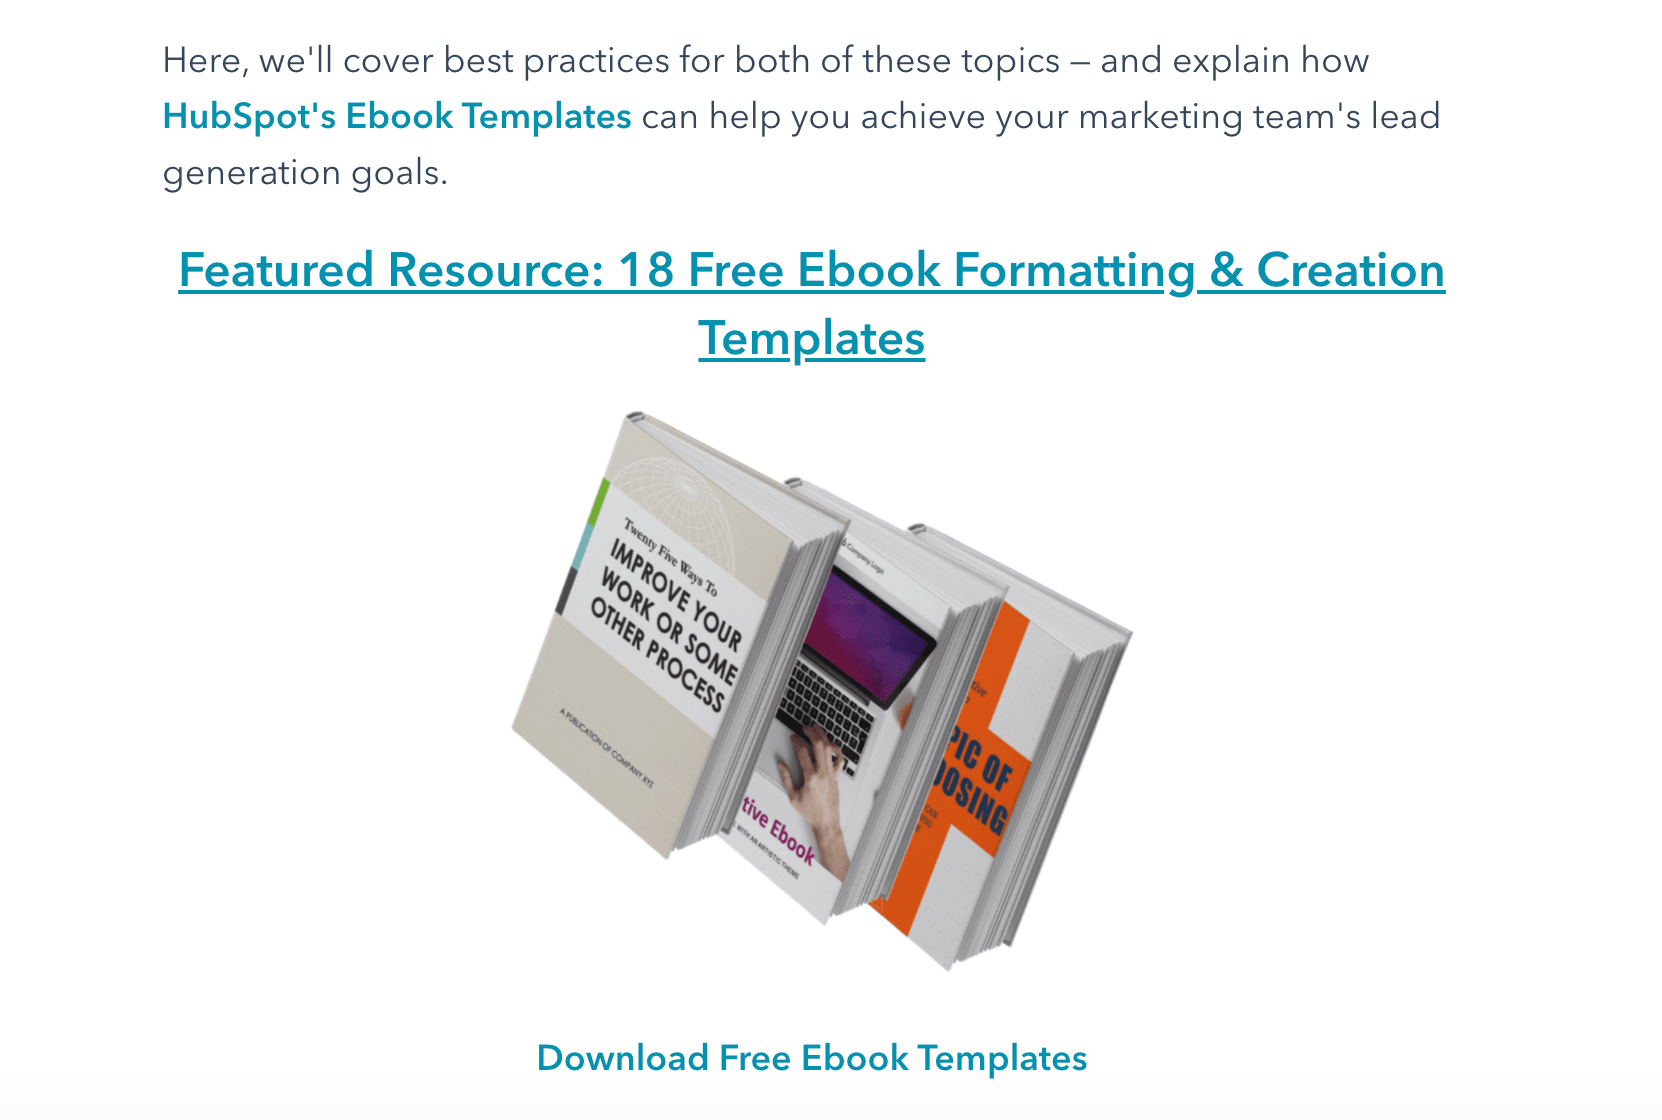
Along with dedicated CTAs for each blog post we create, we also create featured resources for certain topics we believe have high conversion potential. For instance, in this Ebook Format blog post, we created a special featured resource, 18 Free Ebook Formatting & Creation Templates:

HubSpot's featured resource on ebook formatting templates

How to complete this step:

  1. Calculate how many leads each topic cluster could be generating. At HubSpot, we do this by subtracting each cluster's actual CVR from its target CVR, and multiplying that difference by the traffic number for the desired time period.
  2. Organize data by each cluster's lead generation opportunity – looking first at the highest opportunity and at the lowest opportunity last.
  3. Work through your list of high-opportunity clusters and remove any low-intent clusters from your consideration, ensuring you're only left with topic clusters that have a direct connection to your products/services.
  4. Select one (or many) topic clusters which you want to support with a lead-generating content offer.

4. Create lead-generating content.

By this point, you've identified topic clusters which you feel would benefit from a new, dedicated piece of lead generating content. Now, it's time to create that piece of content.

Understanding what kind of content to create comes from knowledge of your industry, your market, and your buyer personas. In our experience, we discovered HubSpot's Blog audience responds to actionable, personalized, and customizable content in the form of templates, tools, and kits.

However, this is not the case for all organizations – so figure out which content format works best for your audience by auditing the performance of your current library or testing out different formats to see what resonates with your blog readers.

With the knowledge of what formats work best for our readership, we got to work on creating templates for our most-read but lowest-converting clusters, so that readers would see our content as an actionable next step for them to apply the knowledge they gained in the blog post. Below are a few examples of how we mapped an offer to a topic cluster.

Blog Topic Cluster

Content Offer

Customer Experience

Customer Journey Map Templates

Sales Training

New Hire Sales Onboarding Template

Product Marketing

Product Go-to-Market Kit

Pricing Strategy

Sales Pricing Strategy Calculator

Facebook Advertising

Facebook Advertising Checklist

The most important thing to remember during this step is to not overcomplicate your content. Remember, to secure a conversion, you need to convince a reader of your content's quality and relevance. If you're struggling to make the connection between your blog content and your offer's content yourself, how well do you think a reader skimming your blog posts will make that connection?

How to complete this step:

  1. Look through the posts in the topic cluster you want to optimize with new content and think about what a natural next step would be for the reader.
  2. Cement an idea for a piece of content you can create that aids your readers in that next step.
  3. Create the content in your desired format (PDF for ebooks, Google Sheets or Microsoft Word for templates, etc.) and launch it behind a lead-generating form on your website.

5. Promote content with CTAs.

To facilitate a blog conversion, you'll need to let blog readers know about the new lead-generating piece of content on the same page as your blog content.

Blog CTAs can take a variety of formats. Two of the most popular are:

    • Anchor Text CTAs – Hyperlinked text to the landing page of the offer you're promoting. Remember to keep anchor text direct and clear so readers know what they're clicking – action words like “download” and “access” are useful here.
  • Image CTAs – Hyperlinked images to your offer's landing page. These CTAs might look like a banner ad and contain an image of the offer alongside copy explaining the value of it. These image CTAs could also be an image of the offer itself, which makes sense if promoting a template or a tool.

At HubSpot, the majority of our posts contain at least three CTAs – one anchor text, and two image. Depending on the intent we expect readers have on a specific post, we may include several more. However, all of these decisions are based on years of data collection and A/B testing – which we encourage you to rely on as well to ensure a non-intrusive CTA experience on your blog posts.

How to complete this step:

  1. Determine the CTA types you want to include for the blog posts you're optimizing.
  2. If necessary, create CTA imagery with a design tool like Adobe or Canva.
  3. Add CTAs to each post, either by utilizing a CTA tool or hyperlinking each image or line of text you add into your blog posts. We recommend the former.

6. Analyze your results.

We gained confidence that this approach worked best for us when the results confirmed so.

After 30 days of launching a new content offer on a series of blog posts, we always answer two questions:

  1. How many leads did each blog generate before we optimized it with the new content offer?
  2. How many leads did each blog generate after we optimized it with the new content offer?

Far more often than not, these clusters see a notable increase in CVR, with some increasing by more than 1,000%.

However, there have been times where we missed the mark and the offer did not perform as expected. When that was the case, we reverted the changes and went back to the drawing board – equipped with the knowledge of what didn't work, which helped us determine what would help us generate more leads in the future.

How to complete this step:

  1. Calculate the traffic, lead, and CVR numbers for each blog post optimized with the new offer before swapping out the CTA.
  2. Calculate the same for a set time period after the CTAs were swapped.
  3. Calculate the difference in leads and in CVR for each post.
  4. If the post did not increase in CVR as expected, consider reverting your changes and creating a new content offer.

7. Align with SEO.

When we discovered that this process was helping us hit our goals, our immediate thought was protection. HubSpot writers and SEOs work hard to ensure our blog posts continuously rank on the first page for the search results of their intended keywords — and we don't want to lose that hard-fought real estate.

However, like all teams, SEO needs to prioritize which blog posts are most in need of protection from losing their SERP rankings and traffic – so it became our job to ensure HubSpot's SEO team knew which posts were most important when it came to generating leads.

We're fortunate here at HubSpot to work with expert SEOs who are able to quickly and effectively prioritize the right content.

As my colleague Braden Becker – HubSpot Senior SEO Strategist – said when we spoke about this topic at INBOUND 2020, "Traffic doesn't pay the bills."

Once we were all on-board regarding prioritization, our teams came to an agreement on how to best manage an SEO strategy for high lead-drivers while respecting the importance of maintaining high traffic numbers for posts across the HubSpot Blog.

The team takes the following steps to ensure lead generation goals are met:

  • Protect the traffic to high-traffic, high-converting blog posts by regularly checking performance and making as-needed updates to the content of these posts. By frequently optimizing these posts, we let search engines know we're quick to add the most relevant information onto these pages.
  • Grow the traffic to low-traffic, high-converting blog posts – or ensure that these posts have maxed out their organic traffic potential.
  • Create posts for keywords that we have not written articles for – but align with related content offers or clusters – as these posts could generate substantial lead numbers for us. This step requires keyword research to ensure these new posts generate traffic.
  • Stop protecting traffic to high-traffic, low-converting posts. While strong traffic numbers are great, we came to the conclusion that a lower traffic number is acceptable if it means redirecting our historical optimization efforts away from posts that might not generate as much traffic, but will generate significantly more leads than other posts.

How to complete this step:

  1. Come up with a list of blog content that you'd like to see an increase or decrease of traffic to for lead-generation purposes.
  2. Present this list to your colleague(s) in SEO to determine what work can be done to redirect traffic growth efforts to the right posts. Note: it's important to set expectations here, as an SEO cannot wave a magic wand and increase demand for a low-ranking keyword. Sometimes, a post is ranking as well as it can be – but that doesn't mean you shouldn't double check to see if there's opportunity to grow traffic where possible.
  3. Present a list of high-traffic, high-converting blog content to see if there are similar keywords which could be written about in a new (or updated) blog post, in addition to potential keywords that could be the basis for net new posts.
  4. Come with data. SEOs aren't in the business of risk-taking, so explain how a sacrifice of traffic in some areas could result in a stronger CVR and higher lead number from your company's blog.

8. Repeat the cycle!

HubSpot's bloggers are always creating new blog posts and historically optimizing existing ones. In other words, my team is always presented with opportunities to create new lead-generating content and ensure the content we've already made still holds up and is of value to our leads.

Whenever we create a piece of gated content, we always follow the seven steps above, and we're consistently rewarded with an increase in leads from our blog.


How the HubSpot Blog Generates Leads [+ How Yours Can, Too] was originally posted by Local Sign Company Irvine, Ca. https://goo.gl/4NmUQV https://goo.gl/bQ1zHR http://www.pearltrees.com/anaheimsigns
11 Social Media Calendars, Tools, & Templates to Plan Your Content

What do cross-country road trips, wedding speeches, and social media marketing have in common? Planning.

You could improvise all three, but it's better to have a plan for what direction you're heading -- especially when developing your social media content strategy.

By now, most marketers recognize that social media plays an integral role in an effective inbound marketing strategy. And with so many social networks to manage and publish on, it's important to stay organized and have a plan for when and what you're going to share on these platforms.

The Benefits of Using a Social Media Content Calendar

We're all busy. And when we're busy without a plan in place for the tasks we have to get done, things inevitably slip through the cracks. Social media content is no exception.

Just like with blogging, a successful social media strategy requires regular publishing and engaging with followers to see positive results -- whether that be in terms of SEO, brand recognition, lead generation, or all three.

So, if you're not already using a social media content calendar, hear me out:

  1. Calendars help you get organized to avoid the dreaded scramble when things come up. With a social media calendar, marketers can plan out posts for entire weeks or months in advance, which frees up working hours to strategize for the future -- and to dash off any posts about breaking news in your industry. Otherwise, you'll spend valuable time each day searching the internet for that day's content to share, which is a known productivity killer.
  2. A calendar helps you plan for each social network to customize posts instead of spamming all platforms with the same message. Social media marketers should take the time to craft custom messages for each network, and doing this in advance will save time throughout the week and ensure you're being thoughtful and intentional when you do post.
  3. Calendars can help you track performance and plan for future posts. Without a calendar, social media marketers are publishing content into the void and are unable to track big-picture and past performance. With a calendar, marketers can look back and analyze which content performed best so they can adjust their strategy accordingly.
  4. With the help of a calendar, marketers can plan for holidays and observance days, such as National Cat Day, when they can tailor their content and engage with a wider audience.

Now that you understand the merits of having a social media content calendar in place, check out our list of top tools to stay organized and on top of your game.

Social Media Content Calendar Tools to Plan Your Messaging

1. HubSpot's Downloadable Template for Excel

Content Calendar

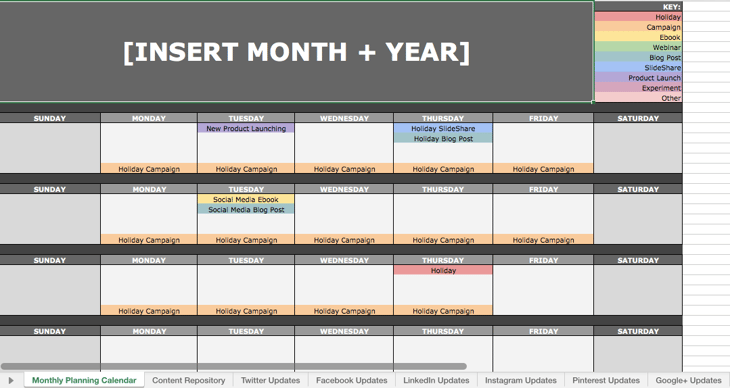
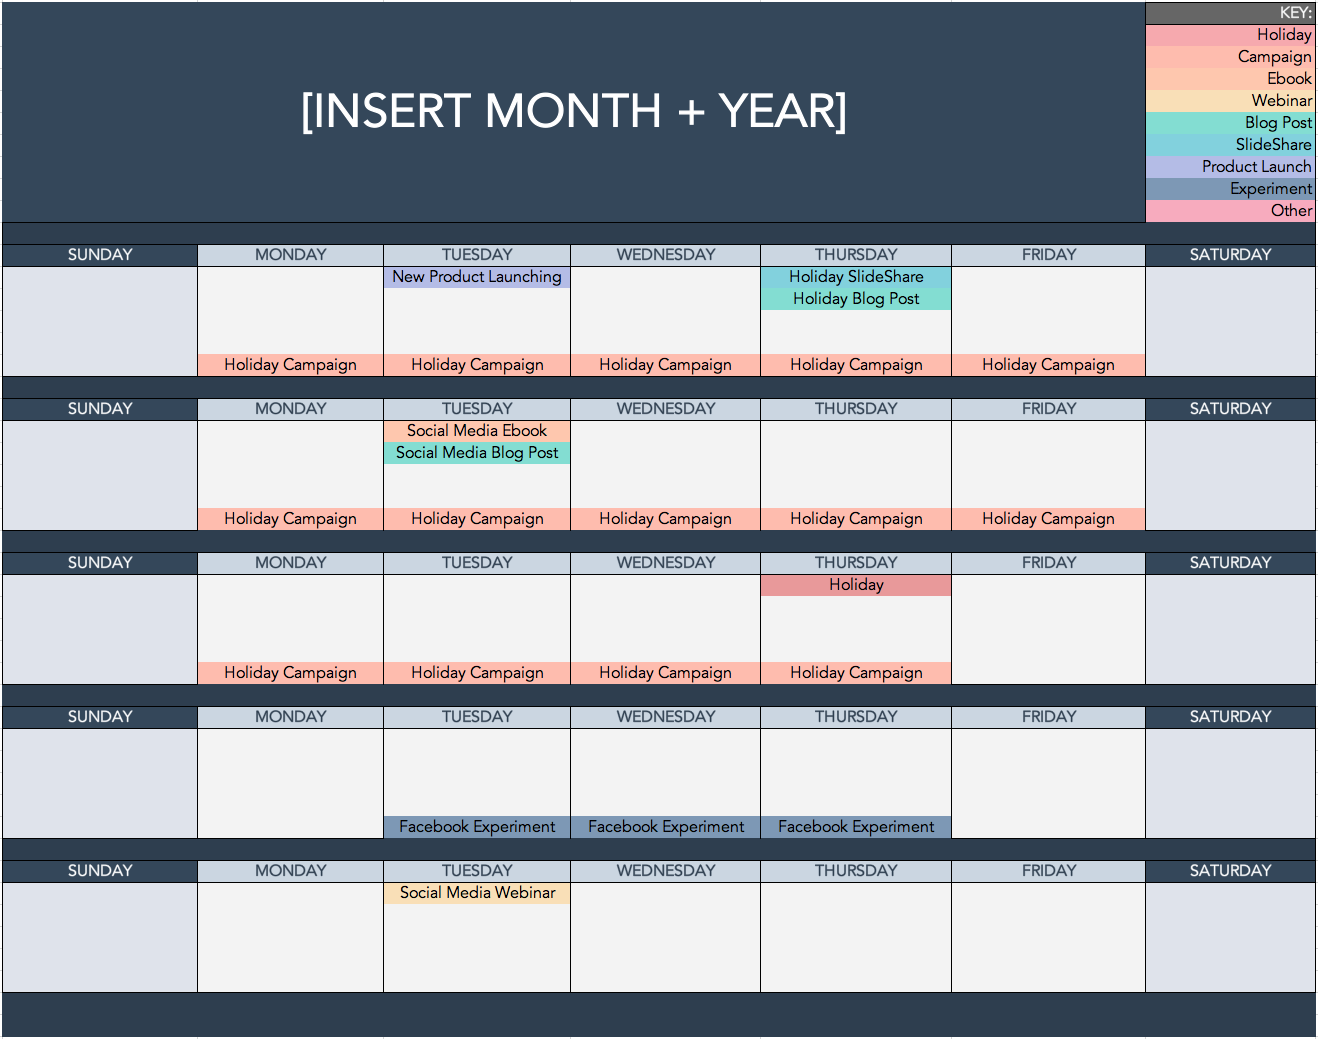
Social media calendar ideas organized on an Excel spreadsheet

Marketers might already use Excel for different types of reports and data analysis in their roles, but it's a highly useful tool for social media content calendar organization, too. Excel can be customized according to whatever priorities or metrics a team is focused on, so it's a great tool for planning ahead.

The good news? We've already done the heavy lifting for you by creating a free, downloadable social media content calendar template using Microsoft Excel. Marketers can use this template to easily plan out individual social media posts -- monthly or annually -- while keeping an eye on bigger picture events, holidays, publications, and partnerships.

  • Use the Monthly Planning Calendar Tab above to get a bird's-eye view of what's coming down their content pipeline in a given month.
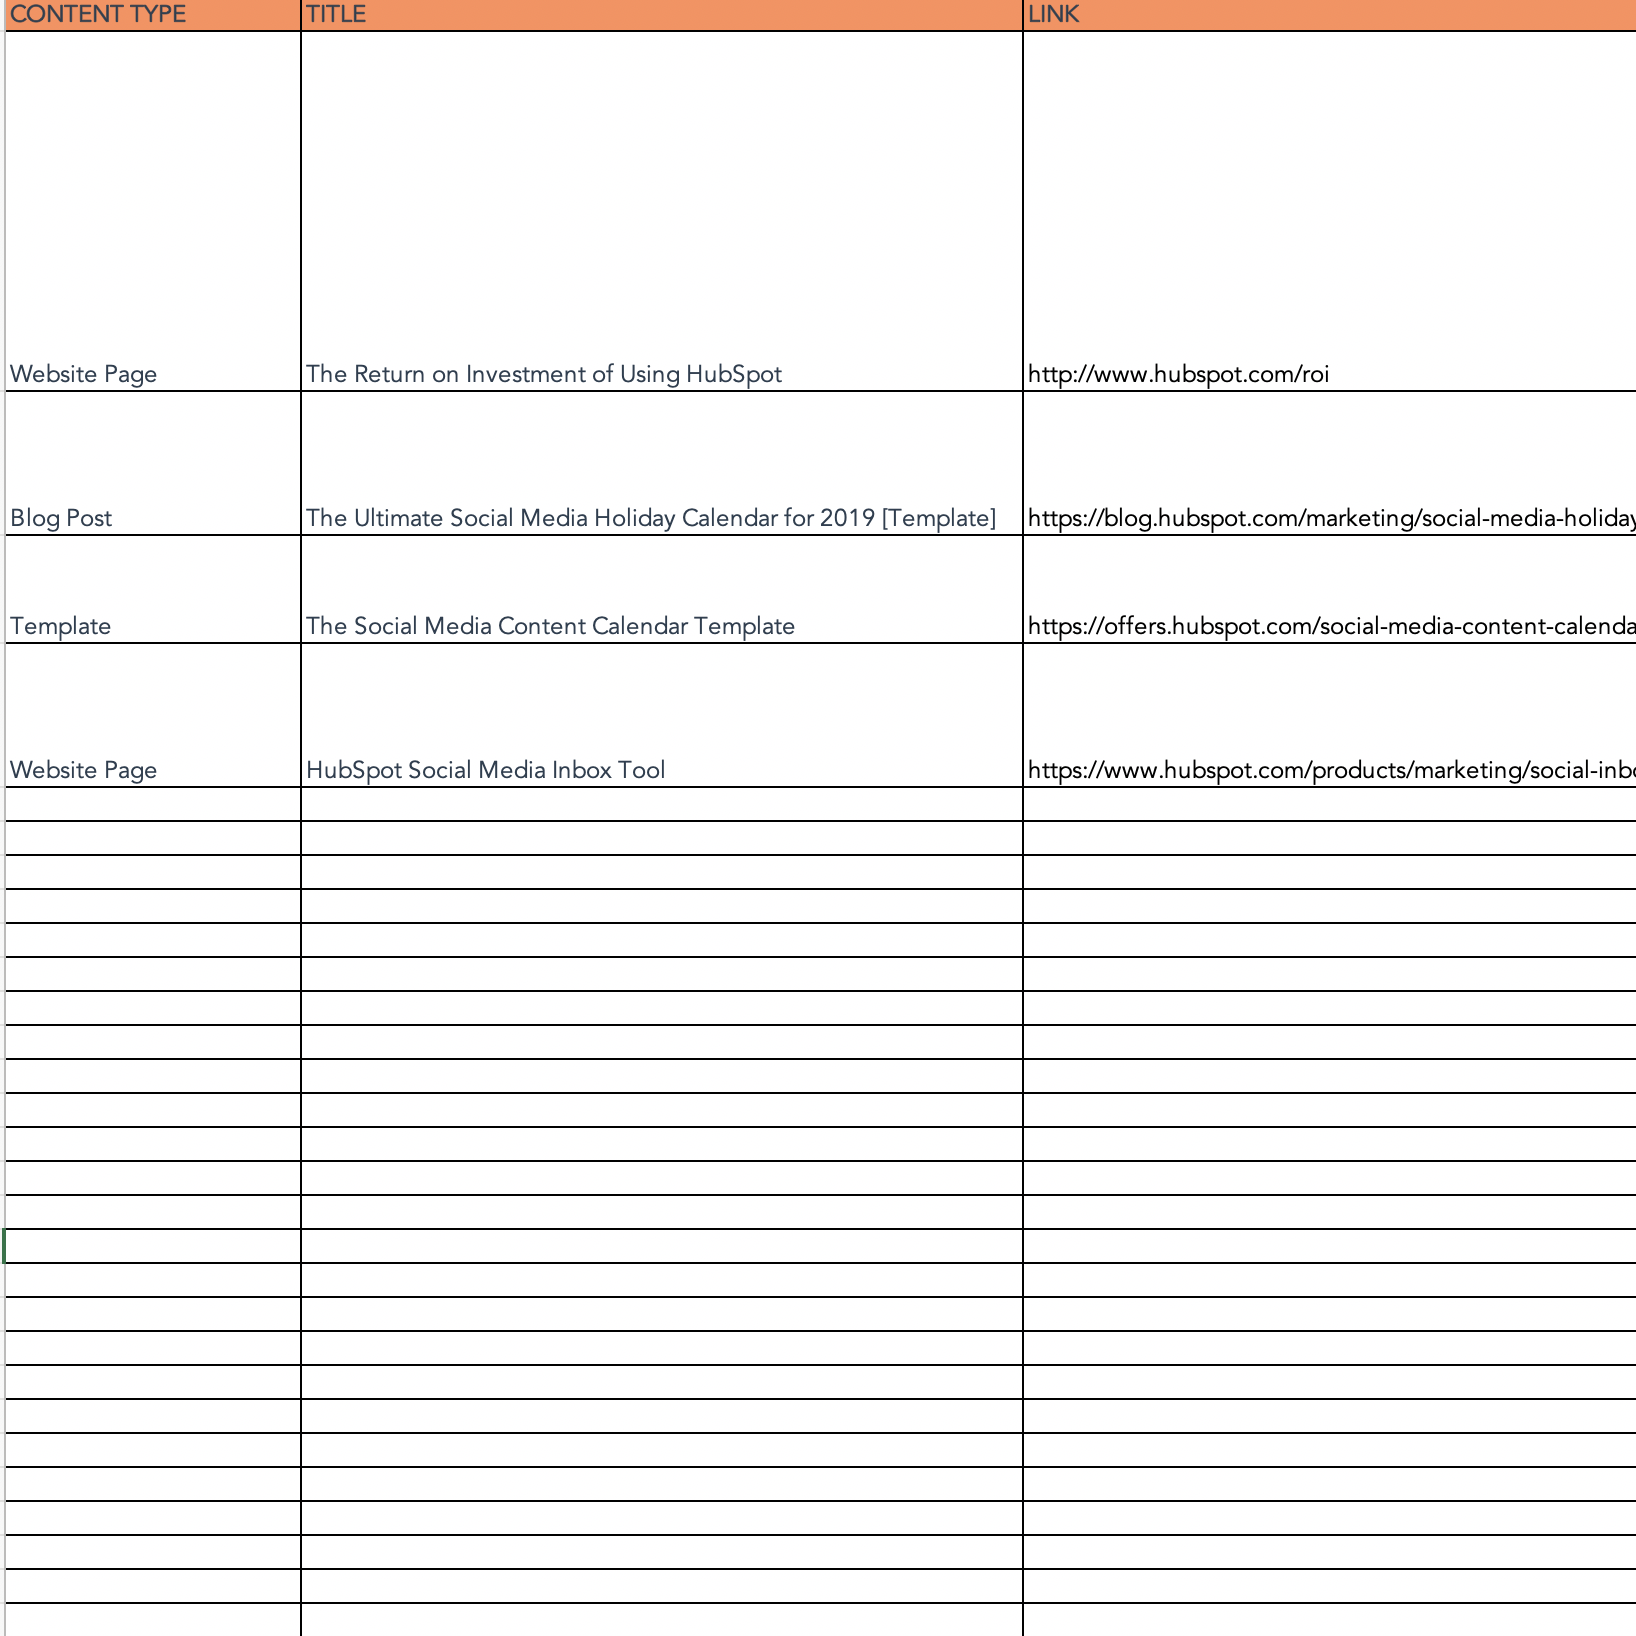
  • In the Content Repository tab, users can record the content they're publishing on this tab to keep track of which pieces have been promoted and to easily recall older content that can be re-promoted on social media.
  • On the Social Network Update tabs, users can draft and plan out social media posts in advance. These tabs are for organizational purposes, and the content of the posts themselves must be uploaded into a social media publisher.

For more on how to use the templates, check out this in-depth guide from my colleague Lindsay Kolowich.

This free resource can be used to draft social media posts, or it can be bulk-uploaded into a publishing app to maximize efficiency. (HubSpot customers: You can use this spreadsheet to organize content and upload it directly into Social Inbox. For instructions on how to do so, check out the template's cover sheet here.)

2. Google Drive

Content Calendar and Asset Organization

Google Drive has several helpful features that make it easy for social media marketers to build out an effective content calendar.

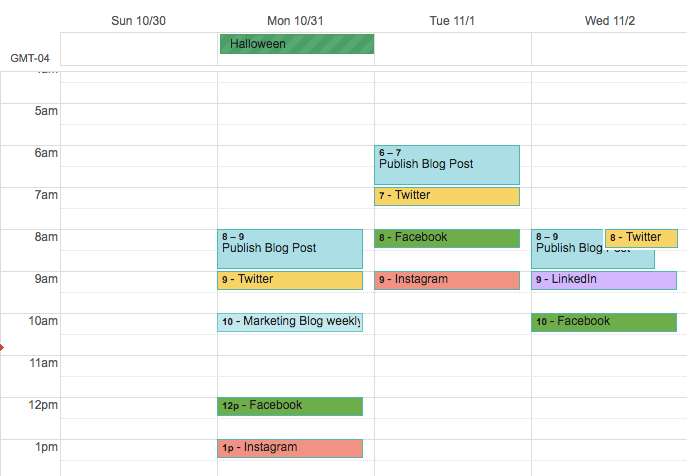
Here's an example of how a team might use Google Calendar to track both their editorial and social media calendars to make sure they're aligning posts with new blog content. These calendars can be easily shared with multiple teams to avoid scheduling conflicts and ensure that campaigns are aligned.

Social media calendar organized on Google Calendar

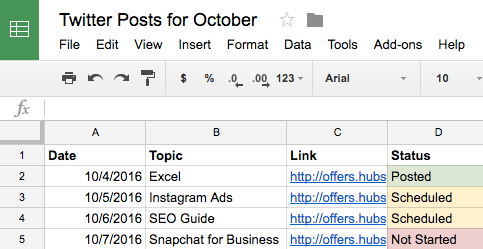
Marketers can also use shared Google Sheets to schedule posts on social media, track the status of different pieces of content, and assign tasks to team members -- all on the same platform as their calendar.

Social media calendar ideas listed on Google Sheets

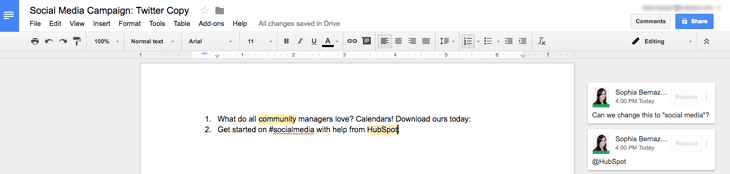
With the help of Google Docs, users can keep comments all in one place and can collaborate on different projects without emailing back-and-forth or having to schedule a meeting. This is a particularly useful feature when editing content for social media, which may need to be drafted and approved quickly.

Google Docs document with projects listed and comments on those projects

(HubSpot customers: You can link your Google Drive account to your HubSpot portal to easily upload files from Drive into your HubSpot software.)

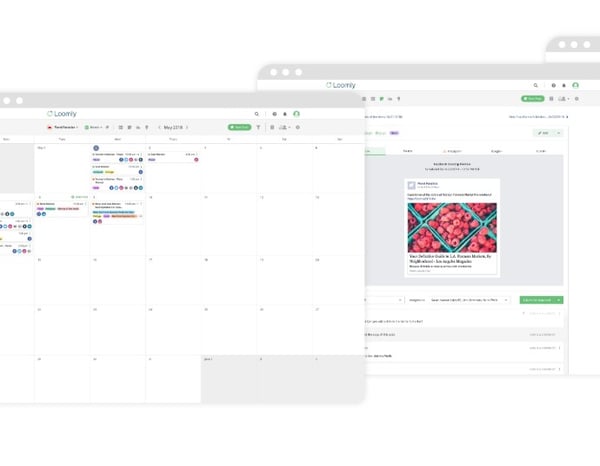
3. Loomly

Content Planning, Creation, Publishing, and Calendar

loomly social media calendar feature

Image Source

If you want more mileage out of a content calendar than publishing dates, you can turn to an all-in-one content planning and publishing platform such as Loomly.

Loomly offers tools beyond the management of content, going even so far as to provide post inspiration and ideas to help you create content. It also allows you to manage your content assets, schedule posts, manage them in both a list view and a calendar view, and analyze what's working.

Their most robust feature set, though, includes a collaboration and approval environment so that teams can submit mockups, provide comments, see version logs, and flag for approval. This can help you streamline for efficiency when it may otherwise seem as though there are "too many cooks in the kitchen" on a particular project.

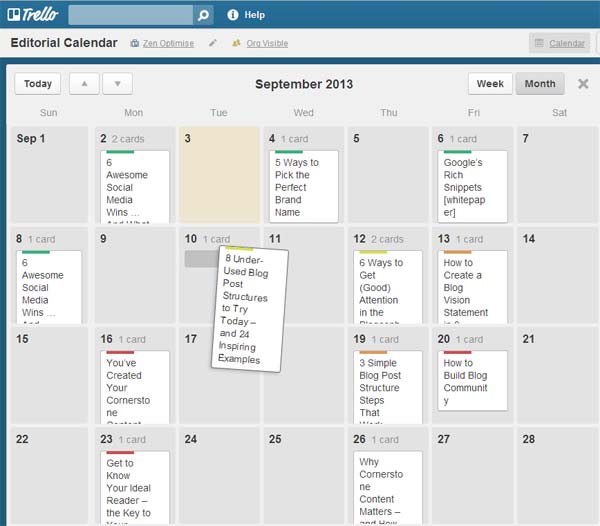
4. Trello

Task Management and Content Calendar

Social media calendar ideas organized on a Trello calendar

Image Source

Trello is another organizational tool that's highly effective for team collaboration. Trello also offers a full calendar view (shown above) which makes it easy to visualize what content is going out, and when. More specifically, social media managers can use Trello's flexible assignment “cards” and customizable “boards” and “lists” to map out to-do lists, manage a content calendar, plan a campaign, and house ideas from a brainstorm.

But you're not limited to just one structure: Users can customize boards according to their needs. For example, a team could create a board to organize social media posts for a given week, on a specific platform, or post ideas around a topic, such as a campaign or awareness day.

Trello cards allow for a ton of customization as well. You can track progress toward completing a checklist, which could be useful for social media marketers looking to track campaign progress.

Additionally, Trello cards can be assigned to different team members, marked with due dates, and commented on. Users can even customize labels with different publication statuses so the entire team can see the progress of their social media posts and when they're due on the calendar. The labels could also indicate different social networks that content is being published on.

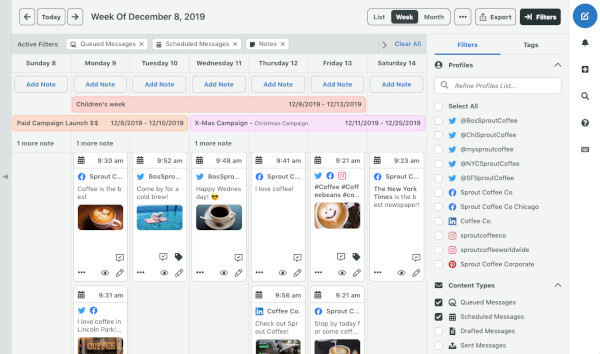
5. SproutSocial

Social Publishing and Content Calendar

social publishing and content calendar using sprout social

Sprout Social’s social media calendar and publishing tool makes it easy for teams or individuals to plan and schedule all of their social posts. You can schedule content to automatically post to Twitter, Facebook, Instagram, LinkedIn, Pinterest and more.

You can also tag each social post and add notes to better track and report on your posting strategy and campaigns. Additionally, their publishing suite includes a tool called Optimal Send Times which analyzes your social media data and automatically publishes at a time your audience is most engaged.

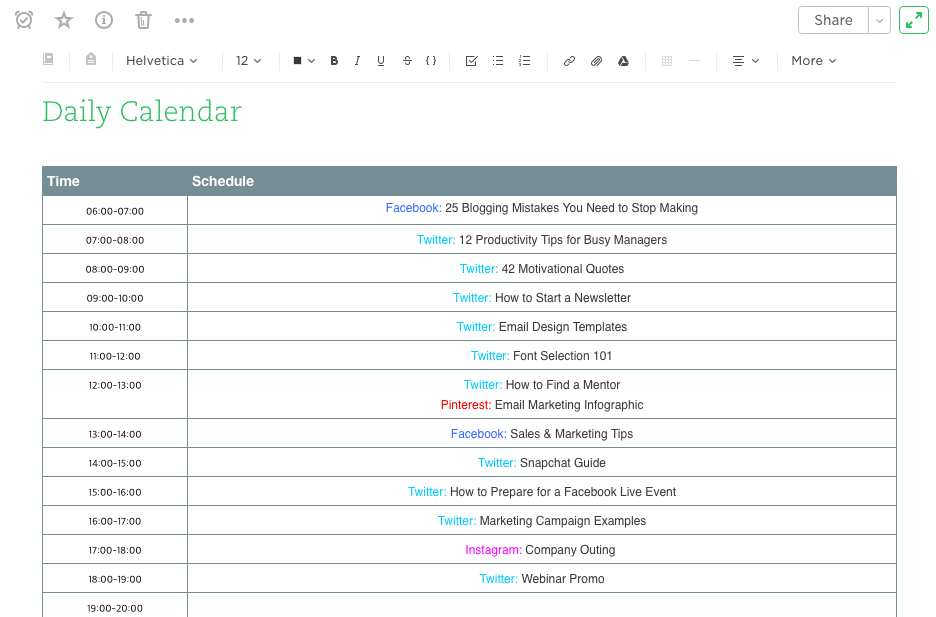
6. Evernote

Content Calendar, Task Management, and Asset Organization

Social media content calendar on Evernote

Evernote is a note-taking app that marketers can use to keep track of all the moving parts that comprise a social media campaign.

The tool also features yearly, monthly, weekly, and hourly logs, which make it easy to keep track of when you're publishing content on social media, when you're producing blog content, and other team-wide priorities. (Evernote offers customizable templates for each of these that can be downloaded into the app.)

Another useful feature? Evernote's Web Clipper extension for Chrome. Marketers can use this tool to easily save links to their Evernote Notebook for sharing later on.

The Evernote mobile app also boasts some interesting features to help marketers keep their social content ideas straight. For example, you can easily snap a photo and save it to your Evernote files for review later.

This feature is of particular valuable for social content creators looking to maintain a backlog of photos to publish on Instagram.

7. Hootsuite

Social Publishing and Content Calendar

hootsuite social publishing calendar features

Image Source

Hootsuite offers a built-in Planner tool to help you create campaigns, identify publishing gaps, and collaborate with your content creation team. Its primary features are in social publishing so that you can release content to your networks in advance, but it also has rich features for collaboration and post approvals. You can even curate content from other sources without logging into your account. Once your content is created, you can preview it with the Composer tool, which displays according to each social network's unique format.

8. Agorapulse

Social Publishing and Content Calendar

agorapulse social publishing calendar feature

Image Source

Similar to Hootsuite, Agorapulse offers social publishing tools and a content calendar so that you can manage your social media accounts with ease. This includes scheduling (or rescheduling), queuing, and bulk uploading posts, which is incredibly helpful for those who do quarterly or monthly content plans. What makes Agorapulse different, though, is its social inbox that allows you to manage all the interactions from various platforms in a single place. After all, content isn't just a one-and-done activity; it's about building awareness and engagement with your readers as well.

9. StoryChief

Content Planning and Distribution

storychief smart calendar feature

Image Source

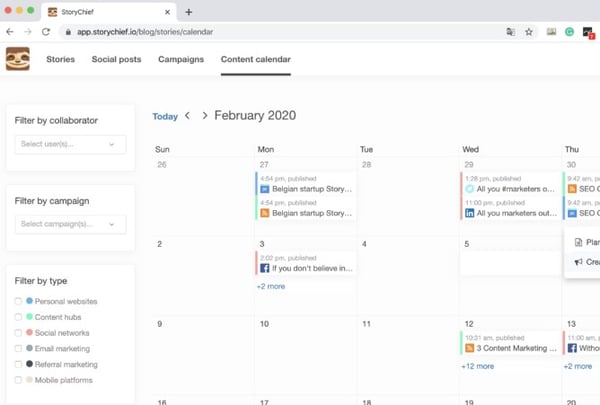
If you want more from your content calendar than simply knowing when posts go live, StoryChief is a good option. With StoryChief's smart calendar, you can better strategize and plan your content strategy across channels. It not only displays your timetable; it also allows you to assign collaborators to tasks and filter by campaign. StoryChief self-describes their tool as a "content distribution platform" that unifies analytics and publishing across multiple channels for a more simplified approach to content creation. Best of all, it syncs with your favorite calendar apps as well as HubSpot.

10. ClearVoice

Content Creation and Management

clearvoice editorial calendar

Image Source

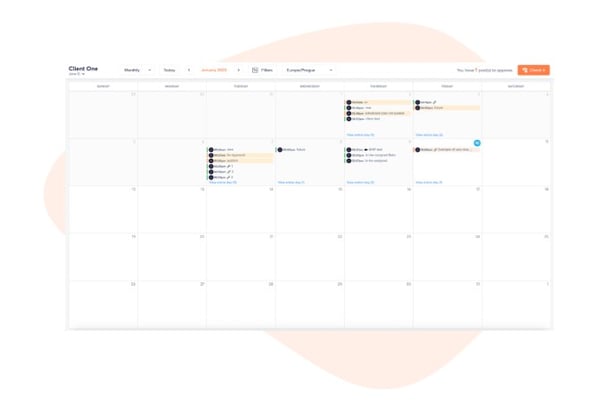
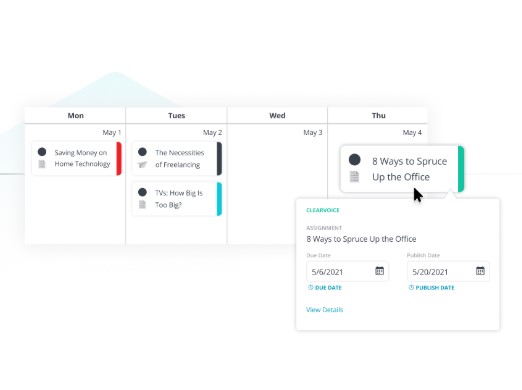
So what about content planning and creation? ClearVoice offers content creation tools to fit into your workflow. While their big claim to fame is their Talent Network Search which allows you to find and connect to content creators to work on your projects, ClearVoice also has features for task management for internal and external collaborators. You can create, edit, and approve projects in an interface that makes editorial management easy. They also have a dashboard and dynamic editorial calendar with plenty of interactive functionality, and there's integrations with other popular software.

11. Zerys

Content Creation and Management

zerys content calendar feature

Image Source

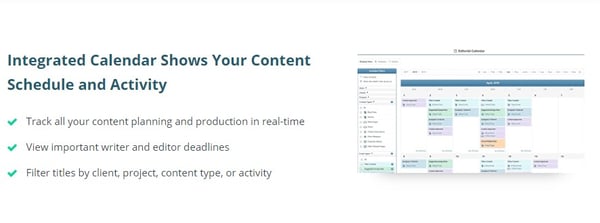
Zerys is another platform that matches you with your ideal content creation freelancers. However, it markets itself as a platform dedicated to content success, offering features for content planning, production, publishing, promotion, conversion, and analytics. You can manage unlimited content projects, plan keywords and titles for blog content, hire writers, and view all deadlines on an integrated calendar. Your in-house writers can use the platform, too, with the project management features that Zerys offers. It also integrates with HubSpot so that publishing is a breeze.

Social Media Templates

HubSpot's Social Media Calendar Template

If you're new to setting up social media calendars, HubSpot offers a pre-made, free, and downloadable template that you can use to schedule out full weeks of posts. 

HubSpot's Free Social Media Calendar Template

HubSpot's Social Media Content Calendar Template for Startups

This template is very similar to the one seen above but also has tabs that work as a repository for content ideas. The template also includes helpful tips for posting on specific social media networks. 

Social media idea repository tab on Social Media Calendar template from HubSpot

If you're aiming to get all of your ideas down in order to develop a big-picture plan for your social assets, we recommend starting with this template. 

Getting Started on Your Social Media Schedule

Now that we've reviewed a few helpful tools to kick your social media strategy into high gear, experiment with them. Every social media team is different, and it could be a combination of these tools that helps you execute your strategy efficiently to drive ROI. 

Editor's note: This post was originally published in 2017 and has been updated for comprehensiveness.


11 Social Media Calendars, Tools, &amp; Templates to Plan Your Content was originally posted by Local Sign Company Irvine, Ca. https://goo.gl/4NmUQV https://goo.gl/bQ1zHR http://www.pearltrees.com/anaheimsigns

How to Design a Process Infographic (And Where to Find Templates)

Have you ever wished you could just use a picture to explain a process instead of words (or your hands)?

A process infographic could be just what you need to show your audience how to do something or how a process works. A well-designed one can establish you as an authority on whatever subject you choose to cover -- whether you’re trying to show how your business’s coffee is sourced or train the new hire remotely.

Even better, they’re easy to create using a template or from scratch, meaning you can get started on one today.

What is a process infographic?

A process infographic simplifies and explains the steps of a process in primarily visual terms. Generally, it illustrates what happens during each step or phase with an intuitive layout that’s easy for the viewer to follow from start to finish. A well-designed process infographic makes the concept you want to share more accessible and saves you and the audience time.

Chances are, you encounter process infographics in some form pretty regularly in your daily life. Just imagine how much (more) complicated it would be to build your new Ikea desk if the instructions only included words and no visuals. Pretty daunting, huh?

Process infographics allow us to visualize how a process works more quickly and with more clarity. This makes them excellent training and educational tools -- but also a smart marketing strategy.

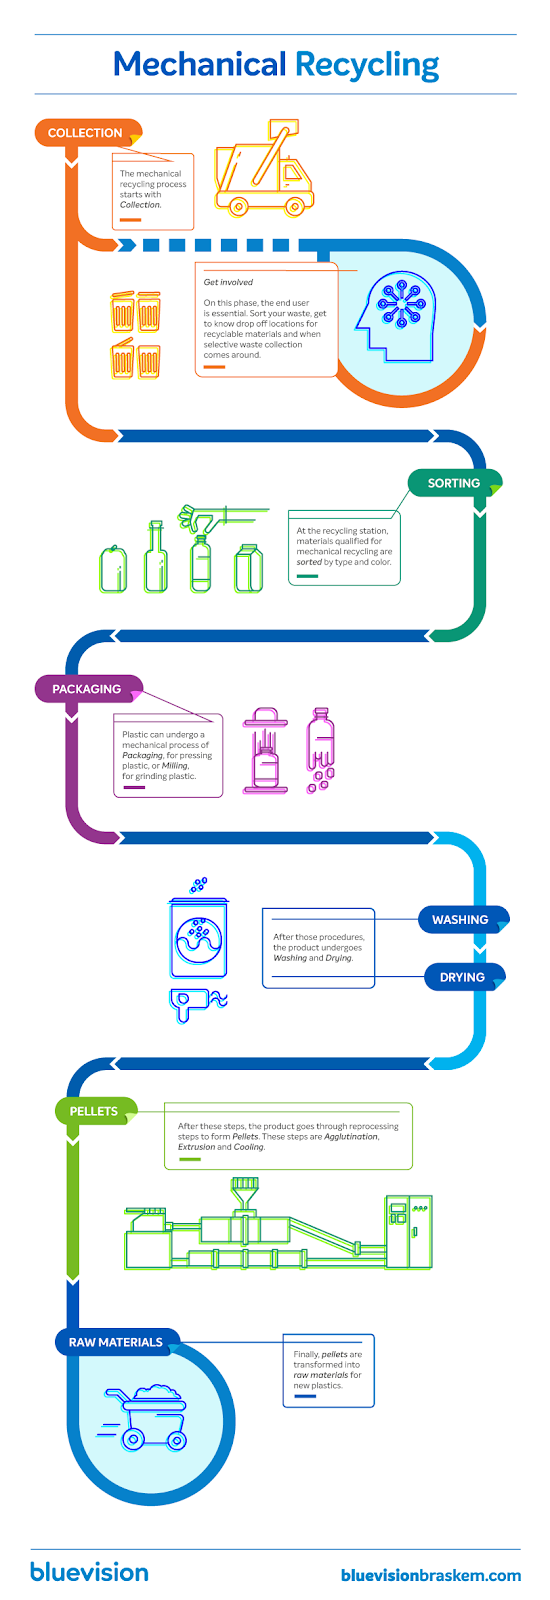
Here's an example of a process infographic that explains mechanical recycling:

Image Source: bluevision

For marketers -- particularly those of us who are trying to market products or services that require a bit of explanation -- process infographics are extremely helpful for connecting with potential leads and communicating your company's value. Explaining how your company's offerings can provide value to customers with visuals can make your marketing materials more memorable and impactful than using copy alone.

Where to Find Process Infographic Templates

If you want to create your own process infographic with a template, here are a few offerings for every budget.

Venngage

Venngage has a wide variety of process-specific infographic templates for a number of different purposes. If you're looking to essentially plug your process into a finalized design and go, you'll likely find what you want on Venngage. Monthly and annual subscriptions are available that give you full access to their template library and the ability to create and download your own process infographics.

Template available on Venngage

Canva

Canva has ready-made infographic process templates ideal for fun activities, recipes, and the occasional life hack. You can also create a blank infographic process template on the site if you can’t find one that fits your project. Canva has a free and paid version depending on your needs.

Template available on Canva

Visme

Visme's library of process-specific templates includes an extensive variety of different options, including more flowchart-style process templates than other infographic builder sites. If you're looking to translate a particularly complex process into a visual medium, Visme is a smart place to start your search for the perfect template. You can set up an account for free or get access to the full library as a premium member.

Template available on Visme

HubSpot

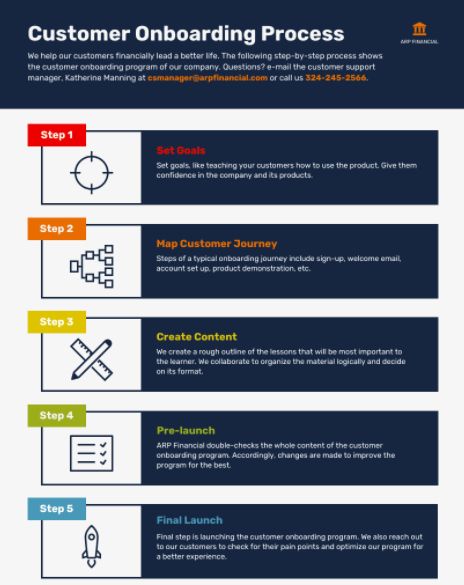
We would be remiss if we didn’t mention that HubSpot offers free infographic templates, including a number of process-specific templates that are easy to customize. All of our templates are free to use and compatible with PowerPoint, so you don't need to download any new programs or apps to use them.

Template available from HubSpot

DesignCap

DesignCap is an online graphic design tool with a curated selection of process infographic templates available to customize to your needs. While their selection is technically smaller than other template tools on this list, every template was created by a professional designer. They offer many templates for free and have paid plans starting at $4.99/month.

Template available on DesignCap

How to Create a Process Infographic Without a Template

If you can’t find a process infographic template that fits the process you want to visualize, you can always create your own from scratch.

For the mechanics of conceptualizing, structuring, and creating a cohesive design for your infographic, you can check out our step-by-step blog post here to develop your own infographic design in PowerPoint. Below, we'll chat through a few tips specific to process infographics you can apply to any design.

Pick one process to explain.

Process infographics are good at breaking down complex subjects, but you still want to limit the scope of your design to one single topic that can be explained in a linear way -- i.e., things that have a start and an end. Trying to explain too much in one visual can make your design confusing. Stick to one central idea per infographic.

Speak to your audience, not yourself.

This applies to most marketing strategies, but it's always important to remember that you are -- more often than not -- not your target audience. Chances are, you know a lot more about the subject of your infographic than your audience, so it's easy to fall back on that knowledge as you plan your design.

Because your audience knows less than you do about this subject, it's important to approach any complexity from their perspective, taking the time to explain more elements than you would need yourself.

Map out each step with a clear start and end.

As you start outlining your infographic, identify where your audience will start (what they likely know about the process before reading the infographic) and where you want them to end (what you want them to know by the end). With those specifics in mind, map out the steps of

Experiment with the layout.

What’s the best way to structure the information of your process infographic? This will ultimately depend on the “shape” of your information.

For example, a supply chain infographic will likely benefit from a straightforward, linear way of displaying information, but a process like how your company recommends specific products for different needs would need more of a flowchart style design. Experiment with different ways to lay out each step of the process you’re describing until you find one that makes sense.

Edit for clarity.

Once you have a draft of your process infographic completed, give it a re-read and check for areas that might be unclear or confusing. Or even better, ask someone else to review your work with a fresh pair of eyes.

Don't skip this final review -- the goal of your infographic is to make something complex more accessible, and not everyone learns new information in the same way. Having someone else take a quick look can help you refine your infographic so it suits a wider audience.

Visuals succeed where words can fail.

We've avoided using this particularly relevant cliche for this entire article, but here it comes: a picture really is worth a thousand words. Using visuals to aid in your explanations of complex subjects or processes can help make your marketing materials more accessible and human.

The next time you're tasked with breaking down a subject that seems to resist clear explanations, consider making a process infographic instead.


How to Design a Process Infographic (And Where to Find Templates) was originally posted by Local Sign Company Irvine, Ca. https://goo.gl/4NmUQV https://goo.gl/bQ1zHR http://www.pearltrees.com/anaheimsigns
Thursday, January 7, 2021

How to Find & Add Nofollow Links to Your Website [Step by Step]

Ever watch those game shows where contestants have to find the designer product in a sea of knockoffs?

Watching the contestants squint to examine the products is my favorite part. One, because I love game shows, but also because upon first glance, you really can’t tell the difference.

Well, nofollow links are kind of like that. You can’t tell them apart from regular links just by looking at them.

As Google continues to prioritize links in its ranking criteria, keeping track of them should be on your SEO to-do list.

So, how do you check for nofollow links and add them to your webpages? All those answers, and more, below.

This matters because links greatly impact your search engine ranking. And whether you’re linking internally or externally, doing so tells Google the destination page is valuable. This, in turn, may increase the page’s ranking — it’s called "link juice."

The better your link building, the better your chances of ranking higher.

So, when you tell Google to ignore a link, the destination page will not get any link juice. For instance, let’s say a food blogger uploads a blog post. The blogger can add a nofollow attribute to the comment section to tell Google, "Hey, any link included here isn't associated with me and I don’t vouch for it."

With Google tightening up its linking requirements, it’s important that brands understand how they work.

How To Tell if a Link Is Nofollow

To find a nofollow link, you can follow one of two routes: Use a tool that will do it for you (jump to that section here) or check it yourself. For the DIY option, here are the steps:

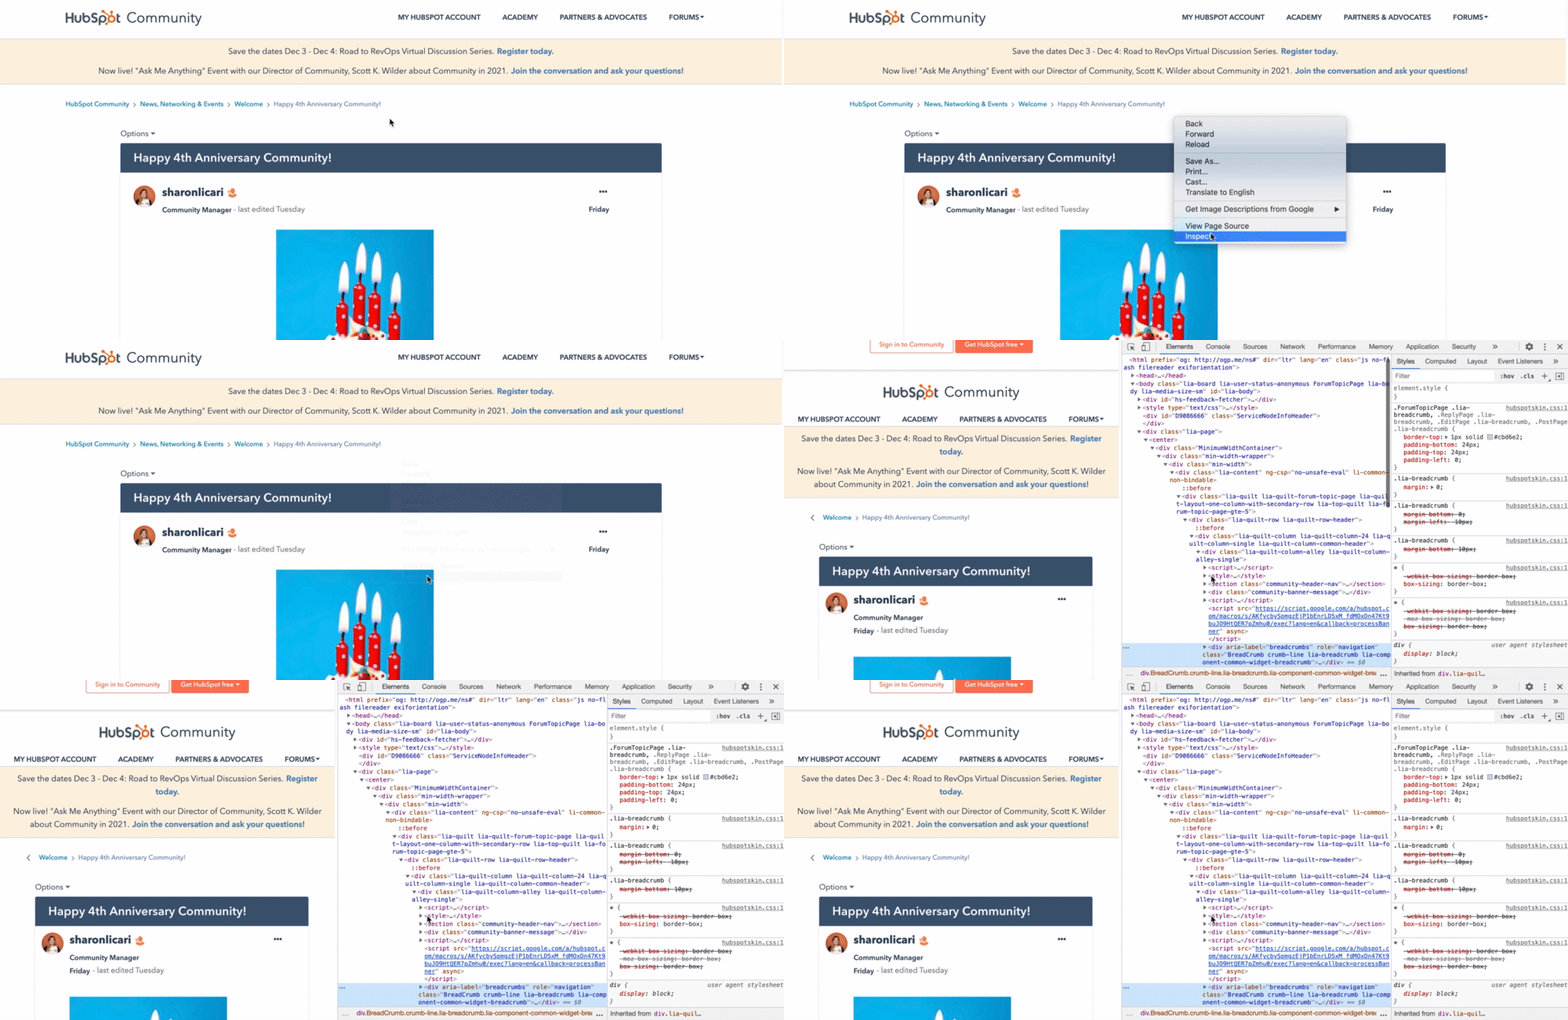
1. While you’re on the page, right-click and select the "Inspect" option.
Right click inspect tool

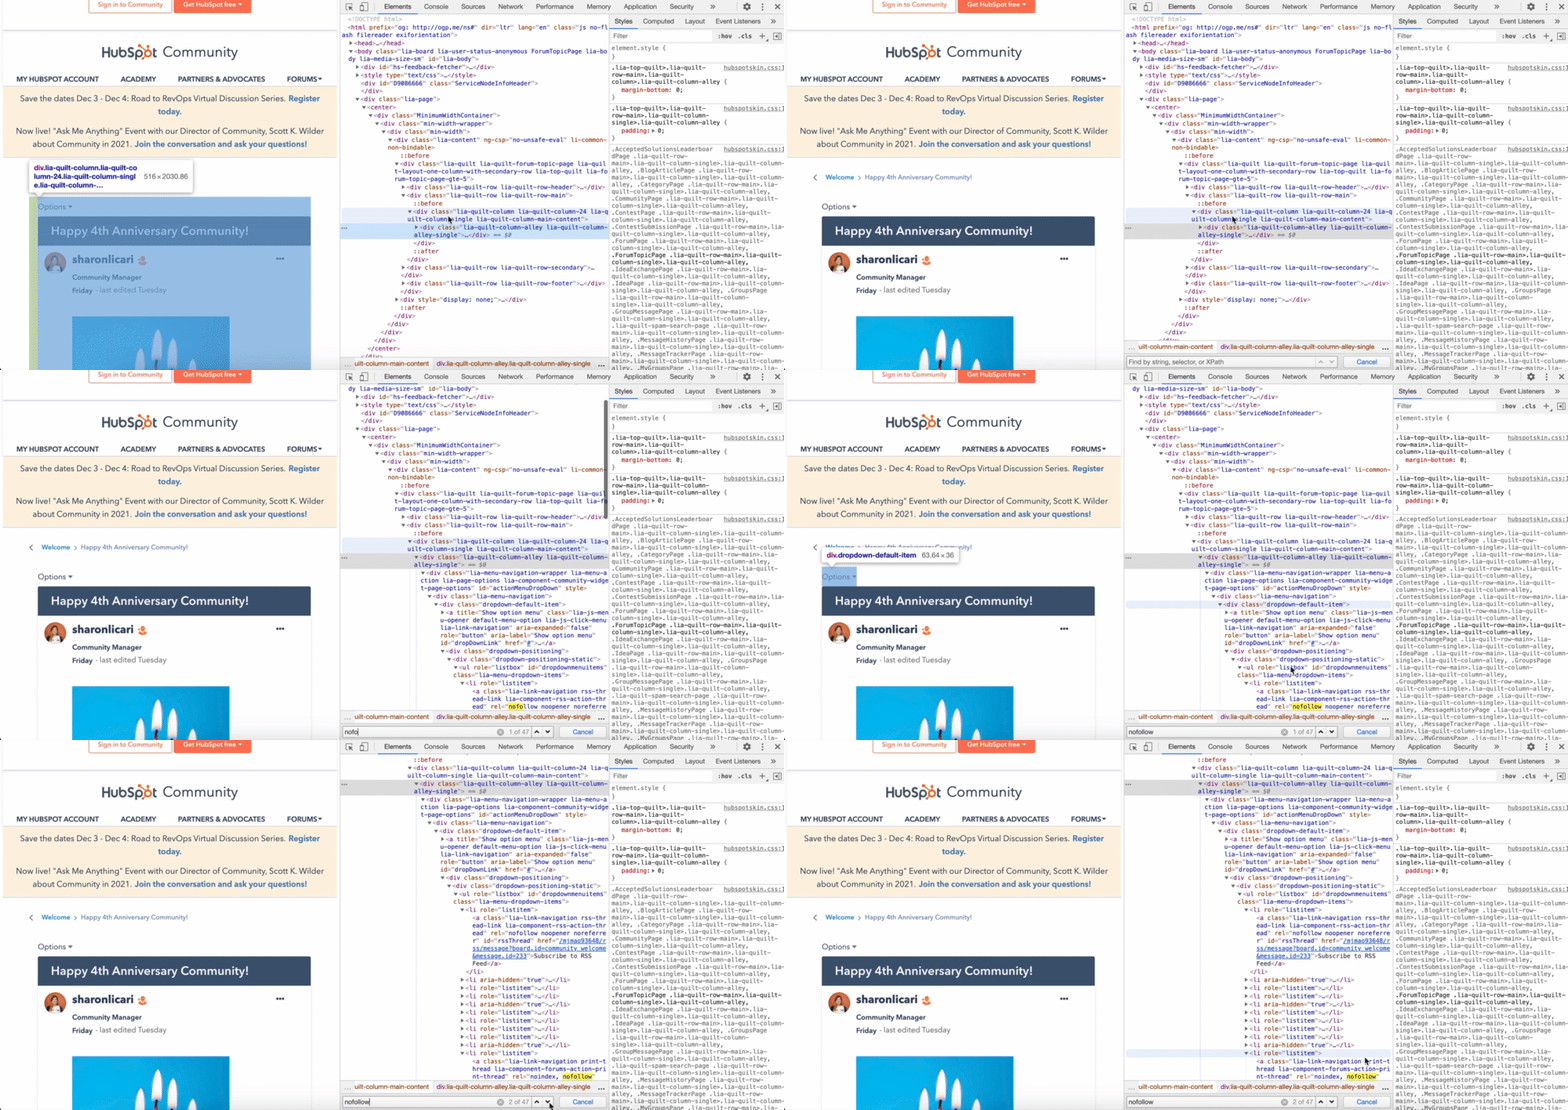
2. Hold Command + F or Ctrl + F to search for "nofollow" in the code.

Search "nofollow" in the code

3. Scroll to find the highlighted nofollow attributes. It should look something like this:

Nofollow Link Example

How To Make a Nofollow Link

Making a nofollow link is as simple as adding rel="nofollow" to the anchor tag within the HTML code. If that made no sense, no worries. Here’s the breakdown:

The code for a regular hyperlink looks like this:

When you’re adding a nofollow link attribute, the attribute will go between the destination URL and the linked text, like this:

Here’s an example using the HubSpot Blog:

Once you have the link, you can add it to the appropriate section of the source code on your content management system (CMS).

How To Make a Nofollow Link in WordPress

When making a nofollow link in WordPress, you have two options: manually inputting one into the HTML code or using a plugin. Find the steps for each below.

Making a Nofollow Link in WordPress Manually

1. Select the anchor text you want to add a link to.

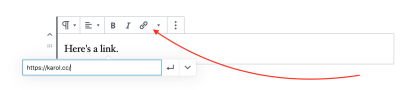
2. Click the link symbol to add a link into the field.

Red arrow pointing to link symbol

Image Source

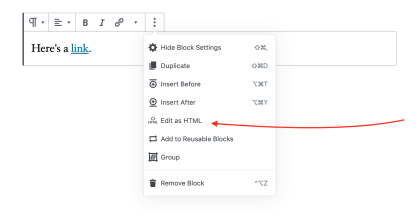
3. Click on the three dots and select "Edit HTML."

Red arrow pointing to "Edit as HTML"

Image Source

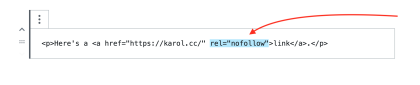
4. Add the rel="nofollow" attribute and you're all set.

Nofollow attribute within HTML tag

Image Source

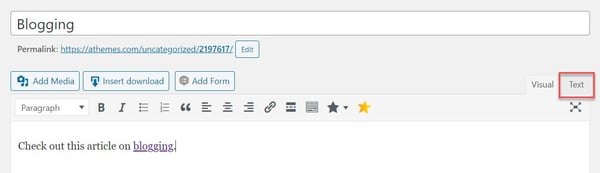
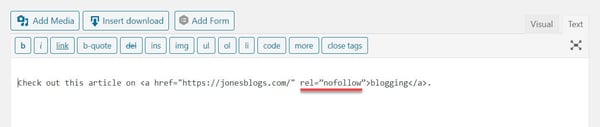
If you’re using an older version of WordPress, you may have to access the source code through the "Text" tab.

WordPress text tab

Image Source

Then, manually add the nofollow attribute.

WordPress source code

Image Source

Once that’s done, go back to the "Virtual" tab and continue editing the post.

Making a Nofollow Link in WordPress With a Plugin

When making a nofollow link with a plugin, the steps will vary depending on the plugin you install. However, here’s an example of how it works using the "All in One SEO for WordPress" plugin.

1. Start by downloading the plugin and making it active.

2. Create or edit a post or page.

3. In your editing text box, select the anchor text and click on the link symbol.

Add link symbol in WordPress

Image Source

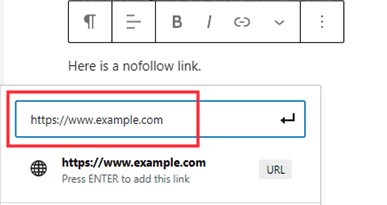
4. Paste the destination link into the field.

Field to paste destination URL

Image Source

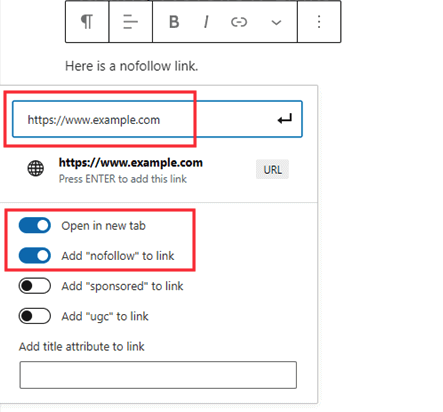
5. In the same box, you’ll also see additional options for the link, including the "Add ‘nofollow’ to link" option.
Adding Nofollow links in WordPress

Image Source

6. Make sure this option is selected, and you’re done.

Pro-tip: A lot of SEO plugins have the nofollow link feature included. So, if you’re looking to optimize your site, you can install a plugin with multiple SEO features.

1. MozBar

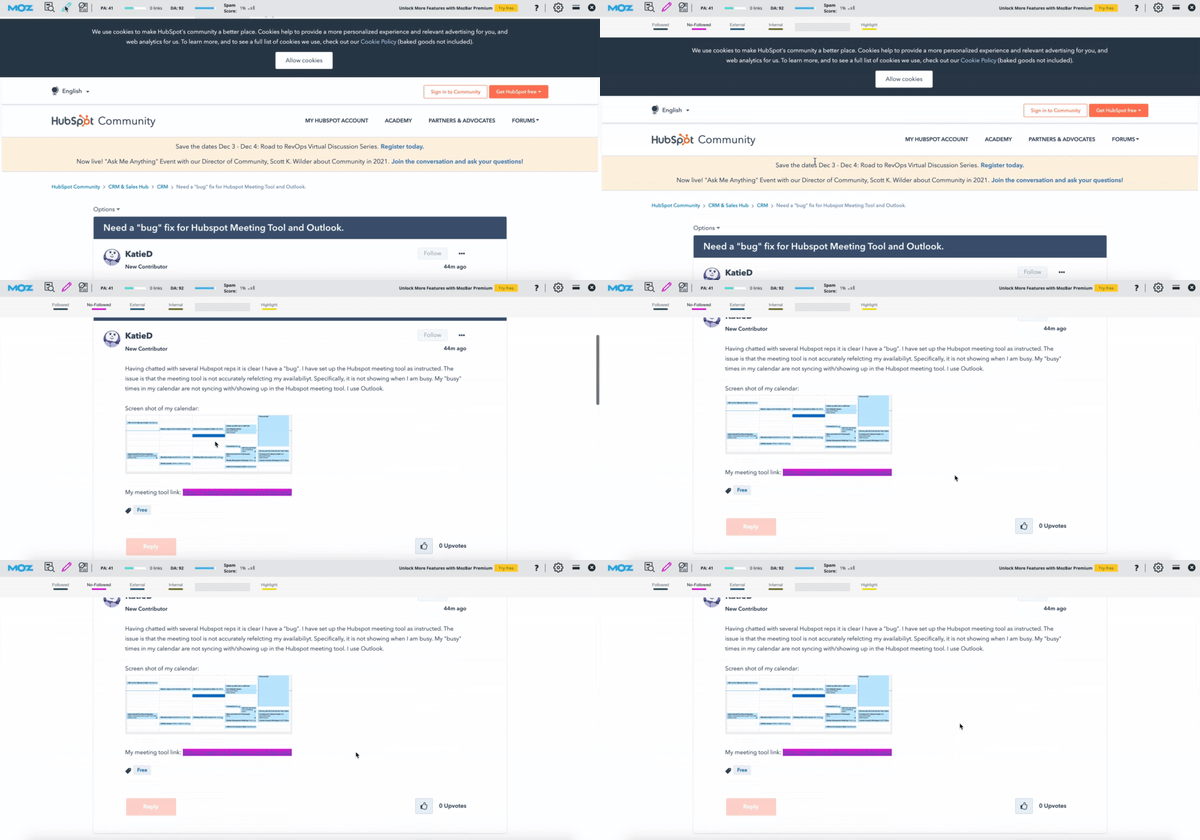
This free Google Chrome extension, created by the SEO software company Moz, highlights all of the nofollow links on a page in one click.

MozBar NoFollow Link Tool

It also tracks followed, internal, and external links as well as keywords on the page. MozBar identifies each link type by color, making it easy to quickly scan the page and find what you’re looking for.

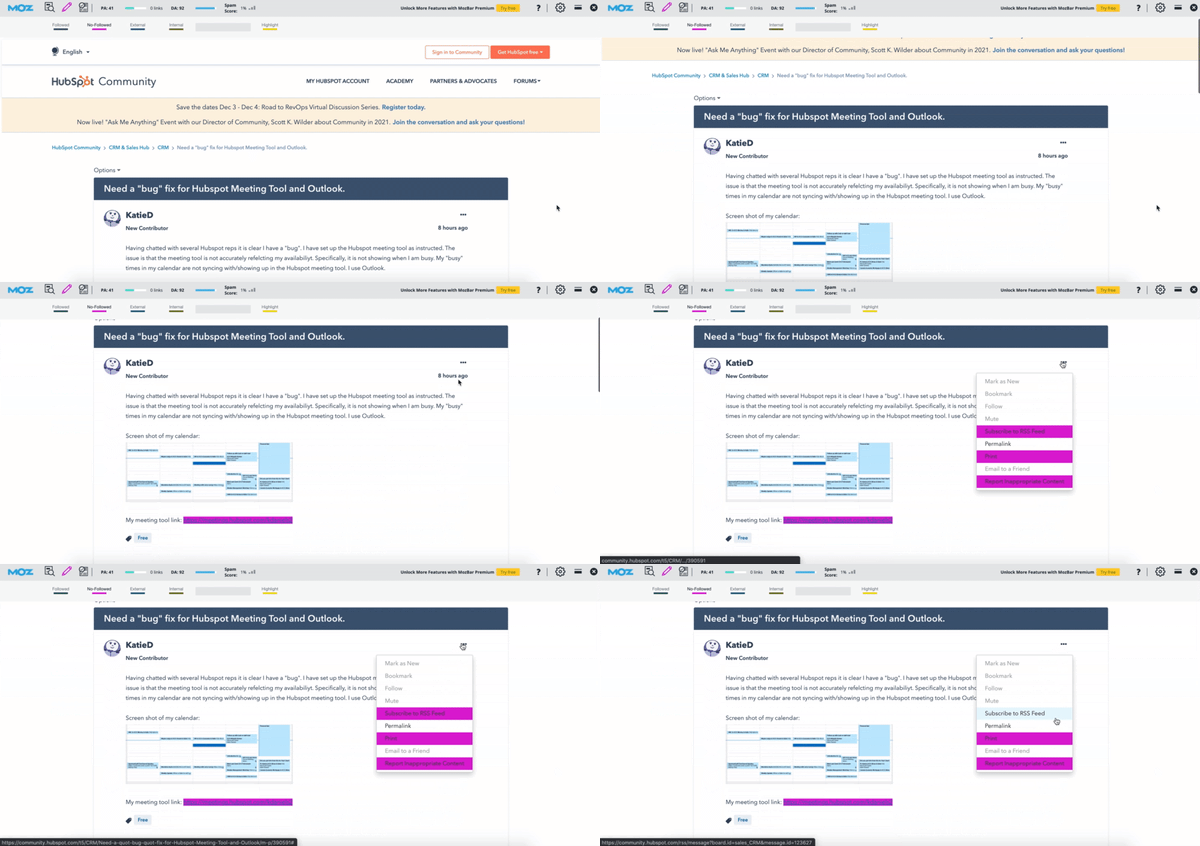
One thing to keep in mind while using the extension is that nofollow links under dropdown menus will not appear as you scroll down. You’ll have to click the menu to reveal the nofollow links. Confused? See the GIF below.

MozBar NoFollow Tool

2. Varvy

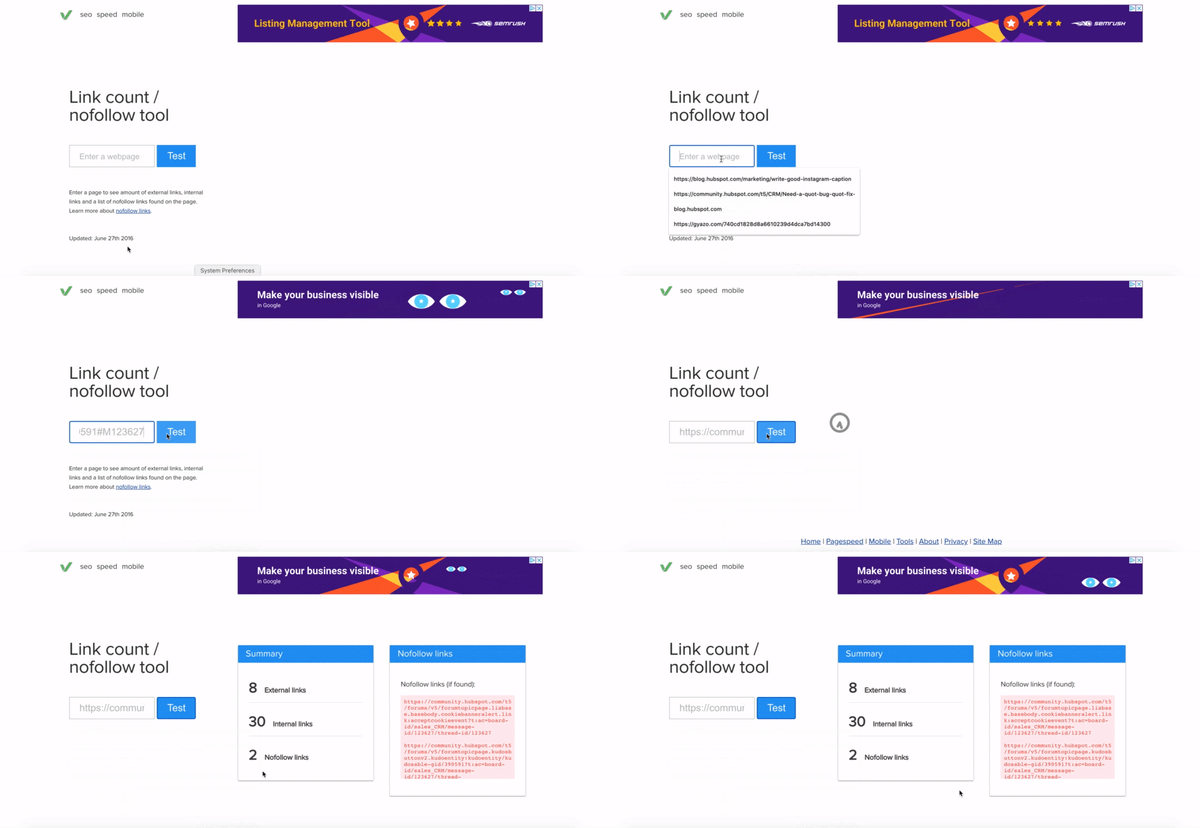
With Varvy’s free nofollow tool, finding nofollow links is as simple as entering the page’s URL and clicking "Test." It doesn’t offer a visual for where the nofollow links are located on the page, but it does tell you how many there are.

Varvy NoFollow Link ToolThis is one of the simplest ways to get an idea of how many nofollow links you have. From there, you’ll have to find other tools to accomplish your next steps.
3. NoFollow

NoFollow is a free extension available on Chrome and Firefox. Similar to MozBar, it identifies the nofollow links on the page and highlights them using a red dotted box.

NoFollow Chrome/Firefox Extension

As long as the extension is active, it will work on every page you visit without prompting. Just as with the MozBar, if a link under a dropdown menu has a nofollow attribute, you won’t see it until you click the dropdown menu.

So, think of yourself like a game show contestant. To win the SEO game, you have to take a closer look at your website links. This will keep you on Google's good side and increase your odds of landing (and staying) on the first page of the SERP.


How to Find &amp; Add Nofollow Links to Your Website [Step by Step] was originally posted by Local Sign Company Irvine, Ca. https://goo.gl/4NmUQV https://goo.gl/bQ1zHR http://www.pearltrees.com/anaheimsigns