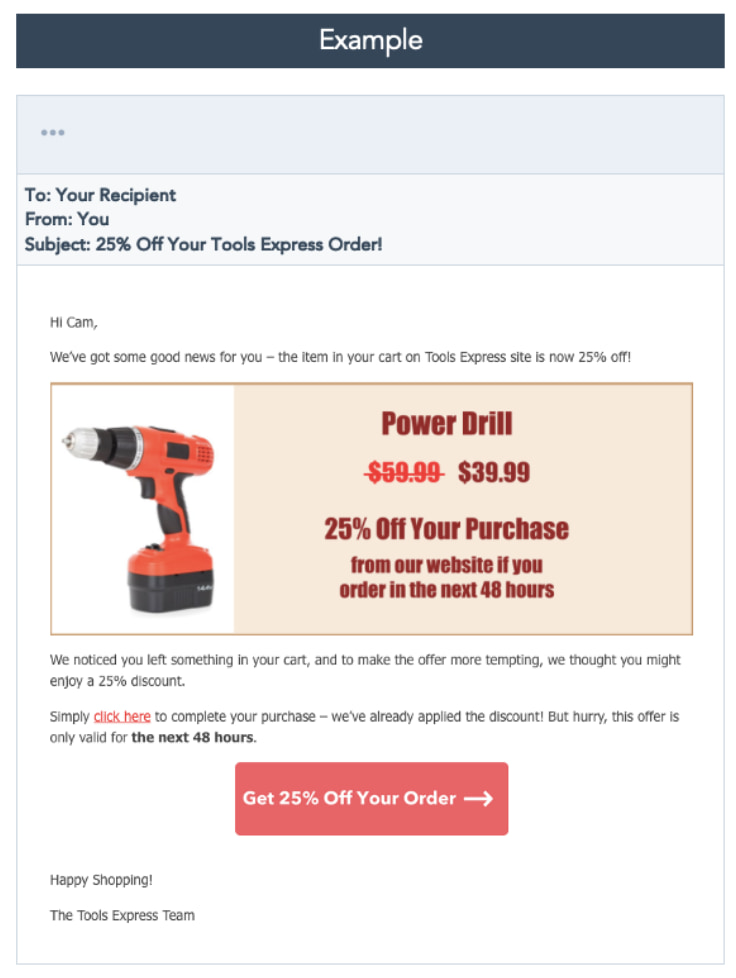
Using a video editing app is critical for creating a winning video marketing strategy. And if you're reading this blog post, chances are you already know you should incorporate more video content into your marketing, especially after the rise of remote work.But like most new strategies, you’ll need to prove its ROI before you get a budget. And that can be tricky because to make a great video, you need a few things — like a camera and editing software. You might already have a high-quality camera built into your smartphone, but editing your raw footage and preparing it for publication requires a third-party mobile app. You might even need to hop on the computer for the more extensive post-production projects.
![→ Access Now: Video Marketing Starter Pack [Free Kit]](https://no-cache.hubspot.com/cta/default/53/8f27c677-d952-4663-8787-bf65c6a1ecf2.png)
The good news: There are several free and inexpensive video editing apps you can download that run the gamut from super simple to Hollywood-level powerful. In this post we will delve into the best video apps for every device and click one of the links below to jump to a specific type of app, or keep reading to learn about them all.
Editing Apps for Videos: Standard Features
Every editing app will be different, but there are a few features you’ll want to look for. Because most apps will have a free and paid version, it’s important to know what’s essential and what might be worth an upgrade.
For every video app whether paid or free, it will include:
- Scrubbing through video as you edit.
- Choosing an aspect ratio that fits with your target platform (Instagram, Youtube, Facebook, TikTok, etc.).
- Adding text and shapes along with professional transitions throughout the shots.
- Exporting video with at least 480p quality with high definition exports up to 4k.
- Adding music to the video via stock music or your library.
The following solutions can help you make video magic — whether your video is meant for Instagram, YouTube, or a similar channel where your audience is hungry for content.
Instagram Video Editing Apps
The following apps allow you to edit and quickly upload beautiful videos to Instagram. None of these apps are limited to Instagram but are known for their support of this social network.
Price: Starts at free | Platforms: iOS, Android, Online

Image Source
Video automation is here — in the form of the Magisto video editor.
Owned by Vimeo, Magisto allows you to make incredible videos without ever leaving your smartphone in three easy steps: First, you'll choose your video editing style (the type of story you're telling), then you'll choose the photos and video clips you'd like included, and lastly, you'll pick your music from Magisto's built-in music library.
Using artificial intelligence (AI), this intuitive app helps organize your footage in a video that best delivers the message you have in mind. Why not stop at the free version? Upgrade to Premium or Professional for a small monthly fee and make longer movies with more of your own content.
Pros
- Easy-to-use templates for hassle-free creation
- Intuitive, beginner-friendly interface
- Online version available for creating both on Windows and macOS laptops
- Professional and Business plans come with a free Vimeo Pro subscription
Cons
- The “Created with Magisto” watermark will be visible unless you upgrade to premium
- No multi-track editing or 4K exporting
- Ideal for very short social media videos (< 3 minutes long)
- Stock videos are only accessible with a Professional plan
Price: Free | Platforms: iOS
Hyperlapse is an app created by Instagram itself that condenses videos into brief, hyper-speed videos that you can upload to Instagram or Facebook.
You can choose among a few different speeds, and the app will show you how long the hyperlapse video will be for every speed in comparison to the length of the video in real-time. (So a 40-second video in real-time will become roughly a 7-second video in Hyperlapse at 6X speed.) It's a cool way to capture something that usually lasts a while — like a sunset or an event setup.
See what happened when I used Hyperlapse to film daybreak at 12X in the video above.
Pros
- It's an easy way to speed up process videos.
- Use a minimal layout that’s nearly identical to the iPhone camera.
- You can capture videos straight from the app.
- No sign-in is required to get started.
Cons
- It only has one capability: speeding up videos
- You can’t import already-filmed videos into the app
- The video saves to your camera roll, taking up storage space
- No multi-track editing, 4K exporting, or other features typically associated with apps for video editing
Price: Starts at free on mobile | Platforms: iOS, Android, macOS, Windows
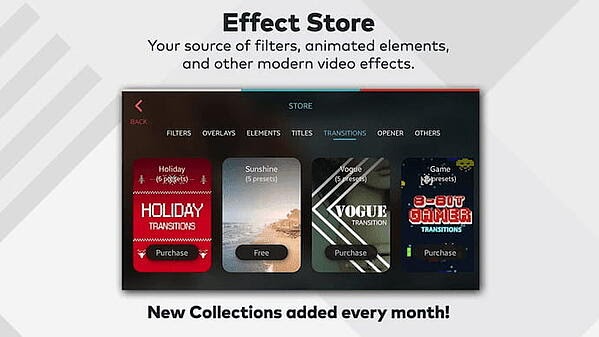 Image Source
Wondershare Filmora (formerly Wondershare Video Editor) is the perfect option if you want to start with basic video editing functionality with the opportunity to get more advanced as you go. The app is perfect for Instagram but can create audience-ready videos for numerous platforms.
Filmora is available for Windows and Mac computers, whereas the company's FilmoraGo mobile app is free to download for both iOS and Android devices.
Filmora's "Easy Mode" strips away the complexity so you can drag and drop video clips, add some music, and produce a finished video in a matter of minutes. The FilmoraGo app has many of these features, plus an Effect Store where you can incorporate preset intros, themes, and transitions into your video creation.
Sounds too good to be true? Well, you're right: The free version of Wondershare Filmora adds a watermark to your videos that you can only remove through upgrading to their paid service.
Pros
- This app is a powerful option for both beginner and advanced video editors.
- The desktop version offers multi-track editing and more traditional video editing capabilities.
- The mobile version includes easy-to-use effects, stickers, and filters.
- You can layer music and different sounds in the mobile app.
- Relatively affordable (starting at less than $50 per year for Filmora X, and free for the mobile app) compared to competitors such as Adobe.
Cons
- The desktop apps are not free, but a trial is available.
- Videos are watermarked with the Wondershare branding unless you upgrade to a premium plan.
Price: Starts at free | Platforms: iOS, Android
There are times when you just want to edit a video — no fancy collages and no splicing. For that, there's InShot, a handy app that lets you trim, speed up, or add music and filters to video. It's pretty fundamental, but with that comes a high ease of use. You can also add a background if you like, though we think it's pretty cool to have an overlap of images — like we did with the video above.
I took a simple video of a tranquil beach scene, but enhanced it with InShot's "warm filter" and added a fitting musical track to it — a song called "Pikake Stream," by Kalani. (I recommend viewing the video in its entirety with headphones, especially if you're having a stressful day.)
Pros
- It's a great app for beginners and marketers who don’t have a lot of time for intensive video editing.
- Built-in music library with royalty-free options.
- You can add voice-overs and your music.
- The app has a 4.8-star rating on the Apple Store and over 1M ratings.
Cons
- There's no desktop app available.
- Filters and stickers are only available with a paid subscription.
- Your video will be watermarked unless you upgrade to the paid version.

Top Free Video Editing Software
The following tools are the most versatile mobile apps of all the free software listed in this article.
Price: Starts at free | Platforms: iOS, Android, Chrome OS
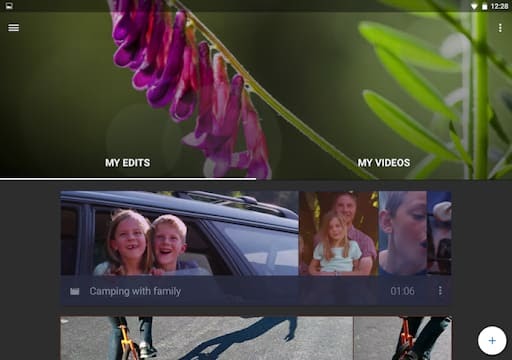
Image Source
Cloud-based video editing software (i.e., software that you access via a browser instead of downloading directly to your hard drive) is growing more and more popular. One of the programs leading the charge is WeVideo.
WeVideo offers some advanced features and functionality, including audio editing capabilities, a library of commercially licensed music, and the ability to share videos in 4K resolution. However, the free version of WeVideo isn't without its limitations.
One major downside is that you're only given 10GB of cloud storage. If you're making a one-off video, this is fine. But if you're planning to edit multiple videos, you'll need more space. The free version also puts a WeVideo watermark on your videos, which isn't ideal.
WeVideo is also available as a desktop computer product and comes with free and paid plans. For a complete breakdown of the differences between these plans, check out WeVideo's pricing page.
Pros
- You can access your videos from any device
- Paid versions are relatively cheap (starting at $4.99 for the Power version)
- 4K exporting available
Cons
- Only 10GB of storage and 5 minutes of published video are available on the free version
- The maximum resolution is 480p on the free subscription
- Your video will be watermarked with WeVideo’s branding unless you upgrade
Price: Free | Platforms: iOS
Splice allows you — as the name suggests — to splice together different video clips on your phone to create a moving collage.
We had a lot of fun playing with this one, especially since Splice even contains a library of musical tracks that can be used as a background for your finished product. You can also use the app to trim and edit the different pieces of video and customize transition lengths from one scene to the next.
My colleague, Amanda Zantal-Wiener, experimented with Splice by compiling the above 15-second video of her dog — using only an iPhone 6.
Pros
- Easy and intuitive to use
- Familiar user-friendly interface
- Multi-track and timeline editing with layers and masks
- No sign-in required
- No watermark, even for free subscribers
Cons
- Subscription starts at $2.99/week, or $12.97/month, which is pricier than other alternatives
- Effects and music are only available for paid subscribers
Price: Free | Platforms: iOS, Android
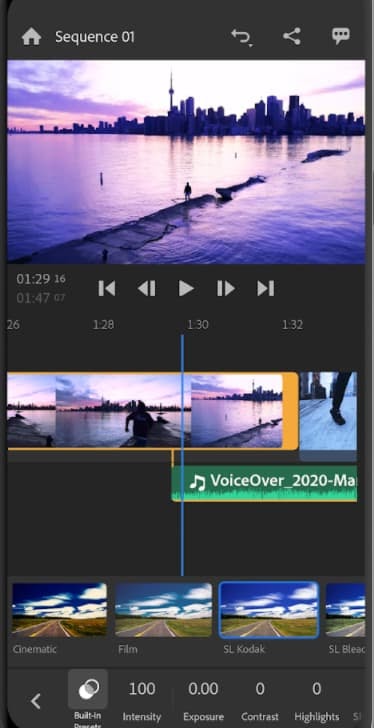
Image Source
Adobe's popular video editor, Premiere, isn't just available on your mobile device — it's free.
Melissa Stoneburner of Examiner.com calls this app a "gateway" into the full Adobe Premiere Pro video editor for desktop, and we can see this for ourselves. Similar to Magisto (the first video editor on our list), Adobe Rush automatically sets your video to the music of your choice (using Premiere Rush’s library or your own), and offers a Freeform editor that allows you to customize your edits further after this initial audio sync.
Premiere Rush's equally robust video editing features help you trim, drag, and drop multiple video and image clips — right from your mobile device's photo and video album — in the order you'd like.
Then, just add proper lighting, manipulate the speed of the video, and share your final product directly on Facebook, Twitter, or YouTube.
Pros
- It's a natural choice for current Adobe users.
- Premiere rush offers a familiar video editing interface for those with experience and an easier learning curve for beginners.
- The paid version supports 4K exports.
Cons
- Some users report exporting and crashing issues on the Android version.
- Limited storage capabilities (<100GB) for free users
Price: Free | Platforms: iOS, Android
We've already covered the coolness of photo collages. But what if you could make a video collage? PicPlayPost is a simple app that lets you do exactly that. Just remember that the sound from both videos will play at the same time, so be sure they won't clash with one another.
There are many uses for a video collage app, but my colleague, Lindsay Kolowich, particularly likes the way fitness professional Melissa Made uses it on her Instagram account. She posts video collages with her performing a workout on one side, while she explains the workout out loud on the other.
Pros
- You can create alternative formats such as gifs and live photos
- 4K exporting available
Cons
- Most valuable features are available on the paid version only
- You can’t paste text from another app
- Video will be watermarked with the PicPlayPost branding unless you upgrade
Best Video Editing Apps for YouTube
Although the video editing services below do not offer mobile versions, they do offer easy-to-learn functionality at minimal cost. These apps are the best for sitting down at your computer and editing amazing video content for your YouTube channel.
Price: Free | Platforms: Windows, macOS, Linux
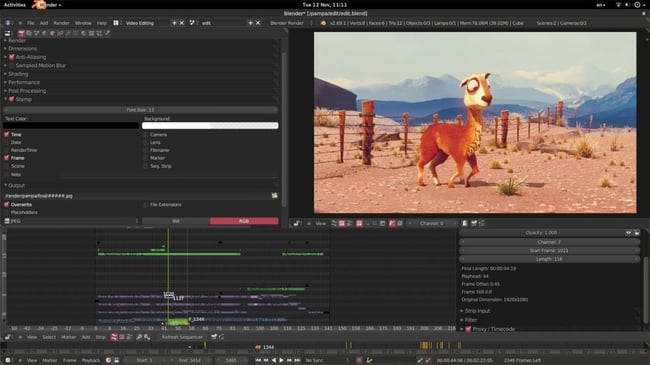
Image Source
The open-source program Blender is more than just a video editor: It's a full-blown 3D animation suite, which allows for modeling, rendering, motion tracking, and more.
On the video editing side, there are a ton of features, including transitions, speed control, filters, adjustment layers, and more. There are also 32 slots available for adding video clips, audio clips, images, and effects, which means you can produce some incredibly complex video.
For the amateur video editor, all the options can be a bit overwhelming. But if you're looking to produce truly professional-quality video — without having to deal with watermarks — Blender is a solid option. The best part: "You are free to use Blender for any purpose, including commercially or for education," according to its website. For the fine print, check out its licensing info.
Pros
- Blender has a long history of use across multiple platforms.
- You can render, model, sculpt, and animate using this app.
Cons
- There's a steep learning curve for beginners.
Price: Free | Platforms: Windows, Mac, Linux
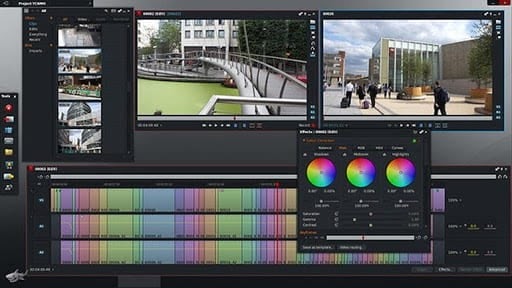
Image Source
Like Blender, Lightworks is definitely on the more advanced (and powerful) end of the video editing software spectrum. In fact, it's a program that's been used to edit some well-known and award-winning films, including Pulp Fiction, The Wolf of Wall Street, and The King’s Speech.
There are two different licenses you can choose from with Lightworks: "Free" and "Pro." (The latter of which, as you might have guessed, requires that you cough up some cash.) The main difference between the two licenses is that the Pro version offers more features, including stereoscopic output and advanced project sharing. But the free version is still quite powerful, providing 100+ effects and supporting multicam editing.
Pros
- Like Blender, Lightworks has a long history of use across multiple platforms.
- You can access royalty-free videos and audio from the desktop app.
- You can export up to 4K.
- Multi-track editing and timelines, even in the free version.
- You can buy a lifetime license for $437.99 and never worry about renewing a subscription.
Cons
- There's an extremely steep learning curve for beginners.
- Limited options for creating titles and subtitles.
- Users have reported formatting issues when importing video clips.
Price: Free | Platforms: Windows, macOS, Linux
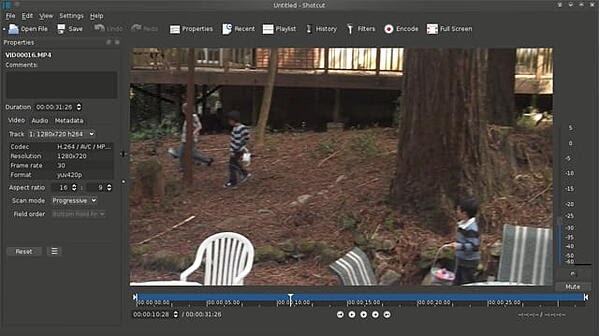
Image Source
Shotcut is another open-source video software — and it's completely free. It's possible to use Shotcut to create professional-looking videos, but the interface is tricky to use. Perhaps that's because it was originally developed for the Linux platform, which looks and feels a lot different from the typical Windows or Mac UX.
With dedication — and time spent in the Shotcut frequently asked questions and how-to guide sections — it's possible to use this software to create and export high-quality videos, completely for free.
Pros
- It's completely free—you never have to upgrade, ever.
- The diverse list of features rivals those of paid apps.
Cons
- Shotcut could be difficult to get the hang of at first.
- Some users find the UI difficult to navigate.
- It's less intuitive compared to other apps such as Premiere Pro and FinalCut, even for experienced editors.
Price: Free | Platforms: Windows Only
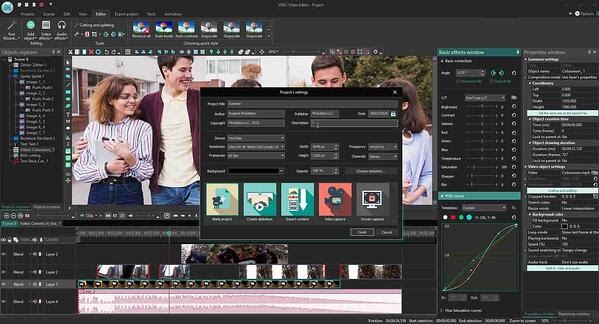
Image Source
In experienced hands, the VSDC Free Video Editor can produce professional-looking videos. In addition to supporting nearly every major video format, the program offers advanced video effects, including object transformation and color correction, as well as advanced audio effects like volume correction and sound normalization. And unlike WeVideo, the VSDC Free Video Editor is truly free. You can use the program's full feature set without having to deal with pesky watermarks.
Unfortunately, there is one catch. If you want technical support, you need to pay. (And because there is a bit of a learning curve, there's a good chance you'll need assistance.) Support for the VSDC Free Video Editor costs $9.99 for one month and $14.99 for one year.
Pros
- The free version is packed with typically premium features such as masking, blending modes, and 4K exports.
- You can share your video directly from the app to YouTube, Vimeo, and other platforms.
Cons
- You have to pay for support if you’re using the free version.
- Not as user-friendly as other alternatives.
- Users have reported a steep learning curve.
Price: Free | Platforms: Windows Only
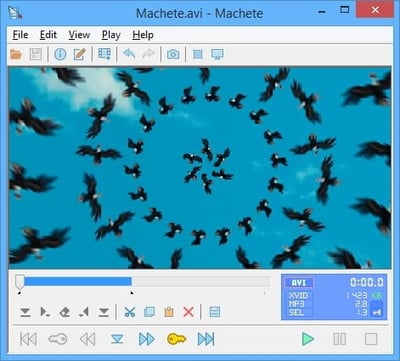
Image Source
At the simple end of the spectrum is Machete Video Editor Lite, a free program allowing you to cut, copy, and paste different sections of video. As the Machete website puts it, Video Editor Lite was "designed for quick and simple 'slicing' of your video files."
The program's intuitive interface means you won't have to waste time shuffling through technical support documents. And because Video Editor Lite doesn't re-encode your video files when you slice them, you don't have to worry about losing video quality.
The main downsides to the program? It only supports the AVI and WMV video formats, and it doesn't allow for audio editing. Still, if you have zero video editing experience and only need to make simple edits, it's a great option.
Pros
- This app offers simple but powerful slicing and editing capabilities.
- It's an incredibly simple and user-friendly interface; simply download and go.
Cons
- You can only export AVI and WMV files.
- You can’t edit or replace the audio.
- The website is outdated with limited support documents.
Price: Free | Platforms: Windows, macOS, Linux
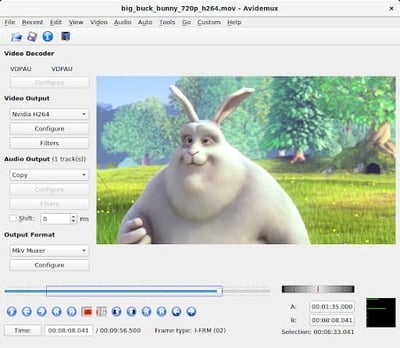
Image Source
Like Machete Video Editor Lite, Avidemux allows you to do basic video editing (no audio editing) without having to worry about losing video quality. But Avidemux also has a few more tricks up its sleeve.
For starters, the program supports multiple video formats, including AVI, DVD, MPEG, QuickTime, and MP4. What's more, Avidemux comes with several filters that allow you to perform a host of different functions, from flipping and rotating clips, to adding subtitles, to adjusting colors and brightness levels.
And while the learning curve for Avidemux is slightly steeper compared to Machete Video Editor Lite, the upside is that there's an extensive Avidemux wiki that covers everything you need to know.
Pros
- Supports multiple file formats such as AVI, MPEG, MP4, and Microsoft’s proprietary ASF
- Simple interface that’s best for tasks such as cutting and splicing footage
- Easy learning curve; simply download and start using
Cons
- Limited capabilities compared to other apps (especially mobile apps)
Price: Starts at free | Platforms: Windows, macOS
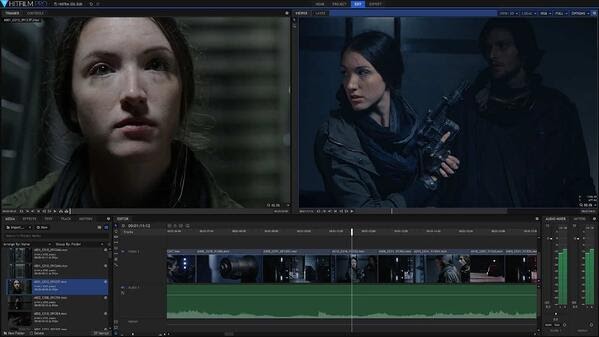
Image Source
HitFilm Express is a free video editing and visual effects software — which means you can use it to add more than 180 special effects to your videos, including 3D editing.
Possibly the coolest HitFilm feature is its wealth of tutorial videos — users can practice applying special visual effects in movie tutorials based on Star Wars, Westworld, and more.
Of course, upgrading to HitFilm Pro grants access to more visual effects, better high resolution and 3D rendering, and better audio syncing between audio and video files. It costs $300, but if you're not ready to fully invest, HitFilm Express users can purchase lower-cost expansions to use more tools in their software.
To see the complete list of differences between HitFilm Free and Pro, check out their "Compare Versions" page.
Pros
- Powerful capabilities such as mask rendering, export queues, and unlimited tracks and transitions
- Built-in voice recorder for easy voice-overs
- Has been described as a mix between Adobe After Effects and Adobe Premiere Pro
Cons
- Beginners may experience a learning curve.
- Some users have reported crashing issues.
Video Editing Apps for Android
These video editing apps are particularly appealing for Android mobile users, though some of them are compatible with more than just the Android operating system.
Price: Free | Platforms: Android, iOS
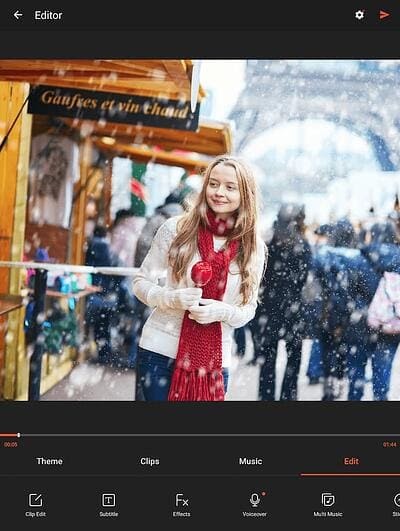
Image Source
VideoShow allows you to edit video content in many creative ways beyond cutting and pasting scenes together. The award-winning app, which has more than 400 million users, allows you to include text overlays, stickers, music, filters, and sound effects in your footage. Because of these features, it lends itself to video producers who want to add a bit more creativity to a vlog series, where the video is primarily of one person speaking directly to the camera.
Pros
- Easy-to-use yet powerful, with HD exports available for free users
- Expansive music library
Cons
- Your video will be watermarked with VideoShow branding if you’re not on the paid version
- You can’t export the video without upgrading to the paid version
Price: Free | Platforms: Android, Windows, macOS
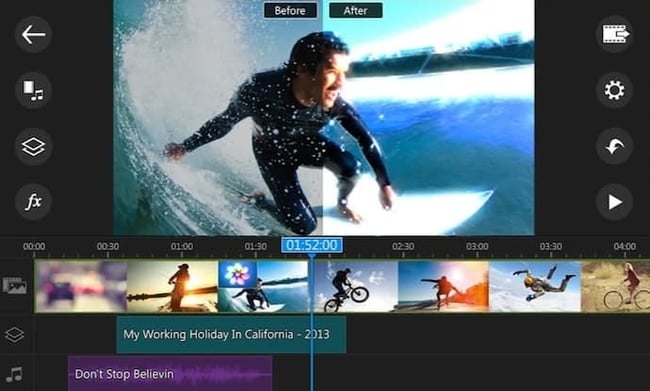
Image Source
This robust video editor has a suite of creative design tools just for Android and desktop users. Developed by CyberLink, the app can help you create 4K-quality videos from footage taken with numerous devices. Special features include motion tracking, which helps you focus on specific subjects in each frame; video collages, which help you piece together numerous photos into a motion video; and video stabilization, allowing you to remove moments of "shaky camera" in your footage. PowerDirector can also help you add voiceovers and creative sound effects using chroma key.
Many of PowerDirector's features are completely free in the Android app. For a more advanced suite of editing tools, you can invest in one of CyberLink's paid products starting at $99.
Pros
- Powerful features such as green screen editing, motion graphics, and keyframe controls
- Incredibly low price compared to competitors such as Adobe
- Multi-track editing and timelines
- The company constantly adds new graphics and templates for users to choose from
Cons
- Some users have reported that it can be buggy
Price: Free | Platforms: Android, iOS, macOS, Windows
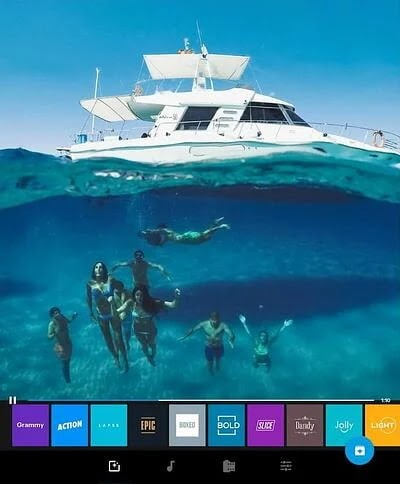
Image Source
Quik is a video editing tool developed by GoPro, making it the software of choice for people who are editing footage from their GoPro camera. But yes, it can edit content from any source.
The app can manage up to 75 photos and video clips in one project, and can even comb through this content to help you make smart editing decisions based on what the app detects in the footage. From time-lapses to panoramic pieces, Quik can manipulate your media in lots of creative ways. The app has more than 20 preset themes to choose from and supports eight common file types.
Pros
- Easy-to-use and intuitive app
- Automatically imports photos from your camera
Cons
- This software no longer receives updates from its manufacturer
- You only have access to the cloud when you upgrade to GoPro PLUS
Price: Free | Platforms: iOS, Android, ChromeOS
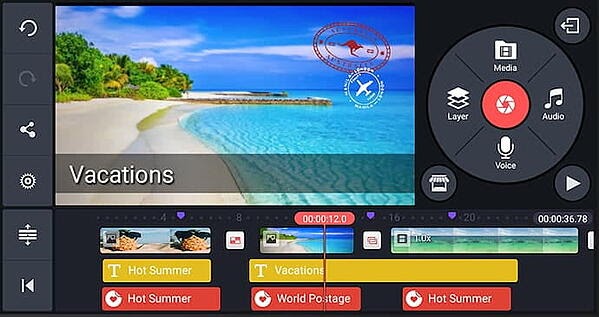
Image Source
KineMaster is a super-versatile video editing tool that allows you to edit videos on "multiple layers." What does that mean? Content creators can add an unlimited amount of text overlays, images, audio, and even free handwriting onto their footage for the artistic detail they or their brand needs. You can also blend multiple pieces of footage and use double-exposures to customize the background in a load of creative ways.
For simpler editing tasks, of course, this app offers intuitive trimming and splitting features to make your video progress just the way you want it to.
Pros
- Powerful features such as multi-track editing, layers, and blending modes
- Over 3M reviews on Google Play and an average rating of 4.5 stars
- You can share on YouTube, Instagram, and Facebook straight from the app
- 4K exports available
Cons
- Your video will be watermarked with the KineMaster branding if you don’t upgrade to Premium
- Limited access to assets on the free version
Price: Free | Platforms: iOS, Android
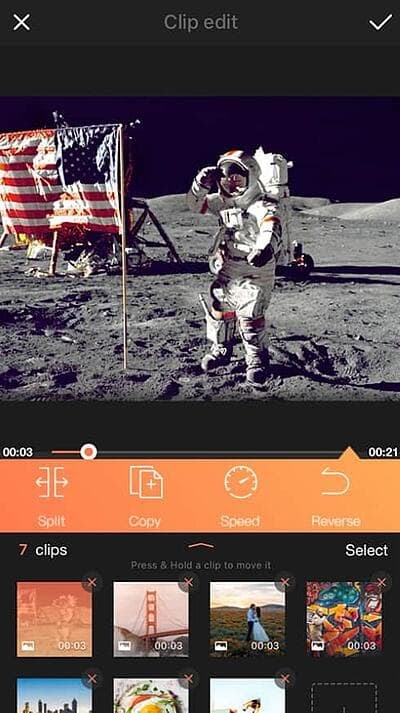
Image Source
VivaVideo makes professional-level edits easy for content creators. Free for all mobile devices, the app allows you to trim, merge, speed up, slow down, and reverse clips and images in a short amount of time. The app also comes with a simple collage- and slideshow-maker and offers a variety of camera lenses to capture new, edit-ready footage directly in the app.
Pros
- Fun on-trend filters, templates, and effects
- Expansive music library with hundreds of clips to choose from
- Multi-track editing allows you to layer voice clips and music
Cons
- The five-minute time limit for videos
With most people working from home, the importance of video can’t be overstated. But unless you get the right app for video editing, you’ll run the risk of publishing videos that look unprofessional and unpolished.
With these apps, you’ll be sure to create a video that attracts, converts, and delights your audience. The sooner you download one, the sooner you can sharpen your audio/video creation skills and attract more people to your brand.
Create Better Videos for a Higher ROI
Online video content isn't just watched more — it's expected more. Luckily, you have the video editing tools to help you delight your audience and improve conversion rates across your social media accounts. Grab the guide below to make the video learning curve easier and to jumpstart your video marketing efforts.
Editor's note: This post was originally published in March 2019 and has been updated for comprehensiveness.
 The 20 Best Video Editing Apps for 2022
 was originally posted by
Local Sign Company Irvine, Ca. https://goo.gl/4NmUQV https://goo.gl/bQ1zHR http://www.pearltrees.com/anaheimsigns


![→ Download Now: Market Research Templates [Free Kit]](https://no-cache.hubspot.com/cta/default/53/6ba52ce7-bb69-4b63-965b-4ea21ba905da.png)