Wednesday, February 2, 2022

The Ultimate Guide to Google Sheets

Google Sheets is one of the best tools you can use to store data, track performance metrics, and create dashboards and reports.

But while it’s a wondrous tool with countless features and functionalities, it can be hard to grasp for beginners — especially if you need to create a marketing report or dashboard, fast.

Not to worry. If you’re looking to get started with Google Sheets, you’re in the right place. In this guide, we’ll be looking at the benefits of Google Sheets and walking you through some of the basics so you can get up to speed quickly and efficiently.

→ Access Now: Google Sheets Templates [Free Kit]

Benefits of Google Sheets for Marketing

Saying that marketers are data-centric people is an understatement. Between return on investment, cost per acquisition, and more, they’re always looking at different metrics and reporting on progress.

It can be tricky to keep all of those numbers straight, though. That’s where spreadsheets come in handy. With a well-organized spreadsheet, marketers can quickly analyze robust data sets and make smarter, more informed decisions about their efforts.

Originally introduced by Microsoft in 1987, Excel was the go-to tool for years for building spreadsheets. But when collaborative, cloud-based tool Google Sheets was introduced in 2012, many users made the switch over to this new (free!) resource.

Let’s talk about the benefits of using Google Sheets for marketing purposes before we discuss more traditional options (like a standard Excel spreadsheet).

  • It’s cloud-based. Cloud-based spreadsheets are automatically saved, stored, and maintained via a remote server. That means that you can access it online from anywhere, any time. Plus: Google Sheets is also available offline.
  • It’s free. No expensive software required — Google Sheets is always 100% free.
  • It works across devices. Modern marketers switch between devices throughout the day — and Google Sheets accommodates that behavior. You can access and edit Google Sheet data from a wide variety of devices (like your smartphone, tablet, and computer).
  • Add-ons are available. We’ll get into the specifics of add-ons for Google Sheets a bit later, but the increased functionality and flexibility of these additional features makes this spreadsheet tool even more versatile and powerful.

You might be wondering: What’s the difference between Google Sheets and Excel? The short answer is: price, collaboration, and flexibility.

While Excel requires a software subscription (which costs about $130), Google Sheets is free for all Google account holders. In terms of collaboration, Excel requires you to save and send a new version when edits are made, while Google Sheets automatically updates a single shared file for all team members. And lastly, because Google Sheets has the ability to accommodate many different integrations, it’s often more flexible than a standalone software solution like Excel.

Common Google Sheets Terms to Know

Next, let’s get familiar with some of the language and common terms used when referencing data within Google Sheets.

  • Column: Columns are vertical cell sets.
  • Row: Rows are horizontal cell sets.
  • Cell: Cells are the single data points within a Google Sheet.
  • Range: Range refers to a selection of cells across a column, row, or both.
  • Function: Function refers to built-in operations for the Google Sheet that can be used to quickly calculate values, to manipulate data, and more.
  • Formula: Formulas combine functions, rows, cells, columns, and ranges to generate a particular end result.

How to Use Google Sheets

Now we’re ready to dive into the more advanced how-to’s and lessons on using Google Sheets.

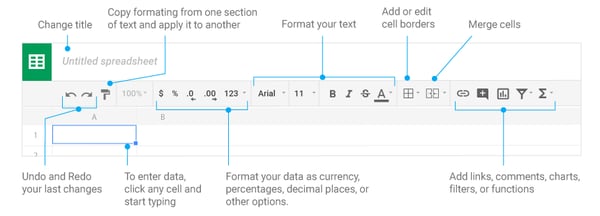
Understanding the Google Sheets Toolbar

One of the very first things to do is master the icons located in the Google Sheets toolbar. Doing so will help ensure you’re getting the most out of its abilities and that you’re saving time with shortcuts. Take a look at the screenshot below to identify some of the basic icons and their purposes within the toolbar.

google-sheets-toolbar

Image Source

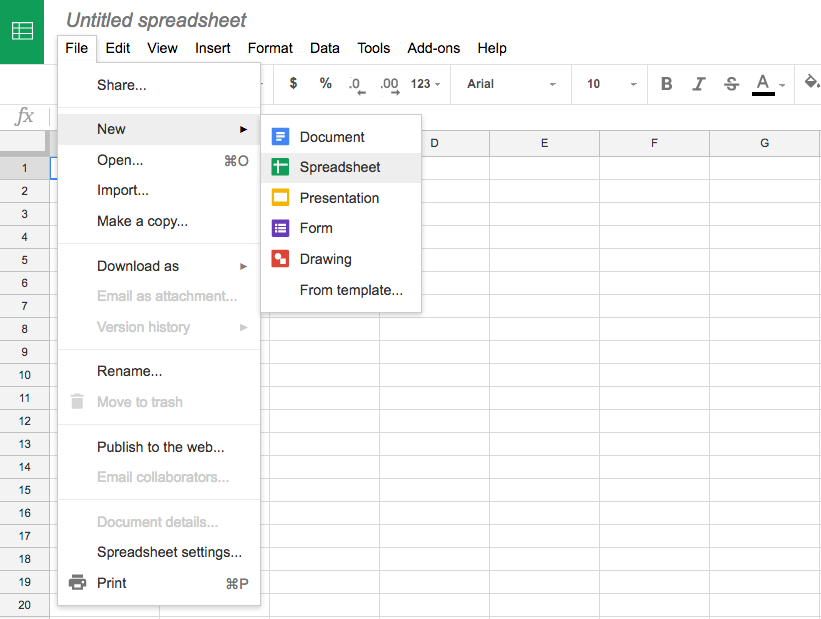
How to Create a New Spreadsheet

When you’re ready to create a new spreadsheet, you’ll just need to follow a few quick steps to get started. Open Google Sheets and click "File" > "New" > "Spreadsheet".

create-new-google-sheet

Once you create your new spreadsheet, you can start adding data. If you want to work with an existing spreadsheet from Excel instead, you’ll need to import that data into your new Google Sheet.

google-sheets-import-file

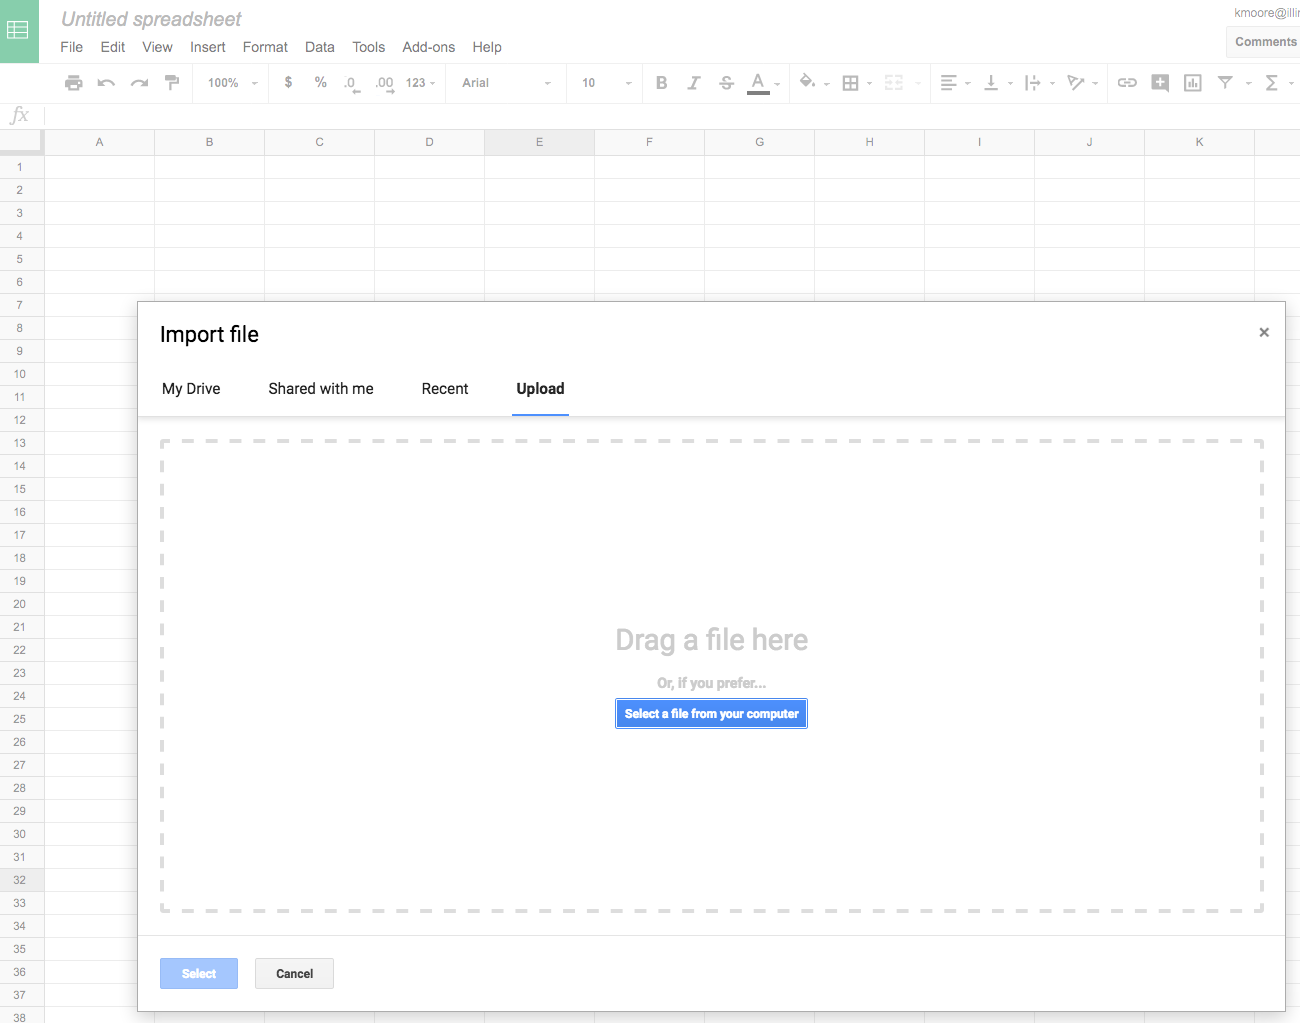
From there, your file will be uploaded and automatically converted into a Google Sheet.

Sharing and Protecting Your Data

Once your Google Sheet is set up and populated, you’ll want to think about how to share and protect your data. Data is automatically saved, so you don’t need to worry about that part. You can select who you share your file with and whether they have edit, comment, or view permissions. You can also protect specific data within your sheet so that those who have access can only edit certain cells.

To share a file:

  1. Go to "File" > "Share" (or just click the blue Share button in the top right corner)
  2. Enter the email address of who you’ll be sharing the spreadsheet with
  3. Assign permission levels (such as "View only" or "Can edit")
  4. Click "Advanced" and select any additional privacy conditions needed

To protect data:

  1. Navigate to “Data” > “Protected Sheets and Ranges”
  2. Choose “Range” or “Sheet” (to protect an entire sheet)
  3. Select the data you’d like to protect
  4. Click “Set Permissions”
  5. Choose to show an error warning to anyone who attempts to edit or customize editing permissions for certain people.

Organizing Data in Google Sheets

Google Sheets is a powerful tool that can hold a ton of data. That means the more data you have, the harder it becomes to find it — that’s when filtering comes in handy. Google Sheets has several filters that allow you to select the data you want to see and hide what you don’t.

How to Hide Data

Google allows you to hide entire rows or columns. This becomes useful when you want to restrict views for sharing, or when you’d like to control the amount of data you’re viewing at any given time. To hide a column, right-click the column you want to hide, then select “Hide Column”. When you hide a column, two arrows will appear on the previous and subsequent columns. Click these to restore the column to full view.=

How to Freeze Rows and Columns

Freezing will create a floating row or column as you scroll and keeps the data in those fields within your line of sight. For example, if you use the first row to label your columns, you can freeze that row so you don’t have to remember what each column is as you scroll.

To freeze a row, select “View” > “Freeze” > “1 row” (or up to X rows).google sheets hack: freeze row

How to Filter Data

What if you’d like to view all of the data in a single column that fits a certain criteria? Apply a filter. Filters allow you to select a criteria and how that criteria applies to your data. For example, you can filter your ‘Site Visits’ column to show all values greater than 1000, or filter your sheet for all cells that have the word “cat”.

To set up a filter, select “Data” > “Create a Filter.” Click the funnel icon that appears in the column, then choose to filter by condition, value, or alpha or numeric order. Your sheet will only display data that satisfies your criteria.

google sheets hack: creating filters

Learn about other filtering options below.

How to Setup and Use Google Sheets Offline

If you need to use Google Sheets offline, just follow the steps outlined here to turn on offline access to your spreadsheets.

Keep in mind:

  • You must be connected to the internet.
  • You'll need to use the Google Chrome browser (don't use incognito mode)
  • You'll need to install and enable the Google Docs Offline Chrome extension.
  • Make sure you have enough free space on your device to save all your files.

From there:

  1. Open Chrome and make sure you're signed in.
  2. Go to drive.google.com/drive/settings.
  3. Check the box next to "Sync Google Docs, Sheets, Slides & Drawings files to this computer so that you can edit offline."
  4. To work on files offline from a computer, learn how to install Backup and Sync.

Advanced Google Sheets Tips

Now that you understand the basics of Google Sheets, let’s get into some advanced tips so you can start using Sheets like a pro. These tips are helpful to have in your back pocket … even if you don’t need them just yet.

Conditional Formatting and Heatmaps

Conditional formatting will automatically apply formatting to a cell based on a preset condition. For example, you can select to highlight a cell in red if the value entered is below 100 or reads “Error”.

Heatmaps work similarly in that they apply a color scale to cells based on a median criteria (values greater than the median will appear darker while values lesser will appear lighter). This helps you view values on a gradient and identifies areas of concern on which to focus your attention.

google sheets hack: creating conditional formatting

Array Formulas

Array formulas can perform multiple calculations at once and output a value based on those calculations. Whereas most formulas require you to perform each step independently (e.g. sum one row then add it to the sum of the subsequent row), arrays make calculations much more efficient. This helps when working with large amounts of data.

Macros

The Macros feature records a series of steps that you’d like Google Sheets to repeat on command. For instance, if you work with a new data set each month, and need to manipulate that data in the same sequence each time, then you can record a Macro, and have Google do the work for you.


10 Must-Know Google Sheets Formulas

When you've entered your data and you need to do some quick number-crunching, basic formulas can help you find the answers you need. Here are a few commonly used Google Sheets formulas to speed up your data analysis.

1. SUM

This formula adds all values within a selected range.

=SUM(range)

2. AVERAGE

This formula calculates the average of values within a range.

=AVERAGE(range)

3. FILTER

This formula returns a filtered version of the source range, returning only rows or columns which meet the specified conditions. This is helpful when segmenting data by year or month.

FILTER(range, condition1, [condition2])

4. FIND

This formula returns the position at which a string is first found within the text. The Find formula is case sensitive.

FIND(search_for, text_to_search, [starting_at])

5. COUNTIF

This formula returns a conditional count across a range.

=COUNTIF(range, criterion)

6. CONCATENATE

This formula allows you to combine values of multiple cells into one cell, e.g., first and last name.

=CONCATENATE(Value1, “ ”,Value2)

7. VLOOKUP

This stands for vertical lookup. This formula searches down the first column of a range for a key and returns the value of a specific cell in the row found.

=VLOOKUP(search_key, range, index, [is_sorted]).

Learn how to do a VLOOKUP in less than a minute.

8. SPLIT

This formula divides text around a specified character or string, and puts each fragment into a separate cell in the row. Use this when you want to break up first names from last names in a list of customers or prospects.

=SPLIT(text, delimiter, [split_by_each])

9. SUBSTITUTE

This formula replaces existing text with new text in a string. For example: You could replace a product name with a new one in a sheet of ad copy.

=SUBSTITUTE(text_to_search, search_for, replace_with, [occurrence_number])

10. PROPER

This formula edits text within a cell to title case so you don’t have to format each entry manually.

=PROPER (text)

For more formulas you can use in Google Sheets, use the search tool on the spreadsheet functions list and find the one you need.

Google Sheets Functions & Skills You Should Know

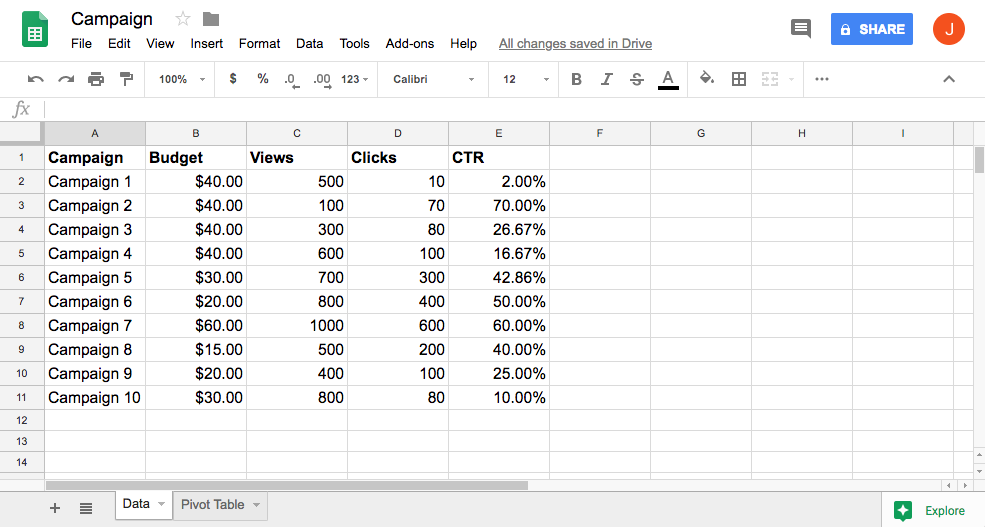
How to Create a Pivot Table

  1. Select the cells with source data you want to use in your pivot table. Note: Each column will need a header.
  2. In the menu at the top, click “Data” > “Pivot table.” Click the pivot table sheet (if it's not already open).
  3. In the side panel, next to "Rows" or "Columns," click "Add" and then choose a value. Note: Sometimes you will see recommended pivot tables based on the data you've selected. To add a pivot table, under "Suggested," select a pivot table.
  4. In the side panel, next to "Values," click "Add", then choose the value you want to see over your rows or columns. You can change how your data is listed, sorted, summarized, or filtered.
  5. Next to what you want to change, click the down arrow.
google-sheets-pivot-table

How to Remove Duplicates

  1. Select the cell in which you'd like to remove the duplicated info.
  2. Enter the function =UNIQUE(
  3. Select the cells you would like to pull data from
  4. Close the parentheses. Your function should look something like this: =UNIQUE(A:A)

How to Create a Drop-Down List

  1. Next to "Criteria," choose an option:
  2. Click "Data" > "Data validation".
  3. Select the cell or cells in which you want to create a drop-down list. List from a range: Choose the cells that will be included in the list.
  4. List of items: Enter items, separated by commas and no spaces.
  5. The cells will have a down arrow. To remove the arrow, uncheck "Display in-cell button to show list".
  6. If you enter data in a cell that doesn't match an item on the list, you'll see a warning. If you want people to only enter items from the list, choose "Reject input" next to "On invalid data".
  7. Click "Save". The cells will show a drop-down list. To change the color of a cell based on the option, use conditional formatting (refer to section above).
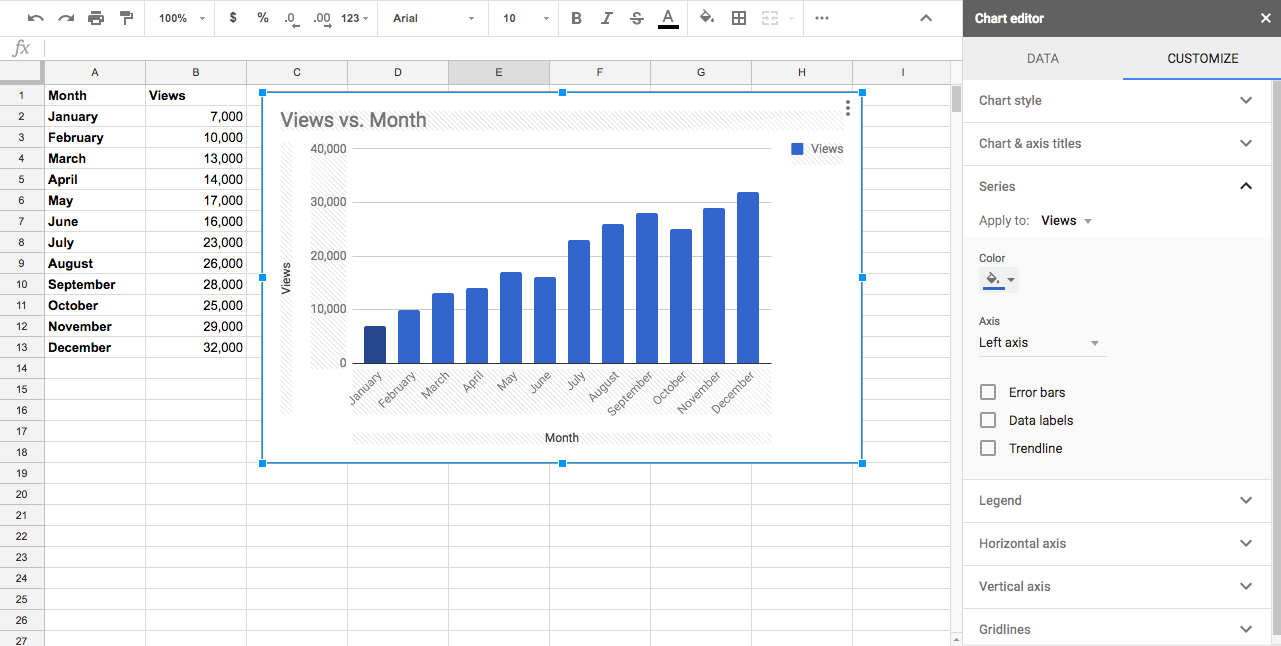
How to Make a Graph

  1. Select the cells you want to include in your chart. To label your chart, add a header row or column.
  2. Click "Insert" > "Chart".
  3. In the side panel, click "Data" > under "Chart type," choose a chart.
  4. To edit your chart, click "Customize."
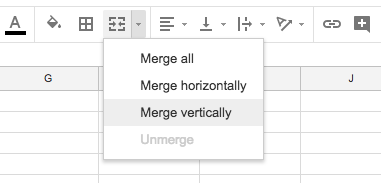
google-sheets-create-chart

How to Merge Cells

  1. Highlight or select a range of cells.
  2. Right-click on the highlighted cells and select "Format Cells".
  3. Click the "Merge" button in the toolbar, then select the merge option you need.
google-sheets-merge-cells

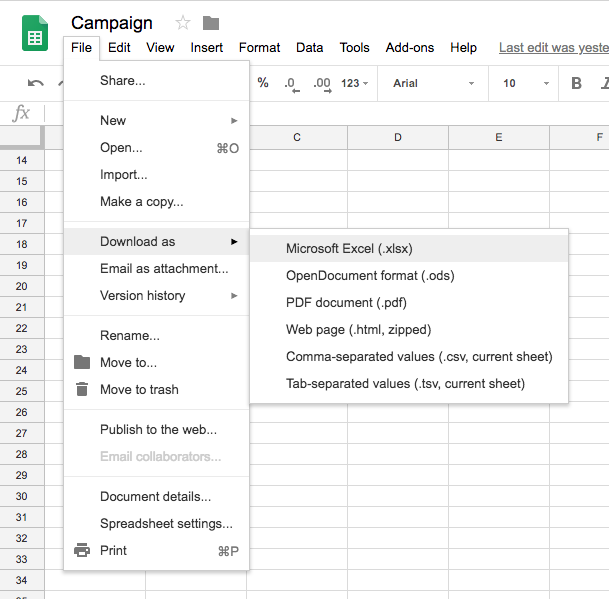
How to Download Google Sheets

If you want to use Excel or another tool for analyzing data sets with your file, you can easily export the file. Go to "File" > "Download as". Then decide which format you need.

download-google-sheets

If you need more help getting started, the quickest way to get a crash course in using Google Sheets is to access the free Google Sheets Cheat Sheet, which outlines the basics on:

  • Customizing spreadsheet data
  • Working with rows, columns, and cells
  • Sharing/collaborating within your spreadsheet
  • Saving and protecting your information
  • Utilizing key functions

You can also access the Tips Library for more advice on using Google Sheets.

Where to Find the Best Google Sheets Templates

Building new spreadsheets from scratch can be extremely time-consuming, so don't reinvent the wheel if you don't have to. Instead, look for pre-existing Google Sheets templates that you can customize and use for your own efforts. Let's look at a few different places where you can find ready-to-use templates for your marketing efforts.

1. HubSpot

where to find google sheets templates: hubspot

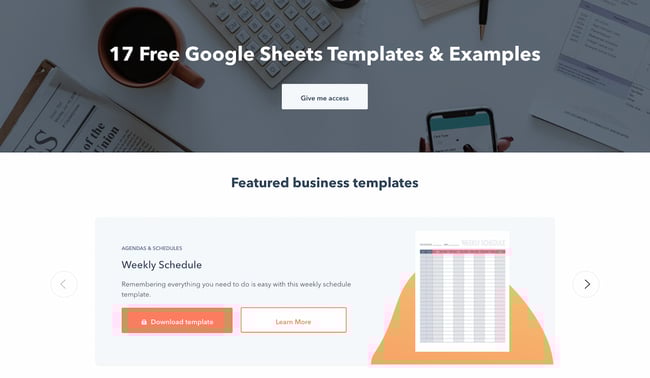
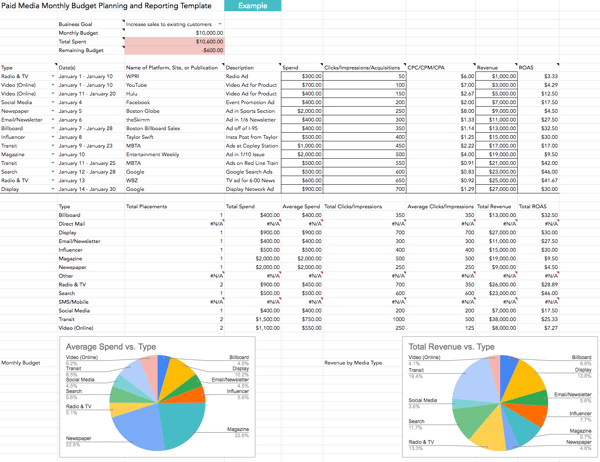
HubSpot’s library of Google Sheets templates is a gold mine of resources for the professional who needs to set up a spreadsheet quickly. In this library, you’ll find a template for any type of document you might need, including a business budget, competitive analysis, expense report, marketing dashboard, and more. You only have to plug in the numbers and personalize the fields. This option is a great fit if you’re looking for an individual template.

Otherwise, you might enjoy downloading HubSpot’s free template kits. The below bundles contain Google Sheets templates designed to supercharge a high-functioning marketing team.

  • Free Google Sheets Template Bundle: Don’t want to look through an entire library and download templates one-by-one? Download this starter kit to jumpstart your spreadsheet creation process.
  • Free Marketing Budget Templates: These customizable marketing budget templates are ideal for tracking your spending on product marketing, content, paid advertising, and more.
  • Free Editorial Calendar Templates: You don’t need expensive software to start planning your publication calendar. Use these templates to get started. They also sync with Google Calendar so that no post goes unpublished or accidentally passed over.
  • Email Marketing Planning Template: This email marketing planning template helps you conceptualize, refine, and schedule your campaigns to increase ROI and optimize your results.

2. Google Template Gallery

where to find google sheets templates: google template gallery add-on

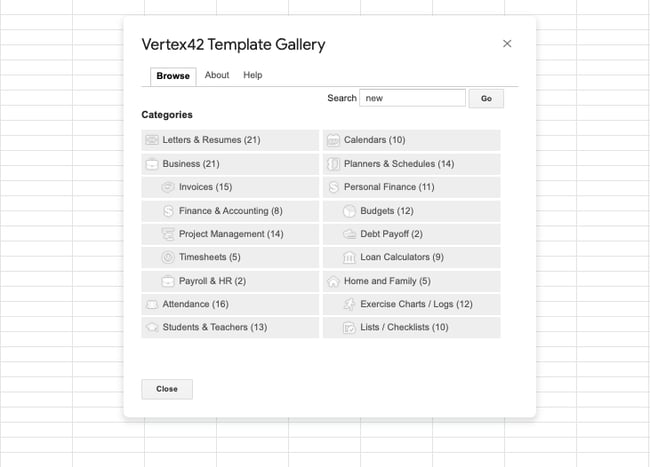
This free Google Sheets add-on gives you access to dozens of different templates right within Google Sheets. There’s no need to download an external document or make a copy from a publisher you might not trust. In this tool, you can access templates for project management, timekeeping, and budgeting. The only downside is that it’s hard to look at the previews of the templates, because the thumbnails are quite small.

3. Template.net

where to find google sheets templates: template.net

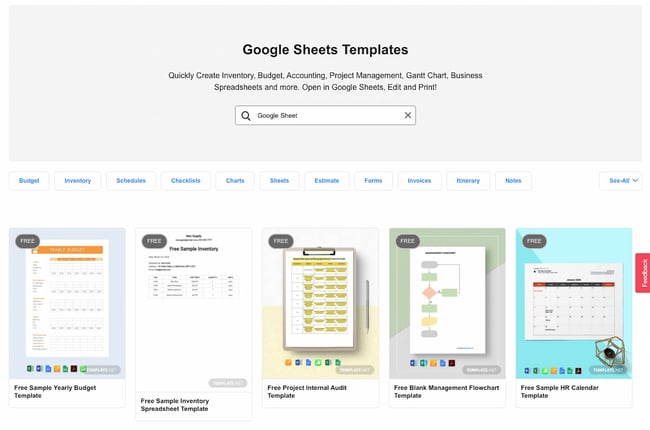
Template.net has a vast library of Google Sheets templates that you can easily preview and customize for your needs. While the library is not as marketing-specific, it still offers plenty for marketers to track their campaigns’ ROI, such as this social media marketing budget template. We recommend spending some time digging through this resource to find a template that works for you.

4. Blockspring

where to find google sheets templates: blockspring

Out of all the resources in this list, this one is the most unique. Why? Because these aren’t plain old templates where you can plug in the numbers and go. Blockspring’s templates are connected with third-party services to pull data into your spreadsheet. Instead of you having to manually link your spreadsheet to these third-party services, Blockspring’s templates do it for you.

For example, the template titled “Get content ideas on a topic using ‘Skyscraper’ analysis” uses data from Moz and Bing to get you a list of content ideas right on the spreadsheet — without you having to actually use either Moz or Bing. You only have to place the topic into the appropriate field, and the spreadsheet will populate on its own.

The only downside to using Blockspring’s templates is that you have to take a few extra steps for them to work. You have to download the Blockspring add-on onto Google Sheets, and then follow a few simple instructions to get the template up and running.

Haven’t found the Google Sheets templates that work best for you? Check out a few roundups we recommend:

The Best Google Sheets Add-Ons

To boost your efficiency in Google Sheets, consider using add-ons. Here are a few suggestions:

TapClicks

Pull your paid search and social advertising data into one spreadsheet, and turn them into beautiful reporting dashboards you’ll be proud to show your team managers and directors. This is a paid tool that starts at $29/month.

Google Apps Script

Google Apps Scripts offers a way to extend the functionality of your Google Sheets workspace beyond the basics. The cloud-scripting language allows you to create, edit, and read your Google Sheet through an integration with other Google apps. Recommended for advanced users and developers. Check out the documentation here.

DataEverywhere

Share data between Excel, local databases, Salesforce, and Google Sheets, without importing or exporting any files. That means that if you’re using Excel and want to automatically sync the data with Google Sheets, you can do so without needing to re-upload the document into Sheets.

XLMiner Analysis ToolPak

Do statistical analysis with functions. Because Analysis ToolPak was originally a Microsoft Excel add-on, this is a great tool for you if you’re getting into Google Sheets after being an Excel user.

Power Tools Add-On for Google Sheets

Streamline routine operations, such as clearing out duplicates and searching for specific values. You can also compare sheets, which is highly useful if you’re working off of two similar spreadsheets. This is a paid tool that starts at $29.95/year.

SuperMetrics

Create a business reporting system for SEM, SEO, web analytics, and social media. Not only does SuperMetrics turn a large amount of data into a more digestible format, but it also carries out automatic refreshes — so there’s no need to manually pull in the data every time you want to see a summary of your performance.

Clearbit Sheets

Create targeted email lists and qualify leads quickly. This add-on is a great option if you’re already familiar with a tool such as LinkedIn Sales Navigator. It fulfills a similar role, only the data lives on your own private spreadsheet, so there’s no need to sign in to LinkedIn every time you want to see prospect data.

Google Sheets is a Must-Have for Every Team

This quick guide to Google Sheets should help you get a running start as you leverage it for your marketing efforts. From more efficient tracking of different metrics to better planning around your content to easier collaboration with your team, this tool can help you make smarter, more data-backed choices that drive meaningful results for your brand.

Editor's note: This post was originally published in October 2018 and has been updated for comprehensiveness.

business google sheets templates


The Ultimate Guide to Google Sheets was originally posted by Local Sign Company Irvine, Ca. https://goo.gl/4NmUQV https://goo.gl/bQ1zHR http://www.pearltrees.com/anaheimsigns

Tuesday, February 1, 2022

How to Create a Location on Instagram (+ Reasons Why You Should)

Adding your location on Instagram is often an underrated feature for brands.

For brands, there are two main reasons to use it: Share your business location with your followers for increased discoverability or show some personality with fun location names.

Download Now: Free Instagram for Business Kit + Templates

Whatever your goal is, learn how to create your own custom location on Instagram in a few simple steps.

1. Check in on your Facebook app and create a post.

how to create a custom location on instagram step 1

2. Select "Check In."

how to create a custom location on instagram step 2

3. Allow Facebook to use your location or select one on the map.

how to create a custom location on instagram step 3

4. On the search bar, type in the name of your new custom location and click on the + symbol at the bottom. Even if someone has already created a location with the same, you can still create your own.

how to create a custom location on instagram step 4

5. Add in your custom location name and location details, then click "Save Custom Place."

how to create a custom location on instagram step 5

6. Your new location is now available on Facebook and Instagram. how to create a custom location on instagram step 6

When you create a custom location, it automatically creates a business profile page. If you’re having trouble seeing your newly created location, here’s what may have happened:

  • Your location is taking a few hours to show up on Instagram.
  • Facebook does not recognize your new location as valid due to the limited details provided.
  • You have not claimed your business profile page.

Can you create a location on Instagram without Facebook?

Currently, there is no way to create a new location on Instagram without relying on its parent app, Facebook. The only locations you can access are the ones already available on the app.

However, that’s not necessarily a bad thing. So many brands and individual users have done the hard part for you, creating fun and relevant custom names that you can use on your posts.

For instance, this brand used the "Coffee Time" location name to add to an image featuring various coffee beverages.

example of how to use location tags on instagram

In this case, the location name serves as another signal of what the post is about and can create some more interest in your brand.

Some brands and users also use location tagging as another branding opportunity.

Take The Bearded Marketer.

example of how to use location tags on instagram

He created a custom location name to add to his Instagram posts, which can help with brand recall.

How to Add Your Location to Your Instagram Story

  1. Swipe left to post a Story and click on the emoji icon.

    how to add your location to your instagram story step 1
  2. Search for the "Location" feature.

    how to add your location to your instagram story step 2
  3. Search your location name or address.

    how to add your location to your instagram story step 3
  4. Click on your location and place it where you want on your Story.

how to add your location to your instagram story step 4

So whether you’re looking for a new way to connect with your audience or want to enhance your store’s discoverability, these tips will help you easily create a location on Instagram.

New Call-to-action


How to Create a Location on Instagram (+ Reasons Why You Should) was originally posted by Local Sign Company Irvine, Ca. https://goo.gl/4NmUQV https://goo.gl/bQ1zHR http://www.pearltrees.com/anaheimsigns

Media Planning: The Ultimate Guide

Today's digital landscape is a competitive one. For any business to find success today, it must create and share media content (such as images, videos, written content, and podcasts) with its audience.

Publishing new media is how you boost brand awareness, engagements, conversions, and revenue for your business. Not to mention, media content helps you stand out from competitors.

Over time, though, it can become confusing to keep track of, plan, organize, distribute, and analyze all that media content.

The best way to combat these issues is through media planning.

Access Now: Free Media Planning Template

Media planning has many moving parts, and the process can be difficult to get right.

By working through the media planning steps as well as implementing media planning templates, you’ll keep any media-related challenges at bay.

Benefits of Media Planning

Media planning aids with parts of content creation and distribution, including:

  • Getting to know your target audience on a deeper level so you can effectively reach them through your media content
  • Deciding which media channels and platforms on which you’ll share your content
  • Determining the timing and frequency of the media and content you publish and share
  • Keeping up with the latest media trends and technology
  • Sticking to your budget as you work to create, publish, and share high-quality and engaging media content
  • Conducting analyses to measure the success of your media planning process

Now that we’ve discussed the benefits of media planning, let’s review the steps in the media planning process so you can begin developing your business’s strategy.

As you work through the following media planning steps, keep in mind that how your business applies the results and conclusions derived from each step will be unique based on your audience and needs.

1. Conduct market research.

The first thing you’ll want to do when developing your media planning process is conduct market research. Market research will allow you to tailor the content you create and the media plan you implement to your target audience and customers.

Start by creating (if you haven’t already) and studying your buyer personas as well as developing an understanding of who your target audience and current customers are.

With this information, you can determine what media will reach, resonate with, and convert your audience. Additionally, it’ll help you decide what platforms and channels through which to share your content.

Featured Resource: HubSpot's Market Research Kit + Templates

market research kit cover imageDownload the Kit

2. State your media planning objective.

When developing your media plan, keep a goal (or a few) in mind to help you effectively navigate the process. Moreover, goals can help you know what content types and platforms you can say "no" to.

Here are some examples of media planning objectives you might have:

  • Strengthen cross-team collaboration (e.g. content, graphic design, animation, video, blog, social media) while creating and sharing media.
  • Enhance and streamline the publication and distribution processes for all media.
  • Improve media distribution timeline to ensure our content is shared efficiently so it’s relevant to our target audience.
  • Amplify the success of our media content by allowing for ample time to analyze its impact and reach our audience.

For instance, say you're looking to create a media plan for your Facebook and Instagram social content. Your objective may be to streamline the content creation process in a timely fashion and then schedule posts on both platforms in advance.

This way, you ensure your posts are relevant to your audience so you can boost engagement and stay top of mind.

3. Create your media plan using a template.

Now it’s time to make your media plan, but before jumping into templates, let’s go over what exactly a media plan is.

It's not enough to simply do the planning and then assume everyone else is on the right page. You need to outline your strategy into a media plan document, you'll be able to ensure alignment on your team and keep all parties accountable.

Other media plans are standalone strategies that detail how organizations plan to leverage media (written, video, audio, etc.) to connect with followers and customers.

Media planning templates ensure you stay efficient and effective while working on all aspects of your media content. They keep your media content organized while publishing and sharing it among your audience members.

Due to the variety of templates available for different types and parts of the media planning process, the templates you incorporate will be unique to your business. Don’t be afraid to experiment with or combine different templates.

For example, if your business is looking to create a media plan for your Facebook and Instagram social media, you might choose to implement a social media calendar template.

This type of template will help you coordinate your content across both channels, boost engagement, and improve productivity among your team members — and therefore, achieve the objective you set in step two.

4. Implement your media plan.

Ensure all parties who should be aware of the plan have the necessary details to help you execute accordingly.

Additionally, share the contact details of the media-planning point person at your company in case anyone has questions or comments.

To get a better understanding of what I mean, let's refer back to our example in the above step about your social media plan for Facebook and Instagram.

If you implement a social media calendar template as part of your media plan, ensure everyone who will be working on or creating the content and publication schedule for both platforms has access to it.

5. Evaluate your success.

Whether your media plan revolves around individual posts on Instagram or a month-long, company-wide campaign, be sure to measure the success of your plan.

Ask yourself and your team questions like, “Did this media plan help us achieve our specific goals?” and “Did the media planning templates and tools we used add value to our media creation and publication processes?”

The way you evaluate your media plan’s success should be directly tied to your business’s specific goals regarding your media and content, the teams who create the media, and the value you hope to derive from the media (e.g. boost conversions, engagements, revenue, etc.).

Let’s look back at our example from above one last time. Think about whether or not your social media content plan and the calendar template you implemented have helped you reach your target audience and achieve the objective you set.

Ask yourself whether or not your media plan helped you boost engagement on the social platforms you focused on as well as collaborate and coordinate more effectively to increase team-wide productivity.

What to Consider for Your Media Planning Strategy

There are a few additional things to consider when crafting your media planning strategy.

First, what's your media planning budget?

Media Planning Budget

If you're aiming for free media, you can disregard this question. But if part of your media planning involves media buying (as we discussed above), you'll need to sit down with your marketing leadership to understand what funds you have to work with.

Set this budget before you start researching platforms and creating content. You don't want to start formulating a campaign that you can't afford down the road.

Second, consider the key messaging points you want your media to communicate.

Media Planning Messaging

You don't have to pre-write all your media content, per se, but you should establish the main themes at the beginning so all media is consistent and on theme.

These messaging points will come from your audience research and may also influence what content types and platforms you pursue, so be sure to establish these early on.

With these points in mind, let’s walk through how to create a media plan of your own.

How to Create a Media Plan

1. Target your buyer personas.

As a marketer, you don’t want to advertise to just anyone. You want to attract the type of buyer that has interest in the media you’re creating — otherwise known as your buyer personas.

A buyer persona is a semi-fictional representation of your ideal customer based on market research and real data about your existing customers.

When you know exactly the type of buyer you need to target with your media plan, you’ll be able to attract the most valuable customers to your business.

When making your buyer personas, center them around these important attributes:

  • Demographics: Age, income, location, or identity
  • Background: Job, career path, and lifestyle
  • Identifiers: Communication preferences and social media platforms
  • Goals: Primary, secondary, personal and professional
  • Challenges: Their roadblocks preventing them from achieving their goals

2. Define your SMART goals.

You want to write out SMART goals for your media plan. The SMART acronym (Specific, Measurable, Attainable, Relevant, Time-Bound) is a framework that will enable you to better track and drive greater impact from your proposed plan.

It’s important to determine these goals before jumping into your work so you have a media plan that sets a clear direction for you and your team members, and ensures you're able to celebrate the wins when they occur.

Some examples of SMART goal-setting in media planning could look like:

  • Specific: “We want to generate a greater number of qualified leads for my business.”
  • Measurable: “We want our media plan to gain my business 2,000 followers across Twitter, Metaverse, and Instagram.”
  • Attainable: “We previously reached 70% in customer engagement online over the past quarter, so we’re aiming for 75% in the next.”
  • Relevant: “We want to achieve more positive customer engagement to better the brand’s reputation and gain more fans.”
  • Time-Bound: “We want our media plan to gain my business 2,000 followers in the next three months across Twitter, Metaverse, and Instagram.”

Once you’ve determined your goals, you can begin looking at resources to assist you in reaching them.

3. Find the media planning tools best suited for you.

We talk in further detail later in this post about some amazing media planning templates your business can use, but there are software tools that can do some of the heavy lifting for you.

To draft, plan, schedule, and collect conversion analytics, your business could benefit from the HubSpot Marketing Hub.

Or if you still want to explore more options, we have a list of 12 essential media planning tools for you to use.

4. Analyze historical data.

You have to know where you began before you can start going forward, look back at your previous media planning strategy and analyze its impact and reach.

For example, if your business was already on Instagram, check your business page insights to see just how far you got on your old posting schedule and content. Look at the posts that got the most engagement, the time period you had the most traffic, and what content helped to turn prospects into customers.

Make note of the effective elements of your previous strategy and let that drive some of your brainstorming for your new media plan.

5. Choose your media mix.

It’s important that you are up to snuff on the most popular marketing channels, along with your buyer personas preferred ones.

According to the 2021 State of Marketing Report, 1,000 global marketing professionals believe that the top marketing channels are:

  • Social Media
  • Websites/Blogs
  • Email Marketing
  • Video Marketing

You want an omni-channel media plan to reach your target audience where they are, and by researching your buyer personas most frequented channels, and exploring new channels, you can decide upon the right mix for you.

6. Put your media plan into action.

As you conduct your media plan, track your insights and see how you’re doing in comparison to your SMART goals.

Also, understand that you can adjust your plan as necessary over time. Marketing is a rather volatile industry and knowing when to change your approach is key.

Now that you know what it takes to create a plan, let’s review some resources available to simplify the media planning process.

Media Planning Templates

There are a plethora of media planning templates available online that you can purchase or download for free. The great part about using media planning templates is that you can customize and tailor them to your business’s specific needs and goals.

Depending on the media software your business uses, such as HubSpot’s (free) CRM, Marketing Hub, or Sprout Social, there may be customizable planning templates included (similar to this menu of options from HubSpot).

You may also elect to create templates on your own with the help of Google Sheets.

Either way, how you choose to implement and use media planning templates will be unique to your business and needs — so don’t be afraid to modify your templates over time as your goals evolve or audience grows.

Free Media Planning Template [Download Now]

free media planning template hubspot downloadDownload this Template

Types of Media Planning Templates

To help get you started, here’s a list of common types of media creation and planning templates. (Click the links to be directed to an associated template resource.)

You might use one or several media templates based on your needs. Remember, there’s no right or wrong answer to which template you should use — it’s about preference and what works best for your business.

  • Use a media planning template to organize your paid media efforts and expenses in one visual location.
  • Use a social media strategy template to align your media content with your audience in a way that provides value for your business.
  • Use a social media calendar template to customize a timeline for when you’ll share your social media posts in a simple, organized, manageable, and effective format.
  • Use an editorial calendar template to plan and optimize all of the marketing content you’ll publish and share including blogs, social media, and campaigns.
  • Use a blog post template to simply fill-in-the-blanks and begin writing engaging, relevant, and well-optimized blog content for your audience (all while avoiding writer’s block!).
  • Use an ebook design template to take the guesswork out of how to make your ebook professional, eye-catching, and beautiful all while saving yourself valuable time.
  • Use an infographic template in Powerpoint or Illustrator to quickly customize the way you present data, share insights, and promote offers in a way that looks and feels professional.
  • Use an analytics and reporting template for Excel, PowerPoint, and Google Drive to make the processes of pulling, organizing, and sharing data simple no matter which metrics you track.
  • Use a budget template to manage and review your spending and budget with Excel or Google Sheets.
  • Use an advertising template to help you plan and manage advertising campaigns in a way that’s sure to convert audience members into leads and customers.

We’ve spent a lot of time discussing the ins and outs of media planning, there’s another side that can help marketers on the job — media buying. Let’s get into it.

Media Planning and Buying

Media planning and media buying are closely related and work in tandem with one another. Depending on the size of your business and your budget, your team members who plan your media may also handle the media buying process.

So, what makes these processes unique?

Well, media planning focuses on the strategy behind the media content that’s created, published, and shared among your customers and target audience. The media referred to here is all-encompassing, meaning it doesn’t always include paid ads and paid content.

This is where media planning and media buying differ.

What is media buying?

Media buying is related to paid media — whether that means your business is buying campaign or ad space on various channels, paying to share targeted campaigns and ads, or negotiating with media vendors.

In a world where your business can create and share media and successfully reach your audience for free, media planning can happen without media buying.

However, media buying requires media planning. (It's like that "a square is a rectangle, but a rectangle is not a square" lesson that baffled us all in elementary school.)

Media planning sets the tone and direction for the buying that needs to occur. Once ad space is purchased or content distribution plans have been negotiated, there needs to be a strategy (or media plan) for getting that media to your audience and customers.

Begin Your Media Planning Process

Media planning is an integral part of your business’s ability to successfully create, publish, and share media content. It’s how you streamline cross-team communication and collaboration around your media as well as ensure it’s shared with your audience in a timely fashion.

So, work through the media planning process steps above and choose which templates you’ll use to begin reaching and converting more audience members.

Editor's note: This post was originally published in February 2020 and has been updated for comprehensiveness.

paid media template


Media Planning: The Ultimate Guide was originally posted by Local Sign Company Irvine, Ca. https://goo.gl/4NmUQV https://goo.gl/bQ1zHR http://www.pearltrees.com/anaheimsigns

20 Blogging Mistakes to Avoid in 2022, According to HubSpot Bloggers

Sometimes, when I tell people that I blog for a living, they roll their eyes. "That's so easy," they say. "You get a paycheck for sitting on the internet all day and writing. A monkey could do your job!"

That's when I roll my eyes. See, people are quick to deem blogging as a no-brainer job. But when they actually sit down to write their first couple of posts, it hits them: This is way harder than I thought. Like any person starting a new job, they mess things up.

→ Download Now: 6 Free Blog Post Templates

That's okay — it happens to pretty much every new blogger. Luckily, it's pretty easy to avoid these roadblocks if you know they're coming.

So for all of you beginner bloggers out there who are looking to get up-to-speed quickly, keep on reading. Below are common mistakes most beginners make and some tips on how to avoid them.

Anyone can start a blog, but many will never give blogging the attention that it needs to be a successful part of a business.

A hobby blog is one thing, but when you want to grow or monetize your blog, there are several things you need to focus on. Namely, you need to identify the goal of the blog, know your target audience and what moves them, build a blog site that is easy to navigate, and choose a writing style that resonates with your audience.

Fear that you’re missing some of these elements? It’s okay! We’re here to help you and your blog become a success. Let’s delve into some common blogging mistakes and the solutions that will help your blog move up the ranks.

Most of a blog's traffic is driven organically — in other words, consumers will search for something on a search engine and click on your blog if it matches their intended topic. However, there are a lot of organizations competing for your audience's attention, so it's important to avoid common blog mistakes to stand out.

Here are the most common blog post mistakes (and their solutions), according to HubSpot bloggers.

1. Create blog posts that serve your larger company goals.

Mistake: You think of ideas that only interest you.

As much as you might read and re-read your blog posts after you publish them, you're not the only reader, or the intended reader.

When you start blogging, ideas will come to you at random times — in the shower, on a run, while on the phone with your mom. While the ideas may come at random moments, the ideas themselves should never be random. Just because it's a good idea in general — or something that interests you personally — doesn't mean it's a good idea for your company.

"Your blog is a honeypot, not a megaphone. Make it a point to position your content around what your audience wants to discover, not what you want to tell them."

— Amanda Sellers, Historical Optimization Manager at HubSpot

Solution: Align your blog posts with company growth goals.

The reason you're blogging is to solve problems for your audience and, ultimately, to grow your business. So, all of your blog post ideas should help serve those growth goals. They should have natural tie-ins to issues in your industry and address specific questions and concerns your prospects have.

Need help figuring out what those goals are and how to address them? Chat with your manager about the larger company goals, and then schedule a meeting with someone on the sales team to hear what questions they get asked most often. After both meetings, you should know which goals you need to achieve and have some ideas on how to achieve them.

2. Identify what resonates with your audience.

Mistake: You forget about your persona.

If you want your blog content to perform well (i.e. generate traffic, leads, and sales), it must resonate with your audience and compel them to take action. One of the biggest mistakes is assuming that your content will perform if you haven't actually considered your audience or the actions you want them to take.

"Your persona is the basis for everything you create. Writing for yourself won’t always resonate with your intended audience. If you, instead, speak to your persona’s pains, challenges, and goals and they feel like you are speaking to them, they are more likely to stay on the page and convert on your offer."

— Christina Perricone, Senior Manager, Content Marketing at HubSpot

Solution: Understand your persona's pain points and solve them.

By defining your buyer persona and the things that matter to them, you can bridge the gap with your content. If you're not consciously thinking about your persona's pains, you're just creating content for content's sake, which is a waste of resources.

3. Write like you talk.

Mistake: Your writing is too stiff.

Writing a blog post is much different than writing a term paper. But when bloggers first start out, they usually only have experience with the latter. The problem? The style of writing from a term paper is not the style of writing people enjoy reading.

Let's be honest: Most of the people who see your post aren't going to read the whole thing. If you want to keep them interested, you have to compel them to keep reading by writing in a style that's effortless to read.

Solution: Write blogs that feel personable.

It's okay to be more conversational in your writing — in fact, we encourage it. The more approachable your writing is, the more people will enjoy reading it. People want to feel like they're doing business with real people, not robots.

So loosen up your writing. Throw in contractions. Get rid of the jargon. Make a pun or two. That's how real people talk — and that's what real people like to read.

4. Show your personality; don't tell it.

Mistake: You think people care about you as a writer.

It sounds harsh, but it's the truth: When people first start out blogging, they think that their audience will be inherently interested in their stories and their interests ... but that's not the case. It's no knock against them as a person — it's just that when you're new, no one is interested in you and your experiences. People care way more about what you can teach them.

Solution: Infuse your personality without eclipsing the topic.

Even though people don't really care that it's you that's writing the post, you can infuse parts of your personality in your writing to make them feel more comfortable with you. How you do that is entirely up to you. Some people like to crack jokes, some like to make pop culture references, and others have a way with vivid descriptions.

Corey Wainwright, Principal Marketing Manager at HubSpot, is particularly good at this. Here's an example from the introduction of one of her posts:

show-personality-in-blog-post.png

To infuse personality into your own writing, try looking for ways to relate to your readers on the topic you're writing about — then write in the first person as if you're hanging out with them and chatting about it. Make your tone personal, approachable, and engaging, just like you would in a face-to-face conversation.

5. Make your point again and again.

Mistake: You digress.

Although you are encouraged to let your own personality shine through in your writing, don't abuse the privilege. It's one thing to be yourself in the topic you're covering, but it's another thing to bring up too many personal experiences, which will bury the point you're trying to make.

Don't digress into these personal anecdotes and analogies too much — your readers aren't sitting in front of you, which means you can't guarantee that you have their undivided attention. They can (and will) bounce from your article if they lose patience.

Solution: Repeatedly assert your argument.

To prevent your writing from losing its audience, restate your point in every section of the article. The best blog posts commit to an overarching message and then deliver it gradually, expressing it multiple times in small ways from beginning to end.

If you're writing about how much water a potted plant needs, for example, don't spend three paragraphs telling a story of how you came home to a dead fern after returning from a two-week vacation. This story offers real evidence of your point, but what is your point? Certain plants can't go without water for more than 14 days. That's one possible point, and it should be stated upfront.

6. Start with a very specific working title.

Mistake: Your topics are too broad.

When people start blogging, they generally want to write on really big topics like:

  • "How to Do Social Media Marketing"
  • "Business Best Practices"
  • "How to Make Money on the Internet"

Topics like these are far too broad. Because there are so many details and nuances in these topics, it's really hard to do a good job answering them. Plus, more specific topics tend to attract smaller, more targeted audiences, which tend to be higher quality and more likely to convert into leads and customers.

So, to get the most short-term and long-term benefits of blogging, you'll need to get way more specific.

Solution: Begin with a clear, concise idea.

Nailing really specific blog topics is crucial to knocking your first few posts out of the park. Let us help you brainstorm with our Blog Ideas Generator. This tool allows you to enter basic terms you know you want to cover, and then produces five sample blog titles that work for business blogs.

Keep in mind that a working title isn't final — it's just a concrete angle you can use to keep your writing on track. Once you nail this stage of the ideation process, it's much easier to write your blog posts.

7. Specific posts should still tie into the bigger picture.

Mistake: You don't tie a specific topic into your reader's broader struggle.

You already know how important it is to resonate with your buyer persona and understand their pain points. However, there's a reason why they're experiencing pain points and what is driving them to get it solved.

Solution: Understand the challenges and consequences they're facing.

You should be asking yourself:

  • What is at stake?
  • What do they gain by taking action?
  • If they don't take action, what will happen?

All of these things can manifest in the content that you write for your blog post. Doing so will signal to your reader that you understand what they're going through and that you want to help.

"If you're uninterested in a particular topic you're writing about, it's probably because you haven't stopped to think about the big picture. Understanding how the topic you're writing about will fit into a reader's broader challenges will help you find meaning and value in any post you write, and will enable you to connect with your readers better."

—Caroline Forsey, Senior Content Strategist at HubSpot

For instance, let's say you're tackling a post like "first vs. third-party APIs." While the topic is dry and allows for little creativity, the big-picture value is huge: to help your readers decide whether they need to shell over the big bucks for an in-house API or whether they can save money and time by asking a third party to develop their API. Essentially, "first vs. third party APIs" is a question that hits at computer security, efficiency, and budget constraints, all of which could have big consequences for your reader.

8. Use a specific post type, create an outline, and use headers.

Mistake: Your writing is a brain dump.

Sometimes when I get a great idea I'm excited about, it's really tempting to just sit down and let it flow out of me. But what I get is usually a sub-par blog post.

Why? The stream-of-consciousness style of writing isn't really a good style for blog posts. Most people are going to scan your blog posts, not read them, so it needs to be organized really well for that to happen.

Solution: Structure your blog with a template, outline, and section headers.

The first thing you should do is choose what type of blog post you're going to write. Is it a how-to post? A list-based post? A curated collection post? A SlideShare presentation? For help on this, download our free templates for creating different types of blog posts. Once you have a template down, it'll be easier to write your outline.

Writing an outline makes a big difference. If you put in the time up front to organize your thoughts and create a logical flow in your post, the rest becomes easy — you're basically just filling in the blanks.

Using headers is also critical for the reader experience.

"While it's nice to imagine that your readers hang on your every word, the reality is that they're probably mostly skimming your posts. As you write, be sure you're making your piece skim-friendly: including plenty of paragraph breaks, clearly titled sections, relevant images, and formatting that makes it easy to find the piece of information they came for."

— Karla Cook, Senior Manager of the HubSpot Blog Team

To write a blog post outline, first come up with a list of the top takeaways you want your readers to get from your post. Then, break up those takeaways into larger section headers. When you put in a section header every few paragraphs, your blog post becomes easier and more enjoyable to read. (And plus, header text with keywords is good for SEO.) When you finally get to writing, all you'll have to do is fill in those sections.

9. Give your audience something to walk away with.

Mistake: You’re relying on vague concepts instead of concrete information.

One of the first things you’ll do in your blog research is look up how other publications are writing about a topic. If you notice, almost all of the results on the first page of Google are writing about conceptual, vague ideas. How can your blog stick out? You can include concrete, actionable steps for your readers to achieve success.

Solution: Include actionable steps for your readers to follow.

One of the biggest tenets of content creation is that it should be useful, and that means your audience should walk away with something.

"People want to learn how to do things in actuality, not just theoretically. When you’re done with a blog, ask yourself, 'Will the reader know how to implement this idea?' or 'Did I provide steps to achieve success?'"

— Rebecca Riserbato, Former Staff Writer at HubSpot

This might come in the form of a "how-to" as you recommend they implement a particular strategy, or it might simply be a suggestion for a tool or tactic to make a process easier.

10. Use data and research to back up the claims you make in your posts.

Mistake: You don't use data as evidence.

Let's say I'm writing a blog post about why businesses should consider using Instagram for marketing. When I'm making that argument, which is more convincing?

  • "It seems like more people are using Instagram nowadays."
  • "Instagram’s user base is growing far faster than social network usage in general. In the U.S, Instagram will grow 15.1% this year, compared to just 3.1% growth for the social network sector as a whole."

The second, of course. Arguments and claims are much more compelling when rooted in data and research. As marketers, we don’t just have to convince people to be on our side about an issue — we need to convince them to take action. Data-driven content catches people's attention in a way that fluffy arguments do not.

Solution: Use data to support your arguments.

In any good story, you’ll offer a main argument, establish proof, and then end with a takeaway for the audience. You can use data in blog posts to introduce your main argument and show why it's relevant to your readers, or as proof of it throughout the body of the post.

Some great places to find compelling data include:

11. Use examples to back up why what you're saying is important.

Mistake: You're not adding enough context.

Meg Prater, Managing Editor of the HubSpot blogs, shared with us that “When I first joined the HubSpot Blog team, I would consistently get the edit that I wasn’t adding enough examples to support my statements. For example (See what I did there?), I might write ‘SMBs should expand their social media strategies to experiment with newer, cheaper channels.’ Sure, that might be true, but it’s a pretty broad suggestion.”

Solution: Illustrate ideas with examples, visual aids, and additional content.

It’s important to build upon your point with details. Meg says, “A stronger way to share this with an audience might be to say, 'SMBs should expand their social media strategies to experiment with newer, cheaper channels. For example, you might test running ads on question-and-answer platform Quora, or simply answer industry questions for which your product or service is an answer.'”

"By adding a specific example to my previously broad statement, I’ve made my point easier to understand and more actionable for my readers."

— Meg Prater, Managing Editor of the HubSpot Blogs

As bloggers, we become experts in our industry. Because of this, it's easy to forget about specificity when giving advice, explaining examples, or walking through a common process. Even Pamela Bump, HubSpot's Senior Marketing Manager of Audience Growth, admits that she has been guilty of not going into enough depth in a first draft.

"When you review your blog post, read it from the point of view of a new grad entering a field or someone who's just learning about a topic for the first time."

— Pamela Bump, Senior Marketing Manager of Audience Growth at HubSpot

Ask yourself questions like, "Will readers know what this big word means?", "Will they recognize this acronym?", or "Can they easily visualize this example, or do I need to add a visual aid?" From there, you can determine where you need to explain something more, or hyperlink potentially confusing words to other blog posts that relate to them.

12. When drawing from others' ideas, cite them.

Mistake: Your content borders on plagiarism.

Plagiarism didn't work in school, and it certainly doesn't work on your company's blog. But for some reason, many beginner bloggers think they can get away with the old copy-and-paste technique.

You can't. Editors and readers can usually tell when something's been copied from somewhere else. Your voice suddenly doesn't sound like you, or maybe there are a few words in there that are incorrectly used. It just sounds ... off.

Plus, if you get caught stealing other people's content, you could get your site penalized by Google — which could be a big blow to your company blog's organic growth.

Solution: Give credit where credit is due.

Instead, take a few minutes to understand how to cite other people's content in your blog posts. It's not super complicated, but it's an essential thing to learn when you're first starting out.

13. Take 30 minutes to edit your post.

Mistake: You think you're done once the writing's done.

Most people make the mistake of not editing their writing. It sounded so fluid in their head when they were writing that it must be great to read ... right?

Nope — it still needs editing. And maybe a lot of it.

Solution: You'll never regret time spent proofreading.

Everyone needs to edit their writing — even the most experienced writers. Most times, our first drafts aren't all that great. So take the time you need to shape up your post. Fix typos, run-on sentences, and accidental its/it's mistakes. Make sure your story flows just as well as it did in your outline.

To help you remember all the little things to check before publishing, check out our checklist for editing and proofreading a blog post.

14. At a certain point, just publish it.

Mistake: You try to make every post perfect.

I hate to break it to you, but your blog post is never going to be perfect. Ever.

There will always be more things you can do to make your posts better. More images. Better phrasing. Whittier jokes. The best writers I know, know when to stop obsessing and just hit "publish."

Solution: Better to publish and update than postpone for perfection.

There's a point at which there are diminishing returns for getting closer to "perfect" — and you're really never going to reach "perfect" anyway. So while you don't want to publish a post filled with factual inaccuracies and grammatical errors, it's not the end of the world if a typo slips through. It most likely won't affect how many views and leads it brings in.

Plus, if you (or your readers) find the mistake, all of you have to do is update the post. No biggie. So give yourself a break once and a while — perfect is the enemy of done.

15. Blog consistently with the help of an editorial calendar.

Mistake: You don't blog consistently.

By now, you've probably heard that the more often you blog, the more traffic you'll get to your website — and the more subscribers and leads you'll generate from your posts. But as important as volume is, it's actually more important that you're blogging consistently when you're just getting started. If you publish five posts in one week and then only one or two in the next few weeks, it'll be hard to form a consistent habit. And inconsistency could really confuse your subscribers.

Instead, it's the companies that make a commitment to regularly publishing quality content to their blogs that tend to reap the biggest rewards in terms of website traffic and leads — and those results continue to pay out over time.

To help establish consistency, you'll need a more concrete planning strategy.

Solution: Schedule and publish blogs consistently.

Use a calendar to get into the habit of planning your blog post topics ahead of time, publishing consistently, and even scheduling posts in advance if you're finding yourself having a particularly productive week.

Here at HubSpot, we typically use good ol' Google Calendar as our blog editorial calendar, which you can learn how to set up step-by-step here. Or, you can click here to download our free editorial calendar templates for Excel, Google Sheets, and Google Calendar, along with instructions on how to set them up.

16. Focus on the long-term benefits of organic traffic.

Mistake: You concentrate your analytics on immediate traffic.

Both beginner bloggers and advanced bloggers are guilty of this blogging mistake. If you concentrate your analysis on immediate traffic (traffic from email subscribers, RSS feeds, and social shares), then it's going to be hard to prove the enduring value of your blog. After all, the half-life for those sources is very brief — usually a day or two.

When marketers who are just starting their business blogs see that their blog posts aren't generating any new traffic after a few days, many of them get frustrated. They think their blog is failing, and they end up abandoning it prematurely.

Solution: The ROI of your blog is the aggregation of organic traffic over time.

Instead of focusing on the sudden decay of short-term traffic, focus instead on the cumulative potential of organic traffic. Over time, given enough time, the traffic from day three and beyond of a single blog post will eclipse that big spike on days one and two thanks to being found on search engine results pages through organic search. You just have to give it a while.

To help drive this long-term traffic, make sure you're writing blog posts that have durable relevance on a consistent basis. These posts are called "evergreen" blog posts: They remain relevant, valuable, and high quality year after year with little or no upkeep.

"Your evergreen content is an ongoing asset and in many cases has more potential to perform than a new, unproven post."

— Amanda Sellers, Historical Optimization Manager at HubSpot

Over time, as you write more evergreen content and build search authority, those posts will end up being responsible for a large percentage of your blog traffic. It all starts with a slight shift in perspective from daily traffic to cumulative traffic so you can reframe the way you view your blog and its ROI entirely.

17. Add a subscription CTA to your blog and set up an email newsletter.

Mistake: You aren't growing subscribers.

Once you start blogging, it's easy to forget that blogging isn't just about getting new visitors to your blog. One of the biggest benefits of blogging is that it helps you steadily grow an email list of subscribers you can share your new content with. Each time you publish a new blog post, your subscribers will give you that initial surge of traffic — which, in turn, will propel those posts' long-term success.

The key to getting significant business results (traffic, leads, and eventually customers) all starts with growing subscribers.

Solution: Set up a subscription CTA and email newsletter.

First, use your email marketing tool to set up a welcome email for new subscribers, as well as a regular email that pulls in your most recent blog posts. (HubSpot customers: You can use HubSpot's email tool to easily set up these regular email sends, as well as set up a welcome email for new subscribers.)

Next, add subscription CTAs to your blog (and elsewhere, like the footer of your website) to make it easy for people to opt in. These CTAs should be simple, one-field email opt-in forms near the top of your blog, above the fold. As for where to put these CTAs, we typically place our blog CTAs at the bottom of our blog posts or add a slide-in, which you can learn how to do using a free tool called Leadin here.

You can also create a dedicated landing page for subscribers that you can direct people to via other channels such as social media, other pages on your website, PPC, or email. 

18. Refresh old content while writing new content.

Mistake: You are publishing new content while neglecting old content.

Once you start blogging consistently, it’s easy to put all of your effort on publishing new content. However, neglecting old content can hurt your click-through rates and SEO because as time passes, the more outdated and less relevant your content becomes to reader’s current needs. For instance, if you have a blog post about Facebook pages with screenshots from years ago, your content is no longer as helpful and thus will drop in ranking. Updating your old content will show Google your information is valuable, relevant, and fresh.

Solution: Refresh your old content.

Your old content is just as important as your new content. When you refresh the information on your older blog posts, you are ensuring your content is accurate and up to date, thereby improving your rankings and click-through rates. By checking for spelling and grammar, updating information, and linking to newer resources, you’ll enrich the user experience and greatly improve your blog post in Google’s eyes.

19. Vary the mediums where you share your content.

Mistake: You only use one medium to share your content.

Growing your audience is imperative to your business, and using different mediums — such as podcasts, ebooks, and more — to distribute your content will help you do just that. Try experimenting with various mediums to present the same information that’s in your blog post. A 2021 stat says that 56% of Americans aged 12-34 listen to at least one podcast per month. That means that more of your audience is relying on podcasts to get the same information they might get while reading an article. Publishing your article in a text medium only will significantly limit your audience reach.

Additionally, by having different mediums, you also get to produce more content around the same topic, negating the need for brainstorming sessions.

Solution: Try different mediums to reach your audience.

By utilizing different platforms, you will increase audience engagement on your blog. You can generate more ideas on the same subject when you use more than one medium and, consequently, generate a larger audience. Additionally, adding video content can help your blog. 34% of bloggers say they experience strong results after including videos in blog posts. So, if you are trying to increase audience engagement or switch up how you share your information, including different mediums will go a long way in building a successful blog.

20. Promote your content.

Mistake: You are not sharing your content via social platforms.

It is essential to write new posts on a consistent basis to be recognized and scale your audience; however, as much as it is important to write new content, you have to promote the content you’re writing. Posting your content on social platforms like Facebook, LinkedIn, Twitter, and Instagram will help your content get more traffic and can help grow your audience. In 2021, 90% of bloggers used social media to promote their content, while 62% of bloggers used email marketing and SEO to help promote their content.

Solution: Promote your blog on your social platforms.

Over 3.6 billion people use social media, and the number is increasing rapidly. That means that platforms such as Facebook and Twitter are essential to promoting your business. Sharing your content via social media will attract a wider range of people to your content. With the right social media marketing strategy, you can drive hundreds, if not thousands, of qualified visitors to your site.

Feeling overwhelmed? Let's summarize the blogging mistakes you should avoid.

Blogging Mistakes Are a Thing of the Past

Blogging is more than just writing words on a screen and hitting the publish button. Don't worry if you read through this list and are now thinking to yourself, Well, this is awkward ... I've made literally every single one of these mistakes. Remember: I used the word "common" to describe these mistakes for a reason. The more you blog, the better you'll get at it — and you'll reap the benefits in terms of traffic and leads in the process.

Blogging as a business is always about setting yourself up for success and knowing and understanding your audience and the content that they want to read and see. Making sure that your grammar, title, and blog is properly organized, staying on brand, connecting with your target audience will only help your business scale into more success.

We hope you'll use this list of mistakes to step up your blogging game. After all, the benefits of keeping up a healthy business blog will be well worth the time and effort.

Editor's note: This post was originally published in July 2014 and has been updated for comprehensiveness.


20 Blogging Mistakes to Avoid in 2022, According to HubSpot Bloggers was originally posted by Local Sign Company Irvine, Ca. https://goo.gl/4NmUQV https://goo.gl/bQ1zHR http://www.pearltrees.com/anaheimsigns