Friday, August 27, 2021

The Ultimate Guide to RFPs

Have you been tasked with the job of creating a request for proposal, or an RFP?

Whether you have no idea what that is or haven’t written one in awhile, today’s guide can help.

We’re diving into the specifics of what an RFP actually is, why you might need one, and how to create your very first one today.

To start, you should understand what all these letters even mean.

Download Now: Free RFP Templates


When your company has a new (often large) project, or one that’s more complex and requires a bit of outsourcing, an RFP can help you get the job done right the first time.

The RFP doc becomes a way for you to quickly uncover the strengths and weaknesses of potential vendors in relation to your project without having to spend too much of your time hunting for them yourself.

RFPs can also give you a sneak peek into different strategies you may not have considered since each vendor will include their own unique action plan along with their bid.

And you’ll have this information before you ever have to commit to the vendor.

Keep in mind, this should not be confused with an RFQ.

RFP vs. RFQ

An RFQ, or request for quotation, is slightly different than an RFP since it’s just the quote itself. Here, companies solicit multiple price quotes from various vendors to compare services based on price alone. While an RFP includes a price quote (along with several other specifics), an RFQ does not detail anything other than price.

As opposed to an RFP, an RFQ is a request for quote or quotation.

Here’s how to understand the difference:

While you’re technically receiving a quote in an RFP, you’re also getting information like the action plan, timeline of completion, deliverable schedule, and the list of services provided as well.

But with an RFQ, you’re only receiving the quote itself for the service or products you’re interested in purchasing.

In most cases, simply comparing quotes is not enough to see if a potential vendor is the right fit for your company, which is why an RFP is more appropriate in these situations.

What is an RFP in marketing? 

In Marketing, an RFP is often used to outsource any marketing activities that could help your brand increase reach. These activities include anything related to marketing that you can't do internally. 

For instance, if you work at a small startup, you might create an RFP to find a full-service communications and marketing firm to create an integrated marketing plan for your business. If this is the case, you'd outline in your RFP that you're looking for a firm to help you "increase SEO presence" or "attract social media followers", etc. 

On the flip side, if you work for a marketing agency, you'll want to keep an eye out for RFPs in your area related to services you offer. For instance, if you work for a web design company, you'll want to look for businesses that have created RFPs for web design services. 

What is an RFP in sales?

In sales, an RFP is often created when a business is looking to purchase a product or service to suit its needs. For instance, if an enterprise company is looking for a new CRM software, the business might release an RFP that outlines what it's looking for, and what it's hoping to achieve with new CRM software. 

For this reason, RFPs can play a critical role in the enterprise sales cycle. Enterprise companies that issue RFPs are often looking for businesses that can provide them with IT support, security, onboarding and training, and other additional services. To close these larger accounts, it's vital your sales team is prepared with an RFP response process, and is able to efficiently respond to these large companies within the time allotted. 

The RFP Process Explained

Before potential bidders can submit their proposals, an RFP must be drafted by the company requesting the work. (P.S. We’ll show you how to do this later in this guide)

This gives potential contractors a better idea of what your company is looking for.

Once your RFP is sent out, contractors or vendors can review it and submit their best bids to compete for the job.

In these proposals, vendors generally include the following items:

  • An action plan of how they’re going to solve the issue
  • A timeline of what you can expect
  • Any necessary background information
  • How much they expect the entire project to cost

In certain cases, bidders may come back and say specific components of the RFP need to be adjusted based on their experience in the industry.

At this point, you can either review their feedback and create a new RFP to adjust for the changes, or you can leave the original as is and keep it in mind while considering the other submitted bids.

Once you receive all the proposals, it will be almost effortless to compare each one and determine which vendor is the best fit for your company.

Out of the stack of bidders, you’ll want to narrow this down to a handful of your top three, five, or 10 favorites to consider, depending on how many you receive or are interested in.

From here, you’ll want to spend time vetting potential vendors further to determine who’s really the ideal fit for the job.

Some companies may request one more best and final offer from their top vendors after they’ve started this negotiation process to ensure they’re not only getting the right person or company for the job, but at the right price, too.

While this may sound like an extra step, it’s one that may save you money, time, and headaches down the road.

But this also leads us to a big question: Is all of this really necessary?

Can’t you just spend time reviewing two or three vendors on your own?

As you’ll see next, that route is definitely not in your best interest.

Why Issue a Request for Proposal?

Let’s briefly compare these two scenarios:

  • Option #1: Spend time finding the perfect vendor on your own.
  • Option #2: Use an RFP to get potential vendors to come to you.

Choose the first route, and you’ll probably use your coworkers, friends, and networking groups to help solicit possible referrals for the job.

Or you might perform a Google search to check out the top vendors in your area.

After you review the website of a possible candidate for the job, you’ll craft the perfect message to reach out and learn if they can even help.

Then, you’ll have to explain the specifics of your project and you may or may not ask them to submit a proposal before deciding to choose them for your project.

It’s not a complicated process, but did we mention you have to repeat it for every promising referral or vendor you come across?

Imagine how long that’s going to take!

Now, what if these potential contractors already knew your project details and they came back with their best plan of action and a formal bid for you to review?

So instead of having to explain your needs each time, you would simply outline it once, and send it out to the masses.

And to save you even more time, it would be up to potential contractors — not you — to reach out.

The RFP route also gives you a sneak peek into each vendor’s real plan of action, not the one they talk you into over the phone or in person.

Since potential candidates have to submit a formal bid, they’ll need to spend time outlining the solution and really working through the problem at hand.

And if they don’t, you have an easy way to weed out vendors and cut through the stack of options fairly quickly.

But, to get to this point, you can’t make this next mistake.

Here’s What Not To Do With an RFP

If you want to find the right vendor, you need your RFP to be specific.

Only asking “yes” or “no” questions won’t get you anywhere.

That’s why you must create specific questions that require thoughtful answers.

Try to use sentences similar to these:

  • Can you share an example of how you’ve solved this problem or a similar one for another company? Did you encounter any unforeseen roadblocks? What would you do the same or differently this time?
  • With your proposed redesign, how long would it take a non-tech savvy person to complete the new registration form? How much time do you estimate this could save?

With these tips in mind, you’re ready to draft your first RFP.

How to Write an RFP

Here’s the basic structure of an RFP and what to include in yours:

1. Project Overview

Before you go into the specifics of your company, you should give a brief introduction to the project itself so vendors know right away if it’s something worth bidding on.

2. Your Company Background

This shouldn’t be a long history of your company. Rather, it should give contractors a better idea of what your company does and who you serve as a target market.

3. The Goals of Your Project

Clearly identify what you hope to accomplish with this project and what you see as a “win” so everyone is on the same page.

4. Project Scope

The details of the project are essential in an RFP. In the same way you don’t want to use vague questions, a vague project scope won’t help you find the right vendor either.

Spend time really detailing your project scope so there’s no surprises later on.

5. Target Deliverable Schedule

Even if your deadlines aren’t super tight, you should still have a target deliverable schedule in mind. This needs to be included in your RFP so potential vendors can properly gauge if they have the resources and bandwidth to complete the job on time.

6. Possible Roadblocks

Don’t hide your existing or potential issues under the proverbial rug if you want them to disappear. A successful RFP is explicitly clear about any technical issues or possible roadblocks, such as: Are you dealing with custom coding or an outdated platform? Does your team have limited resources?

By explaining these up front, potential vendors will know exactly what they’re getting into.

You’ll also naturally weed out contractors who can’t handle the task due to those constraints.

But you’ll also connect with companies that know how to work around these common issues with skill and finesse.

Remember, it’s far better to find this out now than after you’ve accepted the bid and started work.

7. Budget Constraints

It’s also important to be upfront with your budget too. The more you can eliminate surprises, the better for all parties involved.

8. What You’re Looking For in Potential Vendors

Another way to reduce or eliminate surprises is to explain exactly what you’re looking for in potential contractors.

All you have to do is outline what matters most to your project (i.e., time, solution, budget, etc.) and show how you’ll be evaluating their proposals based on that.

We’ll show you how this is done soon, but before we do, there’s one more thing to add here: an RFP cover letter.

Just like a cover letter for a resume, an RFP cover letter creates a professional image for your brand and sets the tone for prospective vendors. It signals that they should take the proposal and the project seriously.

The good news is there are a number of tools to make creating RFPs easier and less stressful than you’re imagining.

Sample Responses to RFPs

If you've issued an RFP and are collecting responses, you might be wondering what you should look for in effective RFP responses. Here, let's look at a few examples of impressive RFP sample responses. 

Example One: General RFP Response for Web Design Services

Dear [author of RFP]:

Regarding your request for proposal (RFP), [our company] is thrilled about the opportunity to provide you web design services. Having worked with [brief list of past clients], we believe a partnership with [company you're writing to] would have a tremendous impact on your customer satisfaction and bottom line.

As one of [client's industry] leading providers of [client's main service], you know just how critical this time of year can be for your customers. On average, the cost to deliver is $[xxxx.xx], and [client name] is committed to "[client's mission statement]."

As these challenges become more common, it is increasingly important to provide customers with a powerful, SEO-optimized website to atttract new leads. With this in mind, [our company] intends to help [client's name]:

  • Create a sleek, impressive website that is clean, user-friendly and mobile responsive to work on all devices, so web viewers have a strong first impression of your brand regardless of the device they use to find you. 
  • Help you strengthen brand identity through a new logo and a new, cohesive color palette. 
  • Ensure each of your web pages are SEO-optimized to rank quickly, which will attract new customers to your website and demonstrate your leadership in the industry. 

As stated in the executive summary, [our company] intends to help [client's name] [brief allusion to client benefits outlined in executive summary]. To do this, our team has outlined a proposed set of deliverables, an order of operations, division of labor, and expected dates of completion to ensure the partnership between [your company] and [client's name] is successful.

[Your company] can't wait to work with you to help [client's name] in addressing [client's challenges described in Executive Summary]. To recap, please see below a brief overview of the services included in this partnership.

This sample response clearly and succinctly explains how the vendor's service will solve the buyer's critical pain points when it comes to creating a strong website. By outlining the key benefits, you're showing the client how you'll put them first and focus on their needs to get the job done. 

Example Two: Video Production Company Offering Its Services

sample RFP response from paul horton visuals

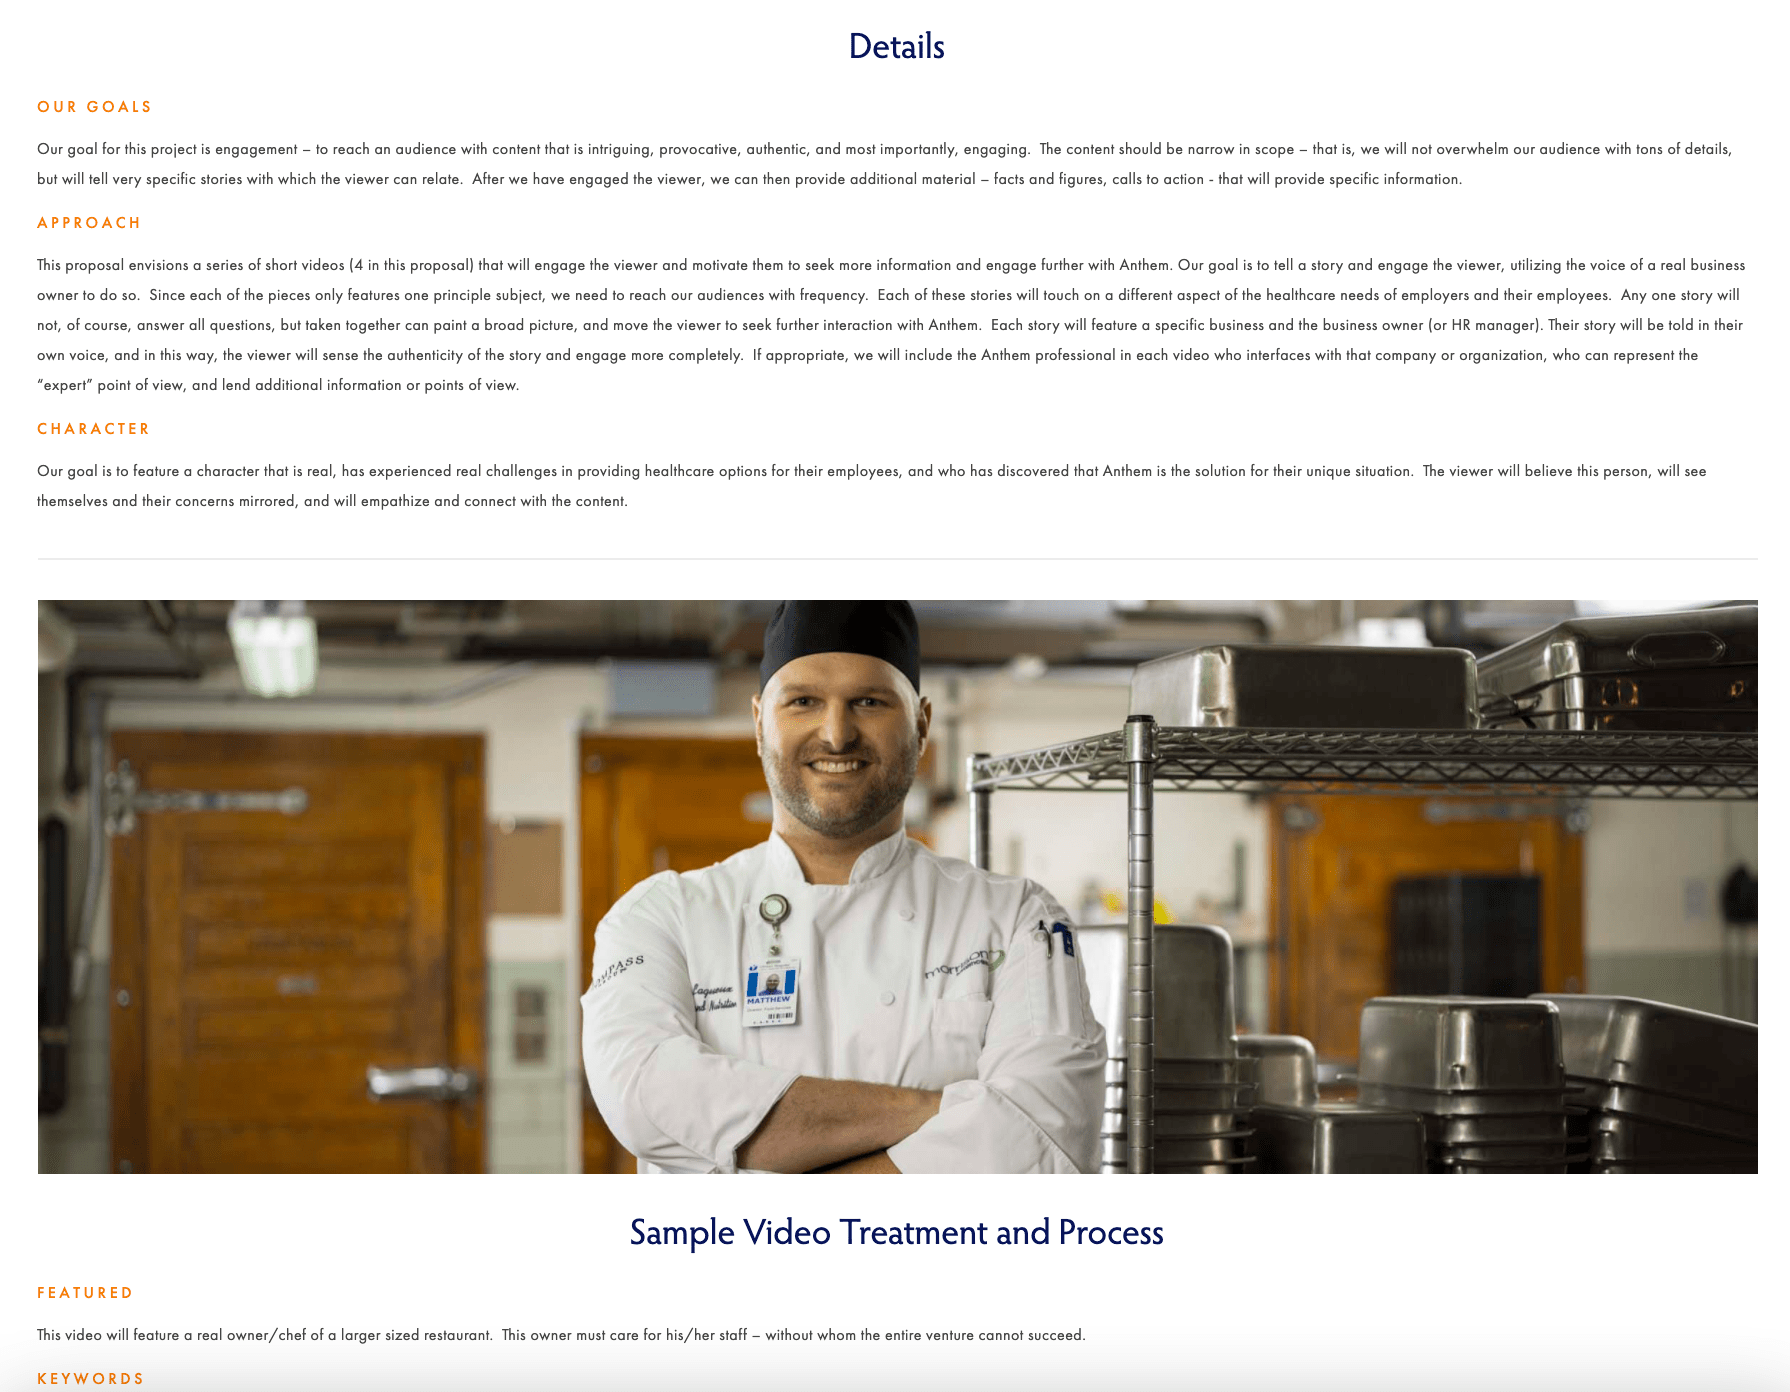
When responding to an RFP from Anthem Blue Cross and Blue Shield, Paul Horton Visuals chose to create a full webpage dedicated to their RFP response. The webpage format enabled the team at Paul Horton to create a full sample video treatment and process to show Anthem what they'd be able to deliver if Anthem chose them. The page also includes an embedded video to highlight the strengths of Paul Horton: video production. 

Proposal Software Tools to Help You Manage RFPs

In this article, we outlined 10 tools to help you manage and create professional looking proposals in less time.

For today’s purposes, the following five tools are great places to get started:

1. RFPIO

RFPIO Solves the problem of responding to RFPs, from project management to collaboration, to integrating with other software.  Their solution includes reporting dashboards, auto-response features, and automated generation of proactive proposals from within your CRM. RFPIO also includes an intelligent answer library that turns previous RFP responses into on-demand intelligence that empowers revenue teams with enterprise content at their fingertips wherever the work. 

And what's better? RFPIO has an integration with HubSpot that will automatically sync your RFP with your portal, making it easy to share information with your team. 

2. PandaDoc

To create customized RFPs with your own branding, consider using the proposal software PandaDoc.

Here you can set up your first RFP within minutes and even collaborate with team members using real-time updates within the document itself.

3. Nusii

Similar to other proposal software on the market, Nusii uses a drag and drop editor that makes building RFPs a breeze — especially for beginners.

Thanks to its clean, modern, simple design, it’s also really easy to figure out too.

One of the most helpful features of Nusii is using it for re-working existing RFPs to save you time. Just copy the content from an RFP you like and edit information to fit your new request.

4. Loopio

How do you plan on organizing all the responses to your RFPs?

One standout feature with Loopio is its RFP response library, which gives you instant access to all your answers from previous RFPs. This saves you the hassle of digging around to find what you need in a crowded inbox.

Their magic feature will even help you auto-populate a response if it appears similar to one you’ve already done.

Plus, you can manage your entire RFP process — including sending automated responses — and collaborate with your team all in one place with their intuitive dashboard.

And if proposal tools are out of the budget right now, or if you’d like to try your hand at creating your own first, use this template as a starting point.

5. RFP360

RFP360 streamlines your approach to RFP response management. Their intuitive knowledge management, workflow and collaboration features make it easy to create, review, update and approve compelling responses in a single library. Proposal automation and answer intelligence (AI) capabilities accelerate your ability to answer questions, suggesting the best possible responses and automatically completing them in bulk.

You can also import RFPs in various formats and generate polished final proposals, and integrated extensions allow anyone across your organization to use content from your knowledge library in Microsoft Office files, online questionnaires and forms — without leaving those applications.

Free and Editable RFP Template

free editable RFP request for proposal PDF template

Download a free, editable RFP template.

To use this template, simply download it here or fill out the form below. You can remove sections or pieces of information that don’t pertain to your project and add whatever else you need for your RFPs.

Over To You

Now that you have a better idea of what an RFP is and how to create your first one, you’re ready to get started.

Sit down with your team to narrow down your project’s specifics, goals, and scope of work. Then determine when the project needs to be completed and your budget before moving on to the drafting phase.

With this intel gathered, you’ll be ready to plug everything into our template.

You can also use this tried-and-tested proposal formula to ensure your RFP is professional and polished too.

Follow these steps and you’ll have an RFP template you can quickly update. Your next project will be a success that much faster. 

Editor's note: This post was originally published in August, 2018 and has been updated for comprehensiveness.

rfp templates


The Ultimate Guide to RFPs was originally posted by Local Sign Company Irvine, Ca. https://goo.gl/4NmUQV https://goo.gl/bQ1zHR http://www.pearltrees.com/anaheimsigns

Going global and staying local – How Storytel cuts through the noise

Storytel is a remarkable success story, one where adaptation and best in class localisation plays a starring role. And in terms of display campaigns, Storytel is a brand at the forefront of multi-market, multi-channel advertising.

Headquartered in Stockholm, Storytel is one of the world’s leading audiobook and e-book streaming services and offers unlimited listening and reading of more than 500,000 titles on a global scale. Present in 20+ different markets it prides itself on connecting with customers at a local level.

At the heart of its digital and display advertising are dedicated individuals who are driving the brand towards ever more global success.

We spoke to Storytel’s Kajsa Berthammar, Head of Brand & Campaigns, Sara Waldestam, Campaign Planner, Svante Fjaestad, Motion Designer, and Nikolina Ivis, Design Coordinator about how they achieve their marketing objectives.

What are the challenges facing Storytel when doing digital marketing? In particular, display advertising?

Kajsa Berthammar, Head of Brand & Campaigns: When it comes to digital and display, it’s making all the formats, especially small formats.

Today we operate across 20+ markets, so that means producing a lot of material! That’s always an issue and it’s an issue that’s increasing for us as we grow.

Sara Waldestam, Campaign Planner: The challenge is with the formats, as Kajsa said. In particular, the volume we need to create, especially for smaller markets and verticals.

Kajsa: We also offer a service that is very local, if you compare it to a lot of other streaming services like Netflix or Spotify. Storytel users tend to consume the content in their local language, meaning we need to easily tweak our material.

The same is true of our video creatives – it’s complicated creating video for a global brand and maintaining local relevance.

How is Storytel overcoming these challenges?

Kajsa: We try to automate as much as we can. In that sense, Bannerflow has been really helpful for us when it comes to intuitive format adaptations and those kinds of things; such as the smoothness of adding local images, or localising copy.

But then it’s also the media mix and understanding the bigger picture. For us it’s about creating smart templates and doing whatever we can with data feeds and those kinds of things that can be automated and connected to the product.

How have your display advertising processes changed since using Bannerflow?

Sara: A big change has been that things that once were done by a production company, we now use Bannerflow instead. And with 20+ markets to serve, we can now take a single campaign and push it out to all of those markets quickly.

Kajsa: The general answer is that we have been able to make the markets more self-servant. Now we can provide material to 20+ markets without doing every single adaptation ourselves, which is a huge help.

Sara: Bannerflow enables us to use the right display formats for the right market. Before we were like, no, we can’t make one more size but today we can target better because we can create that extra size. Plus, since our Christmas 2020 campaign, we started creating social assets in Bannerflow – with sound – which was amazing.

Sara Storytel body quote

How long does it take you to produce a campaign?

Kajsa: It varies because we do everything. Big global brand films, which cover every channel – including display – for those the production process is quite long.

But we also do many performance-focused campaigns. And, of course, this is a much quicker process. For example, it could be: Can we test this? Can we try it in one market and see if it works and then ramp up? etc.

What’s the quickest campaign you’ve ever done?

Svante Fjaestad, Motion Designer: I’m not sure – but the last one for the performance team was 56 still ads, complete with videos for about 50 more, which took 15 hours. However, when the automation works as it should, it goes rather quick!

Sara: We are pushing large amounts of display formats in those sets too. How many sizes do you have in one set?

Svante: Maybe a few hundred, it was a lot – and that’s just for the English template. The local markets will take the English version of the campaign and translate it into their own local language. And the best thing is they don’t have to go into each asset at one time; they just change the image URL, change the copy, and away they go!

Storytel designer quote image

What is it like producing and controlling campaigns across multiple markets?

Kajsa: As you know, Storytel is a rather local product in the sense of the content. Meaning that when it comes to titles and book covers (those kinds of things), it’s crucial that we localise.

Failure to do so would just be weird. We simply can’t promote a title that we don’t have in the specific market materials. Yet, it’s also important to find a balance and understanding in regards to what material we need or what should be localised, and when and where it is not as necessary. Because localising is also a very time-consuming process.

How are you able to make sure your localisations are accurate?

Kajsa: We set the master copy for our global communications, either in-house, or via an agency; depending on the campaign. Local teams then translate it by themselves. This is also a challenge – just with translation and localisation. It’s a process that needs to be tweaked all the time, to ensure that we do it in the best possible way.


Nikolina Ivis, Design Coordinator: A big thing for us is using automation but achieving the flexibility we require as well. Usually those two things collide.

We want to automate as much as possible, but we also need to be able to adapt creatives to 20+ different markets. And sometimes that can be complicated, for example, a word in Finnish might be ten times longer than in English, and so on. You always need to find the best way to blend automation with the flexibility to make changes.

In Bannerflow you just translate an ad set in the platform and it’s done.

Nikolina Storytel quote

Are you able to take learnings from one market and apply them to new markets?

Kasja: That’s often what we do. You have an idea of what you think might work, test it in one market and then you scale it out.

Currently, one of the things we are investigating is exploring how much you need to localise and amend. If you look at the time, effort, and resources going into our ad output, what is the perfect balance? And with the setup we now have, it’s possible to start looking at these questions and answering them.

Do you feel your focus on localisation gives you a competitive edge?

Kajsa: We’d like to hope so. It’s one of the things that makes us stick out, I feel. We have a local presence, local offices, and local production processes, in most markets where we are present. And that’s not always the usual set-up.

If you have your ears to the ground, then of course you get the extra sense of what works or what doesn’t. It’s easy to assume what works in one market automatically will work in all of them – when in fact we need to be very open to local differences.

Kajsa Storytel on localisation

Finally, what is it about the Bannerflow platform that makes designing ads smoother?

Nikolina: The scaling and automation. And just to underline it: today we create something once and then share it to all of the markets to do their adaptations. Before we had to do every banner manually in our team and that takes so much time.

Now, if you just change the copy in the box to the right and then change the image, the creative automation adapts all the assets – easy for us in Stockholm, and easy for all the other teams in different markets. If they want to change an image, or the copy, it’s done and dusted in two minutes.

Next steps

Want to know more about how to localise and save time building ads through production automation? Then get in touch with the Bannerflow team today, or apply for a demo now!

The post Going global and staying local – How Storytel cuts through the noise appeared first on Bannerflow.


Going global and staying local – How Storytel cuts through the noise was originally posted by Local Sign Company Irvine, Ca. https://goo.gl/4NmUQV https://goo.gl/bQ1zHR http://www.pearltrees.com/anaheimsigns

Thursday, August 26, 2021

Conversion Rate Optimization (CRO): 8 Ways To Get Started

Today, most marketing teams are focused on driving traffic toward websites in hopes that this traffic then converts into qualified leads for sale reps to close. But that's only half the battle.

Getting more out of existing traffic and leads (versus entirely new traffic) can propel companies toward long-term, sustainable growth. That's where conversion rate optimization (CRO) comes in. In this guide, you'll learn about the power of CRO, why your business should focus on improving your conversion rate, and how to get get started.

Download Now: Free 8-Week Conversion Rate Optimization Planner

What is a conversion rate?

A conversion rate is the percentage of visitors who complete a desired action, like completing a web form, signing up for a service, or purchasing a product.

A high conversion rate means your website is well-designed, formatted effectively, and appealing to your target audience. A low conversion rate could be the result of a variety of factors related to either website performance or design. Slow load times, a broken form, or copy that doesn’t convey the value of the offer are common reasons for a poor conversion rate. 

What is a good conversion rate?

A "good" conversion rate depends on your industry, niche, goals, traffic channel, and audience demographics, among other factors. For example, the average conversion rate of ecommerce sites globally was 2.17% in the third quarter of 2020, which was down from 2.37% the previous year. The ecommerce conversion rate in the US was higher, however, at 2.57%.

The average not only differs by year and by country — it also differs by niche. For example, the average conversion rate of ecommerce sites in the food and beverage sector is 5.5% whereas the average in the haircare sector is 3.5%. 

If your conversion rate is lower than you'd like — maybe it's below average in your industry, or lower than your top competitors, or simply underperforming against your own goals — then it's time to optimize. 

What is CRO?

Conversion rate optimization, or CRO, is the process of enhancing your website and content to boost conversions. 

The process of optimizing for conversions allows you to boost your number of highly-qualified leads, increase revenue, lower acquisition costs, obtain greater value from your current leads and customers, and, simply, grow better.

Conversions can happen all over your website: on your homepage, pricing page, blog, landing pages, and more. To maximize the potential of converting website visitors into paying customers, you should optimize each location. 

Before we take a look at the benefits of CRO, let's walk through how to calculate your site's conversion rate. That way, you'll have a better understanding of how much time and resources to invest in a CRO strategy. 

How to Calculate Conversion Rate 

Conversion rate is calculated by dividing the number of conversions by the number of visitors and multiplying that number by 100 to get a percentage.

how to calculate conversion rate: conversion rate formula

As long as you know how you're defining a conversion, then calculating your conversion rate is easy. You just plug in two values and multiply by 100. 

Let's say you're defining a conversion as a newsletter opt-in, and you have an opt-in form on every single page of your website. In that case, you'd divide the total number of newsletter form submissions by the total number of website visitors and multiply it by 100. So if you had 500 submissions and 20,000 visitors last quarter, then your conversion rate would be 2.5%. 

You can repeat this process for every conversion opportunity on your site. Just make sure to only count the number of visitors on the webpages where the offer is listed. For example, if you want to calculate the conversion rate of your ebook offer, then you'd divide the total number of downloads by the number of people who visited webpages where the ebook offer is listed. 

Alternatively, you can calculate your website's overall conversion rate by dividing the total number of conversions for every conversion opportunity on your site by the total number of visitors on your site.

How Websites Benefit From CRO

Here are four areas of your website that have the potential to largely benefit from conversion rate optimization.

1. Homepage

Homepages are prime candidates for CRO. In addition to making a first impression on visitors, the homepage is also an opportunity to retain those visitors and guide them further into your website.

You can do this by emphasizing links to product information, offering a free signup button, or even incorporating a chatbot that solicits questions from visitors at any point during their browsing experience.

2. Pricing Page

A website's pricing page can be the make-or-break point for many website visitors. CRO can help a pricing page convert visitors into customers by modifying the pricing intervals (e.g. price-per-year vs. price-per-month), describing the product features associated with each price, including a phone number for visitors to call for a price quote, or adding a simple pop-up form. 

Hotjar, for example, added a simple email opt-in popup form on its pricing page and got over 400 new leads in just three weeks.

how websites benefit from CRO: Hotjar Pricing Page Popup Overlay

3. Blog

A blog is a massive conversion opportunity for a website. In addition to publishing thoughtful and helpful content about your industry, a blog can use CRO to convert readers into leads.

This process often includes adding calls-to-action (CTA) throughout an article or inviting readers to learn more about a topic by submitting their email address in exchange for an ebook or industry report.

4. Landing Pages

Since landing pages are inherently designed for people to take an action, it makes sense that they have the highest average conversion rate of all signup forms at 24%. An event landing page, for example, can be optimized with a video of last year's event to encourage visitors to register this year. A landing page that's offering a free resource can be optimized with preview content from that resource to encourage visitors to download it.

Now that you know where you can optimize for conversions, you may be wondering how you know when your business is ready to start the process.

When is CRO right for your business?

The short answer: CRO is important for any business online. That's because, no matter how established or large your company is, you want to convert your website visitors into qualified leads, customers, and brand advocates — and you want to do so in the most effective, impactful, and reliable way.

With conversion rate optimization, you'll get more out of your existing website traffic while ensuring you're targeting qualified leads.

Although this is a straightforward concept, setting a conversion goal isn't as easy as saying, "This page converted 50 people this month, so we want to convert 100 people next month."

You don't just want 50 more conversions from a webpage. Instead, you want 50 more conversions for every X amount of people who visit it. (This is your conversion rate — the percentage of people who convert on your website based on how many people have touched it).

To provide a better understanding of where you stand at any point in time in regards to conversion rate, here are three commonly-used formulas your business can use to understand, analyze, and improve.

CRO Calculation 1: Conversion Rate

As we mentioned earlier, to calculate conversion rate, you must divide your number of conversions (or leads generated) by your number of visitors (or web traffic), and then multiply that number by 100 to get the percentage.

Leads Generated ÷ Website Traffic x 100 = Conversion Rate %

CRO Calculation 2: Number of Net New Customers

To calculate your number of net new customers, you'll want to divide your net revenue goal by your average sales price.

New Revenue Goal ÷ Average Sales Price = Number of New Customers

CRO Calculation 3: Lead Goal

And lastly, to calculate your lead goal, take your number of new customers and divide it by your lead-to-customer close rate (which is your total number of leads divided by total number of customers) percentage.

Number of New Customers ÷ Lead-to-Customer Close Rate % = Lead Goal

Here's an example of these formulas in action:

If your website has 10,000 visitors per month that generate 100 leads — and subsequently, 10 customers each month — the website visitor-to-lead conversion rate would be 1%.

What if you wanted to generate 20 customers each month?

You could try to get 20,000 visitors to your website and hope that the quality of your traffic doesn't decrease — although, that's a risk you'll likely want to avoid. Rather, you could obtain more leads from your existing traffic by optimizing your conversion rate. This is less risky and is more likely to produce better results for your bottom line.

For instance, if you increase your conversion rate from 1% to 2%, you'd double your leads and your customers. The following table is proof of this — you can see the positive impact that results from increasing your website's conversion rate:

Company a B c
Monthly Site Traffic 10,000 10,000 10,000
Conversion Rate 1% 2% 3%
Leads Generated 100 200 300
New Customers 10 20 30

Notice the drastic increases in number of leads generated and net new customers when you boost your conversion rate.

Not only that, but it's clear that generating more website traffic isn't necessarily the right approach when trying to improve your conversion rate — in fact, this chart shows you that you can grow your business substantially without increasing traffic at all.

Hard to believe? Think about this way: Pretend you were trying to fill up a leaky bucket. If you pour more water into the bucket, you won't fix the root cause of the issue — instead, you'll end up with a lot of water that's wasted (not to mention, a bucket that will never fill up all the way).

Are you ready to take the first steps toward CRO at your company? Review the strategies below and start experimenting.

CRO Marketing Strategies to Try

Here are some applicable conversion rate optimization marketing strategies to test and implement at your company.

1. Create text-based CTAs within blog posts.

While it's considered a best practice to include CTAs in a blog post, they sometimes fail to entice visitors to take your desired course of action. Why?

Banner blindness is a real phenomenon related to people becoming accustomed to ignoring banner-like information on websites. This lack of attention coupled with the fact site visitors don't always read all the way to the bottom of a blog post (rather, they "snack” on content), means a different approach is required.

That's where the text-based CTA comes in handy. Here at HubSpot, we ran a test with text-based CTAs — a standalone line of text linked to a landing page and styled as an H3 or an H4 — to see if they would convert more traffic into leads than regular CTAs located at the bottom of a web page.

In HubSpot's limited test of 10 blog posts, regular end-of-post banner CTAs contributed an average of just 6% of leads that the blog posts generated, whereas up to 93% of a post's leads came from the anchor-text CTA alone.

2. Add lead flows on your blog.

A lead flow is another conversion rate optimization element you can include on your site. Lead flows are high-converting pop-ups designed to attract attention and offer value.

You can select from a slide-in box, drop-down banner, or pop-up box, depending on your offer. We experimented with the slide-in box on the HubSpot Blog back in 2016 and it achieved a 192% higher clickthrough rate and 27% more submissions than a regular CTA at the bottom of a blog post.

3. Run tests on your landing pages.

Landing pages are an important part of the modern marketer's toolkit and, as mentioned earlier, integral to conversion rate optimization.

That's because a landing page is where a website visitor becomes a lead or an existing lead engages more deeply with your brand. To optimize a landing page, run A/B tests to identify your best design and content features for audience members.

For instance, with A/B testing you can quickly and easily test different versions of your website copy, content offers, images, form questions, and web pages to determine what your target audience and leads respond to best.

Thanks to A/B testing, China Expat Health was able to increase their lead conversion rate by 79%. One of the most impactful changes was swapping out the headline “Health Insurance in China” for “Save Up to 32% on Your Health Insurance in China,” which immediately conveyed a value proposition to visitors. This proposition was then supported by customer testimonials.

Get everything you need to start effectively A/B Testing your website today.

4. Help leads to immediately become a marketing-qualified lead.

Sometimes visitors want to get right down to business, skip parts of the typical buyer's journey, and immediately speak with a sales rep (rather than be nurtured).

There are specific actions you should encourage these high-intent visitors to complete so they can easily become marketing qualified leads (MQLs) — and they can take action through a combination of thoughtfully designed web pages, compelling and clear copy, and smart CTAs.

For instance, at HubSpot, we discovered that visitors who sign up for product demos convert at higher rates than visitors who sign up for free product trials. So, we optimized our website and conversion paths for people booking demos or meetings with a sales rep.

Admittedly, this depends on your product and sales process, but our best advice is to run a series of tests to find out what generates the most customers. Then, optimize for that process. The key here is to look for ways to remove friction from your sales process.

5. Build workflows to enable your team.

There are a number of automated workflows you can create to enable your team with the help of marketing automation software.

For example, with marketing automation, it's possible to send automatic emails with workflows. Then, leads can book meetings with reps in one click. Meanwhile, reps receive notifications when leads take high-intent actions such as view the pricing page on your website.

Or, if you work in ecommerce, you can send an email to people who abandon their shopping cart as a reminder.  According to research from Moosend, abandoned cart emails can be very effective. They have a high open rate of 45%. Of the emails that are opened, 21% are clicked. Half of the people who clicked make a purchase.

Here's an example of an abandoned cart email by the Dollar Shave Club. 

cro marketing strategy: abandoned cart email by Dollar Shave Club

Image Source

6. Add messages to high-converting web pages.

Use live chat software to chat with your website visitors in real-time and offer support and guidance as needed. To increase conversions, add these messaging features to your high-performing web pages — such as your pricing and product pages — so leads get the information they want in real-time.

You can also make your messaging and chat bots action-based. For example, if someone has spent more than a minute on the page, you may want to automatically offer to help and answer any questions they may have (again, a live chat tool, like HubSpot, makes this easy).

7. Optimize high-performing blog posts.

Again, publishing blog articles opens the door to a big opportunity for conversions. Even more so if you already have existing blog content on your site — in fact, at HubSpot, the majority of our monthly blog views and leads come from posts published over a month ago.

To get started optimizing your blog content, identify your posts with the highest levels of web traffic but low conversion rates. (Possible causes of this issue may be related to SEO, the content offer you are promoting, or your CTA.)

In one instance, we at HubSpot added an inbound press release template offer to a blog post about press releases — as a result, we saw conversions for that post increase by 240%.

Additionally, look at your blog posts with high conversion rates. You want to drive more qualified website traffic to those posts and you can do so by optimizing the content for the search engine results page (SERP) or updating it as needed to ensure it's fresh and relevant.

8. Leverage retargeting to re-engage website visitors.

It doesn't matter what your key conversion metric is: The cold, hard truth is that most people on your website don't take the action you want them to. By leveraging retargeting on Facebook and other platforms, you can re-engage people who left your website.

Retargeting works by tracking visitors to your website and serving them online ads as they visit other sites around the web. This is particularly impactful when you retarget people who visited your highest-converting web pages.

The normal inbound rules still apply here — you need well-crafted copy, engaging visuals, and a compelling offer for retargeting to work.

Take United's retargeting campaign for example. Using insights from previous ad campaigns, United focused on reaching people who had viewed their ads and were already considering booking a vacation. To this select audience, they promoted a 15-second video ending in a call-to-action.

If viewers felt inspired enough to book their vacation, all they had to do was click on the CTA to be taken straight to the United website. This proved to be a huge success. In just one month, 52% of conversions attributed to YouTube were click-through conversions directly from the ad.

(If you're a HubSpot customer, take a look at how the AdRoll integration can improve your conversion efforts.)

Now, let's talk about how you can get started with CRO at your company.

How to Get Started with Conversion Rate Optimization (CRO)

Maybe you're wondering, "Where do I start with CRO?”

Enter: PIE framework. Before starting a CRO project, prioritize your efforts by ranking each element on Potential, Importance, and Ease.

Use the PIE framework to answer the following questions for every strategy outlined in the previous section. Then, assign a score between one and 10 (one being the lowest and 10 being the highest) to each strategy.

  • How much total improvement can this project offer?
  • How valuable will this improvement be?
  • How complicated or difficult will it be to implement this improvement?

Once you've assigned a score for each strategy, add up the numbers and divide the total by three — this gives a score that shows what project will have the greatest impact. Then, work on the projects with the highest scores first.

The PIE framework isn't perfect, but it's easy to understand, systematic, and offers a starting point for CRO collaboration and communication among colleagues.

Frequently Asked Questions About CRO 

We've covered a lot about conversion rate optimization, but not everything. If you still have questions, then check out the answers to some of the most frequently asked questions below. 

What is the purpose of a conversion rate optimization?

The purpose of conversion rate optimization (CRO) is to improve the likelihood of visitors taking a desired action on a webpage.

What is a CRO strategy?

A CRO strategy is designed to convert more of your visitors into paying customers. While each CRO strategy will vary company by company, the general steps will not. You have to identify key metrics and your target audience. Then you have to collect user feedback and other data to decide what you’re going to test. Finally, you’ll run A/B tests to improve different pages and parts of your site for conversion.

What are CRO tools?

CRO tools are designed to simplify or automate the process of optimizing your conversion rate. They might help with lead capture, research, analytics, mouse tracking and heat maps, feedback, or running experiments.

What is a CRO test?

A CRO test involves adding, re-arranging, and redesigning elements on your website in order to maximize your conversions. Different CRO tests might focus on optimizing the copy, design, or placement of your CTAs, or the length of your headlines, among other elements. 

Begin Using CRO

There are many "best practices" out there when it comes to CRO but, ultimately, you need to find out what your customers respond to, and what drives results for your business.

Keep these three follow-up actions in mind when getting started with CRO today:

  • Use the three formulas to start the CRO conversation.
  • Experiment with CRO strategies to discover what works for your business.
  • Leverage the PIE framework to help prioritize your strategy.

Editor's note: This post was originally published in January, 2019 and has been updated for comprehensiveness.

Get the 8-Week CRO Planner


Conversion Rate Optimization (CRO): 8 Ways To Get Started was originally posted by Local Sign Company Irvine, Ca. https://goo.gl/4NmUQV https://goo.gl/bQ1zHR http://www.pearltrees.com/anaheimsigns

How to Add HTML Embed Codes to Your Website [Quick Tip]

If you want to curate others' content from social media or just make your own visual social media content work harder for your overall content strategy, you need to know how to embed HTML code onto your blog or website.→ Click here to download our free guide to digital marketing fundamentals [Download Now].

But wait a second ... before we get into the nitty-gritty of this tip, what the heck does "embed" mean? And what is HTML? If you don't know how to code at all, no worries — embedding external content is extremely easy. Let's take a second to break down the basics.

What does embed mean?

Embed means to integrate external content into another website or page. You embed something when you place a block of code — called an embed code — into the HTML editor of another website. When you hit ‘Save’ or ‘Publish,’ the media then renders on the published page.

Embedded content is referenced with HTML. HTML is one of the most basic languages used on the web to design and lay out web pages.

You often see this code when you're in the "back end" of your blog post. There’s where you’ll add your embed code.

Most social and multimedia websites have an option to generate an embed code right in each individual post. Here’s an example of an embed code for a HubSpot YouTube video:

And here’s the embedded result.

Want to do the same thing on your blog posts and pages? Let’s go over how you can generate an embed code for the top social sites.

Below, we cover these steps in more detail for each platform. In general, you’ll want to:

  1. Generate the embed code.
  2. Access your content management system and paste the embed code in your HTML viewer.
  3. Finished! You have embedded content into your website or blog.

Let’s dive into each step.

1. Generate the embed code.

Before embedding external content, you must first generate an embed code for the post or page you want to embed on your website.

We’ll go over how you can do that on most of the major social and content networks.

Embed a Facebook Post

To embed a Facebook post, do the following:

  • Navigate to Facebook on your desktop browser and go to the post that you’d like to embed.
  • Click on the three dots on the upper right-hand corner of the post.
  • On the drop-down menu, click Embed.

Embed code button on a Facebook post

  • A pop-up will appear, where you have the option to include the full post and access advanced settings. For beginners, we recommend leaving the options as they are and simply clicking Copy Code.

Embed code options on a Facebook post

  • Finished! You’ve got your embed code.

Embed an Instagram Post

Want to embed an Instagram post? The process is similar to Facebook’s. Note that you can only embed posts from the desktop version and not the mobile app.

  • Click the three dots in the upper right-hand corner of the post.
  • A popup will come up with several options. Click Embed, the second-to-last option.

embed-instagram-post

  • A pop-up will come up with your embed code. You have the option of including or excluding the caption.
  • After you’ve finished customizing your options, click Copy Embed Code.

Copy embed code pop-up on Instagram

  • Complete! You’ve got your Instagram embed code.

Embed a YouTube Video

YouTube videos can take your blog posts to the next level, and the best part is that you can embed its wealth of content on your blog posts for free.

To do so, take the following steps:

  • Navigate to the video that you’d like to embed on your website.
  • Under the video, next to where the likes are located, click Share.

Share button under a YouTube video

  • A pop-up will come up with several options, including sharing the post to other social networks. Click Embed.

Share options for a YouTube video

  • YouTube will create an embed code, which you can customize. You can start the video at a certain point or hide the player controls.
  • After choosing your options, click Copy on the lower right-hand corner of the pop-up.

Generated embed code for a YouTube video

  • Complete! Your YouTube video is ready to get embedded.

Embed a Tweet

If you embed a Tweet on your website pages or blog, you can generate engagement for your Twitter profile without relying on your Twitter followers. Website visitors can engage with your Twitter content, too.

To embed a Twitter post, do the following:

  • On a desktop browser, navigate to the post that you’d like to embed.
  • Click on the three dots on the upper right-hand corner of the post.
  • A drop-down menu will appear. Click Embed Tweet.

Embed Tweet button on Twitter

  • Twitter will take you to an external page on publish.twitter.com, where you can then further customize the look of the Tweet before embedding it on your site. For instance, you can set it to dark mode and change the display language of the Tweet.

Options for embedding a Tweet

  • Once you’ve customized it, click Update.
  • Click Copy Code.
  • Finished! The Tweet is ready to embed on your site.

There’s another way to generate an embed code for Twitter. Go to publish.twitter.com and insert the URL of the post that you’d like to embed. Twitter will then generate the embed code, and you can customize it using the same process as the last method.

Embed a Pinterest Post

Embedding a Pinterest post can lead website users back to your Pinterest profile and help you grow your Pinterest following. To get started, do the following:

  • Navigate to the Pinterest post you’d like to embed.
  • Click on the three dots right next to the image (or under the image, if you’re using the mobile website).
  • On the drop-down menu, click Get Pin embed code.

'Get Pin embed code' button on a Pin

  • A pop-up will appear with the embed code. You have the option of creating a small, medium, large, or extra-large embedded pin.

Generated embed code for a pin on Pinterest

  • Once you customize the size, highlight the code and click Command + C or CTRL + C.
  • Finished! Your Pin is ready to get embedded.

Embed a SlideShare Presentation

While SlideShare presentations are not as popular these days, they can still be a handy multimedia tool for spicing up blog posts and pages. Here’s how to embed a SlideShare presentation:

  • Go to the SlideShare presentation you’d like to embed.
  • Click Share under the presentation.
  • In the same window where the presentation appears, you’ll see the option to share it via social channels. The embed code will be underneath that.

Share SlideShare options with an embed code

  • Choose the size of the embed window and which slide you’d like the presentation to start on.
  • Highlight the embed code and click Command + C or CTRL + C.
  • Ready! You can now embed the SlideShare presentation in a web page or post.

Embed an External Webpage

Don’t want to embed a social post but rather a web page? You can embed an external web page using the iframe HTML tag.

All embed codes, including the ones for social sites, use iframe tags. This is what they look like:

You can use these same tags to embed an external webpage. Here’s how:

  • Navigate to the webpage you’d like to embed into your site.
  • Open up the notepad app on your computer. Paste the following code into it:
  • Return to the webpage and copy the URL.
  • Paste the entire URL where it says url in your iframe code. Don’t forget to include https:// at the beginning of your URL and to place the link inside the quote marks. Here’s what your code should look like:
  • Change the width and height of the frame if desired.
  • Copy the entire line of code. After, the webpage is ready to get embedded on your website.

2. Access your content management system and paste the embed code in your HTML viewer.

Although every CMS is different, you can probably find the HTML viewer with similar steps. We’ll go over how you can do it in CMS Hub and WordPress.

CMS Hub

In CMS Hub, you actually don’t need to add your embed content using the HTML editor (although you have the option to). Here’s how:

  • In your HubSpot dashboard, navigate to Marketing > Website > Blog. If you’re planning to add the code to a website page, navigate to Marketing > Website > Website Pages.

Blog and Website Pages buttons on the HubSpot CMS

  • Find the post or page that you’d like to add the embed code to. Hover over it, then click Edit.

cms-hub-website-page-list

  • Click into the module where you’d like to add the embed code. An options bar will appear near the top of the screen. In the right-hand side, click Insert.
  • Choose Embed from the drop-down menu.

Embed button on the HubSpot CMS

  • A pop-up will appear. Paste the iframe code into the text bar.

Insert embed pop-up in the HubSpot CMS

  • Click Insert.
  • Finished! You can edit the width and height of the embed content to customize it further.

To access the HTML editor, complete steps 1-3 above. On the top options bar, click Advanced > Source Code. You can then paste your embed code manually. Note that the end result is the same.

WordPress

To paste an embed code into your WordPress website, use the following steps:

  • Access your admin area and go to either Pages or Posts.
  • Click the title of the post that you want to add the embed code to. This action will take you to the post editor.
  • Click the Text tab on the upper right-hand corner of the text editor.

WordPress plain text editor

  • Paste your embed code where you want the module to appear.

3. Finished! You have embedded content onto your website or blog.

Once you reload the page, your embedded social post will appear.

Add Embedded Content to Increase User Engagement

By embedding external content on your pages and posts, you can increase engagement on your website and get your site visitors to interact with the content you post on social media. The best part is that it’s easy to do — simply generate the embed code, paste it into your HTML editor, and watch your user engagement grow.

Editor's note: This post was originally published in September 2013 and has been updated for comprehensiveness.

New Call-to-action

New Call-to-action

How to Add HTML Embed Codes to Your Website [Quick Tip] was originally posted by Local Sign Company Irvine, Ca. https://goo.gl/4NmUQV https://goo.gl/bQ1zHR http://www.pearltrees.com/anaheimsigns

Wednesday, August 25, 2021

18 Impressive Product Demo Videos You'll Want to Copy

In marketing these days, you can’t swing an enthusiastic micro-influencer without hitting someone who’s talking about video content. And it’s not without merit.

A recent Wyzowl study revealed that 69% of consumers prefer to watch a short video to learn more about a brand’s products or services.

With 84% of people saying they’ve been convinced to make a purchase based on a brand’s video, it’s clear video marketing is the future and product demo videos are a lucrative path forward.

→ Download Now: Free Product Marketing Kit [Free Templates]

There are many different types of product demo videos, so I’m sharing a few of my favorites below, along with tips on how to get started on your own product demo video.

Want to skip straight to the videos? Click here.

1. Identify the goal.

Purchases? Subscriptions? Education? Brand awareness? Decide what your video is trying to achieve and what you want the viewer to walk away with.

What action do you hope the viewer takes after watching your video, and what business need does it fulfill? For example, "After watching our product demo video, we hope the viewer submits a demo request form."

2. Determine your audience.

Has the audience for this video purchased with you before? Are you introducing a new product or feature to them? Or, is this video reaching people who have never heard of you? What will this audience be concerned with? How long will they want to watch? What buyer persona will you be gearing this video for?

All of these are important questions to answer.

For example, let’s say you’re introducing software that regulates the temperature of various areas in your office.

The audience for your video might be harried office managers who are constantly fielding requests to turn the temperature up or down.

They’re concerned with keeping their colleagues comfortable without breaking the bank on electricity costs.

3. Set a budget and a timeline.

Do you have $7,000 or $80,000 to make this product demo video?

Identify your budget so you know how to proceed. This is also the time to set expectations. If you have a $500 budget, you’re not going to come out with a video on par with Apple’s latest release – and that’s alright.

Oh, and don’t forget to outline when you need this video to be completed. Even the biggest budgets can run up against roadblocks if the timeline is too limited.

4. Decide between in-house or agency.

This decision will likely be dependent on your budget. If you have a lot to work with, interview agencies that can give you quotes and creative pitches for your project.

If you have a small budget, you can still create a great video with a smartphone that has a high-quality camera. You can also screen record your computer to use as B-roll as you navigate through your platform.

Work with what you have and be proud of whatever you create.

5. Structure your video.

Will you tell a story? Highlight pain points? Use text or visuals only? Decide how you want to communicate your goal and how you’ll bring it to life.

If you’re working with a creative agency or freelance videographer, they may help you define the structure. If you’re going it alone, use videos like the ones we’ve listed below to inspire you and define which format will work best for your product and goals.

Another factor to consider is length. How long should a product demo video be, you ask? Two minutes is the sweet spot. However, you can go up to five minutes, if your demo goes into detail about use cases and features.

6. Choose between animation and live-action.

Animation can sometimes be a little cheaper than a live-action video.

Work within your budget and skill level. In addition, narrow down which option best highlights your product and the scope your project requires.

7. Write a script.

The script is a crucial part of your video. It defines the tone, pace, and message.

Start with a project brief, move on to an outline, and navigate your script, section by section, making sure it speaks to the goals you’ve previously outlined.

Call out opportunities for B-roll throughout, and always conduct a verbal run-through before getting behind the camera. This will help you see if anything sounds unnatural and should be reworked.

For more tips and a video script template, check out this blog post and accompanying video on how to write a video script.

8. Create a marketing plan.

Once you’ve shot, edited, and finalized your video, it’s time to decide how you’ll share it with your audience. YouTube, your website or campaign landing pages, and special email campaigns are all great channels for distribution.

But don’t overlook less obvious opportunities, like including your video in your email signature, sharing it in partner blog posts, and incorporating it into your sales team’s pitches.

Discover videos, templates, tips, and other resources dedicated to helping you launch an effective video marketing strategy. 

Product Demo Video Examples

1. The Lip Bar

In this demo, a model shows makeup users how to use one of the brand’s products: the "Caffeine Concealer."

At just under five minutes, the model incorporates the product into their makeup routine and explains the application method as they go.

Here's why this works: While the demo allows viewers to see what the product will look like in real life, it also helps show consumers just how easy it is to add it to their daily beauty routine.

2. Airtable

This classic product demo video uses animation to show how users can benefit from it.

What this video does well is demonstrate several different use cases, taking a broad, top-of-the-funnel approach that will attract the masses.

Airtable also do something else that’s incredibly smart. As the seconds tick by and viewers hypothetically click out of the video, the information shared gets more specific, with specific tactics and features.

Airtable knows if someone has stuck around over one minute into their demo video, this is likely a qualified lead who wants to learn more.

3. Zendesk Sunshine

Zendesk leads with pain points in their product demo video.

"Customer relationships are complicated … made up of fragmented pieces of what you know about your customers … it’s kind of all over the place," a narrator explains. But Zendesk gets it: "What seems like chaos is actually everything you want."

The viewer immediately feels like Zendesk understands them. It’s a full 50 seconds into the video before Zendesk even introduces a solution.

We never actually see the platform at work, but that’s not really the goal of this video. That's what makes it an effective demo. 

4. SurveyMonkey

At nearly two minutes long, this product demo packs a powerful punch with visuals of SurveyMonkey’s benefits and features as well as a walk-through of the product interface.

Why it works: Viewers see just how easy it is to send a survey using SurveyMonkey. They even see how it integrates with other platforms like Slack.

This is a workhorse of a demo video, but the viewer witnesses how SurveyMonkey can integrate into their daily workflow – and how easy the product is to use, from sign-in to send.

5. Headspace

Is there anything harder to sell on the internet than meditation? Headspace makes it seem easy with their modern, relatable animated product demo video.

They offer a "healthier, happier life" and show you how the app works for a variety of users with differing goals and times.

This demo works well because it’s an inclusive video that communicates a lot without overwhelming the viewer.

6. Esusu

Esusu, an app created by Forbes 30 Under 30 social entrepreneurs Abbey Wemimo and Samir Goel, aims to help people in marginalized locations with financial planning. The demo created by the company gives viewers a look inside Esusu’s platform and the tools it has to offer.

Specifically, this demo walks through how families can use the platform together to build each member's credit, save funds together, or send funds to each other.

One great thing about the intro above is that it establishes a pain point by asking the audience if they've ever dealt with bad credit or poor savings. Then, it highlights exactly how Esusu can help them.

This demo is also a great example of how a quick and simple tour of an app can show potential users exactly what they need to know about navigating and using this type of financial planning app.

7. Apple

This glossy product video introduces the new iPhone 12 by showing what it can do. Simple text alerts the viewer to the features and capabilities through vivid visuals.

The goal of this product demo is to wow rather than educate, and that’s exactly what it does.

8. Slack

Slack uses this brightly hued video to break down a common misconception about their platform: that it’s only for sending private messages. They walk viewers through how teams can communicate using their interface.

"It’s way more than just a place to talk," explains the actor, "we keep all of our files here too."

The video is feature-heavy, but the actor chimes in with how those features translate into benefits as he walks viewers through a demonstration of Slack.

A simple "Get started with Slack, today" closes out this informative video with a clear call-to-action.

9. The Origins of Nike Free

This product demo tells the origin story of the Nike Free running shoes.

What works well here is the context the brand provides for the idea and vision behind the product.

The shoe creators share a bit about how the shoe was designed and call out benefits like, "more natural movement" and "nice, modern evolution."

A simple tagline at the end reads, "Engineered for modern motion."

10. Duolingo

Duolingo kicks things off with social proof from The Wall Street Journal: "Far and away the best free language-learning app."

What follows is a description of how the platform works, backed with more data on how effective it really is.

If you want to prove that your product works, sometimes facts are more alluring than a demo of the product itself.

11. IKEA Place

There’s nothing wrong with stating your purpose upfront.

"Hey, IKEA would like everyone to know about Place, our new augmented reality app," explains this demo video.

What follows is a demonstration of the app and a video montage of people struggling to design and furnish new spaces.

"We want to make it easier for people everywhere to imagine a better place," the narrator explains.

Why this works: It addresses a pain point and explains why this product is here to solve it. Not every demo has to use this formula, but it is a great place to start. 

12. NoseFrida

Your baby is cute until she’s not.

The narrator in this demo explains what happens to a baby’s nose when they’re sick – and why your baby gets fussy.

Immediately, he’s identified the viewer’s pain points and explained the problem with NoseFrida’s competitors.

The narrator begins to explain how to use the NoseFrida, a device that allows parents to physically suck snot out of their baby’s nose and effectively ruins your days of carefree milkshake sipping forever (take it from me).

It’s here that the company does something brilliant. They know their customer’s biggest purchasing block is the gross-out factor this product elicits, so they confront it head-on.

"Breathe easy, we know what you’re thinking," the narrator says. They then explain how NoseFrida is designed to be hygienic and safe.

Know your product has a big red flag for customers? Try addressing it bravely, like NoseFrida does, instead of tip-toeing around the elephant in the room.

13. Craftsy

How do you get people to part with their most valuable asset: their free time? Online learning platform Craftsy, formerly known as Bluprint, has the right formula.

They first engage users by letting them know they have something for everyone. The narrator says, "Whether you’re just getting started with a craft or looking to advance your skills, our world-class instruction is here to help."

The video then outlines the various lessons consumers can take, from baking to knitting, emphasizing the value of having seasoned instructors to guide them.

14. Sphero

Are you known for one product but want to introduce another? Sphero knows a little about that.

A few years ago, the brand created a robot called BB-8 for a little-known movie called Star Wars: The Force Awakens. Lucky for them, I hear that panned out.

In a Kickstarter video for their newest robot, they begin by featuring the iconic BB-8 robot that skyrocketed their success. Once the viewer knows who they are, they present their new robot: The Sphero RVR.

The rest of the video features the robot’s engineers speaking about what their new creation does and why it’s special. We believe them because they’ve tethered this new creation to their past authority.

What works well here is that Sphero establishes its credibility straight on by referencing past success then introduces their new product and its features. 

15. Ring Door View Cam

This is another great example of showing viewers instead of telling them what your product can do.

The video shows everyday people using Ring’s Door View Cam in a variety of ways.

We see them use the mobile interface, benefit from the speaker, and avoid danger using the camera.

Many times, demos outline the benefits but what's better than seeing it in action? That's why use cases are great for demos.

16. Peloton

This product video begins with an origin story of the Peloton bicycle and quickly moves to the benefits (i.e., you can ride it in your bedroom without waking your partner).

Before you know it, the video is speaking to viewer pain points, "One of the challenges with boutique fitness is that it can be inconvenient."

Their solution? Peloton.

Thousands of classes, experienced instructors, community, and ease of use.

Close-ups of the machine in use highlights certain features, but what this video demonstrates most is the experience you’ll have using Peloton.

"This is what I’ve been missing," says one video participant.

I can’t help but think that’s the primary goal the makers of this video had for their viewers.

17. Zoom

This is a classic example of a product demo video. A solid, feature-heavy script that immediately jumps into how professionals can use and benefit from Zoom.

What works well here: The viewer sees the product being used as they listen to how it works, and they’re left with a clear picture of what Zoom can offer them.

18. Gusto

I’ve saved the most comprehensive product demo video for last. This example, from HR software provider Gusto, clocks in at an impressive five minutes and fifty-six seconds.

What follows is a careful walk-through of the product, its benefits, and how to pick the perfect plan.

Viewers who make it to the end likely signal to Gusto that they’re ready to speak with a salesperson. This video probably works best for buyers further along in the buyer’s journey.

Key takeaway: If your goal is to introduce your product/service to new audiences, stick with a shorter option that’s quick and easy to consume.

Using Product Demo Videos in Your Marketing Strategy

Product demo videos might take a bit of time and planning to create, but once they're live, they can be an effective piece of your brand's overall video marketing strategy.

As consumers seek out more video content while researching products, marketers are also finding that videos are their most effective asset. Like them, you'll want to leverage video marketing and product demos to guide your prospect to the customer stage.

Want to create your own video? Check out our ultimate guide to video marketing.

Editor's Note: This blog post was originally published in June 2019, but has been updated for comprehensiveness.

Product Marketing Kit


18 Impressive Product Demo Videos You'll Want to Copy was originally posted by Local Sign Company Irvine, Ca. https://goo.gl/4NmUQV https://goo.gl/bQ1zHR http://www.pearltrees.com/anaheimsigns

Facebook Text Overlay: How to Use the 20% Rule to Improve Your Ads

The best billboards demand your attention with bold fonts, in-your-face messages, and bright, eye-catching graphics. The best Facebook ads take the exact opposite approach.

If you want to reach and engage with potential customers on Facebook, you need to create ads that blend as seamlessly as possible into the rest of the content on their newsfeeds. This means focusing on simple, high-quality images, straightforward messages, and most importantly: minimal text.

Download Now: Free Facebook Advertising Checklist

Facebook has found that the best performing ads include images with little to no text. Formerly, they had a “20% rule,” which stated that in order to run an image-based ad on Facebook, your image must contain less than 20% text. It even created a text overlay tool to help advertisers determine whether their images had too many words.

The 20% rule is no longer a requirement, and the Facebook overlay tool is inactive. However, it’s still smart to follow the 20% rule and keep text to a minimum in your image-based ads.

It's important to note that you should use the 20% rule only for the text contained within images in your ad. It does not include text on your ad outside of images, like the description copy or call-to-action button.

There are a few exceptions to the 20% rule, including images of book covers, album covers, event posters, video games, and some product images that contain text (e.g., a cereal box).

Text-based logos are not an exception to the 20% rule. You should count your logo when deciding how much text to include in your image.

So, why exactly did the Facebook 20% rule exist, and why is it still relevant today? It all comes down to what users want to see and engage with in their newsfeeds. Ads with less overlay text perform significantly better than images crowded with text, so sticking to the rule creates a better experience for both users and advertisers.

Facebook Text Overlay Tool

The Facebook text overlay tool is no longer active, but it’s still wise to carefully choose the text you’ll include in your images.

While you're creating an ad, it can be tricky to evaluate the exact percentage of text covering your image. The following examples will show you some of the ways you can add text in a way that will naturally generate engagement.

Before designing your ad, be sure to review specs and sizes for your images and Facebook’s guidelines for image-based ads.

1. Ad With Acceptable Text Overlay

Facebook ad with acceptable text overlayYour best approach when creating a Facebook ad is to use little to no text.

In this example of an ad image, there's only a small text-based logo and no other copy. This image contains 4% text.

An ad with a simple image like this will blend more easily into users' news feeds and is much more likely to gain exposure and engagement among your target audience.

The best part is that it might strike curiosity because it doesn’t share much; instead, viewers will have to read the description to find out what the ad is about.

2. Ad With Minimal Text Overlay

Facebook ad with minimal text overlayIn this next example, there are two lines of text, bringing the text percentage to 12%. The logo has been removed from the corner.

It still works because the text doesn’t cover 20% of the image. The text also helps the viewer understand what the ad is about.

Nevertheless, consider adding the copy into the body of your ad instead of your image. Since the image and the description are visible at the same time, you can use the body only to describe your offering.

3. Ad With Excessive Text Overlay

Facebook ad with excessive text overlayThis final example is exactly what Facebook does not want to see. It contains a whopping 44% text-to-image ratio.

While the copy is well-written and the offering is clear, this ad contains too much text over the image. The information displayed here could easily be incorporated into the body copy of your ad, creating a much cleaner look in users' news feeds.

It might be tempting to throw important information onto your images like this, but you risk alienating users who are turned off by busy copy.

Now that you have an idea of what a good ad looks like, how can you put it into practice in your own ad? Let’s take a look.

Facebook Text Overlay Best Practices

The best way to capture users' attention on Facebook is to use an eye-catching image with no text.

The 20% rule isn't just an arbitrary recommendation — it helps advertisers reach their target audiences more effectively, and prevents users' news feeds from becoming overwhelmed with disruptive advertisements.

If you do want to add text to your image, you should use the following best practices for overlaying text over your Facebook ads.

1. Choose the right font size.

Believe it or not, font size is even more important than the amount of text you overlay over your image.

Smaller font sizes naturally won’t take up as much space, reducing your text-to-image ratio. Bigger font sizes will make you exceed the 20% rule straight away, even if you’re only including two or three words. That said, you don’t want to make the text too small; otherwise, viewers will have to squint to read what it says.

The font size you choose will depend on the size of your image and whether you’re adding a heading or a whole sentence. For headings, try to stay under 42 pixels; for sentences, try to stay around 24 pixels. Play around with font sizes to find what best works for the image.

2. Include only a heading or one line of text.

There’s no reason to include more than one line of text in your Facebook ad. You have the body of the ad to include enough context and information for the viewer to click your link.

If you add text, consider only adding a heading — such as an offer, a call-to-action, or a discount. That’ll maximize the impact of the text and ensure viewers see something that will compel them to click.

For instance, “Buy 1 Get 1 Free,” “Apply Now,” and “30% Off” are all eye-catching phrases that will warrant a second look and don’t take up too much space. That brings us to the next point: Choose only the best and most eye-catching text to add to your image.

3. Choose eye-catching, impactful text.

When adding overlay text to your Facebook ad, be sure to choose a line of text that will 1) Catch your target audience’s attention and 2) Hint at the value they’ll extract if they click through to your offer.

In the body of the ad, you can go into greater detail about your product or offer. But in your image, include only the text that will help someone decide whether they want to read more.

4. Use an alternative text overlay tool to see your text-to-image ratio.

While Facebook’s text overlay tool is no longer available, you can use an alternative that mimics Facebook’s original tool. We recommend trying these:

They’re virtually identical in functionality, so simply choose the one that’s most convenient for you and your browser.

To use them, upload your image and select the squares that have text. On the right-hand column, the tool will tell you whether you’re above or under the 20% text-to-image ratio. That way, you know for sure whether you’ve added too much text to the image.

5. Take advantage of a grid to align the text.

In a free tool such as Canva, you can typically overlay a grid over your design as you’re creating it. Simply go to Elements > Grid and scroll until you find a grid that best works for your design. (Be sure to lower the transparency of the grid so you can see your ad beyond it.)

Use the grid as a guiding tool for aligning your text and ensuring it doesn’t take up too many boxes. If your grid has nine boxes and one line of text takes three boxes horizontally, then you know that the text is too big. If it only takes up one box, it might be too small.

Without a grid, you might lean on gut feeling only — and while your gut feeling can be of great help, it’s best to approach text overlays with as much exactitude as possible.

The 20% Rule Will Help You Create Better Facebook Ads

While Facebook no longer requires advertisers to adhere to the 20% rule, it’s still a valuable guideline for adding text to your Facebook ads. Keep text to a minimum and you’ll ensure your Facebook ad packs as much impact as possible, significantly boosting your ROI and encouraging viewers to engage with your brand.

Editor's note: This post was originally published in June 2019 and has been updated for comprehensiveness.

New call-to-action

Facebook Text Overlay: How to Use the 20% Rule to Improve Your Ads was originally posted by Local Sign Company Irvine, Ca. https://goo.gl/4NmUQV https://goo.gl/bQ1zHR http://www.pearltrees.com/anaheimsigns